
Your live stream looks perfectly smooth on your screen. The video is sharp, the audio is in sync, everything feels right. Then you check how your viewers actually see it, and the picture falls apart into pixelation, stutter, and lag. That gap is exactly why so many streamers ask the same thing: why is my stream quality so bad? It is one of the most common questions our support team hears.
In this blog, we will walk through the real reasons behind poor streaming quality, show you how to find the exact cause inside your own software, and give you a practical fix for each one. Most problems come down to your bitrate, hardware, network, and a few platform settings.
- Bad stream quality is almost always fixable and traces back to bitrate, bandwidth, encoder load, your connection, or platform settings.
- The OBS Stats dock tells you the real cause, with separate counters for GPU, encoder, and network problems.
- Matching each platform's official specs, a 2-second keyframe, CBR, and H.264, stops most rejected and unstable streams.
- A wired Ethernet connection removes the jitter and silent dropouts that no speed test ever reveals.
- A cloud platform like OneStream Live takes a single upload and handles the encoding and multistreaming, removing the bottlenecks that cause most poor streaming quality.

Why Poor Streaming Quality Costs You Viewers Fast
Let me be honest with you about how people do when your streaming quality is bad. The bad video quality not only annoys people; it forces viewers to skip it. They have come for enjoyment, so they need and expect the best quality. I have watched my live viewer count drop the second a stream started to stutter, and the data backs up what I saw.
Just think of yourself as a viewer for a second. Would you wait around for a live stream to fix itself once you knew your own internet was fine? Most people would not. They leave and find something else.
The UMass Amherst and Akamai study from 2012 is still the baseline here. Viewers start leaving after just 2 seconds of delay, and by the 10-second mark, about 40% are gone.
The newer numbers are worse. Mux found that many viewers leave after a single buffering event longer than two seconds. Akamai puts a price on it too: each buffering instance costs one big broadcaster around $85,000 in lost ad revenue.
So this is a real problem, not a small one. When you ask how to improve streaming quality, you are really asking how to keep the audience you worked so hard to get. Video streaming quality maps directly to retention, ad revenue, and channel growth.
Why Is My Stream Quality So Bad? The Five Real Culprits
Most live stream problems come down to bitrate, bandwidth, encoder load, network stability, and, in many cases, it is due to the platform settings.
I will walk through each one. Diagnosis matters more than guesswork, so I will also show you exactly which numbers to read inside your live streaming software before you change anything.
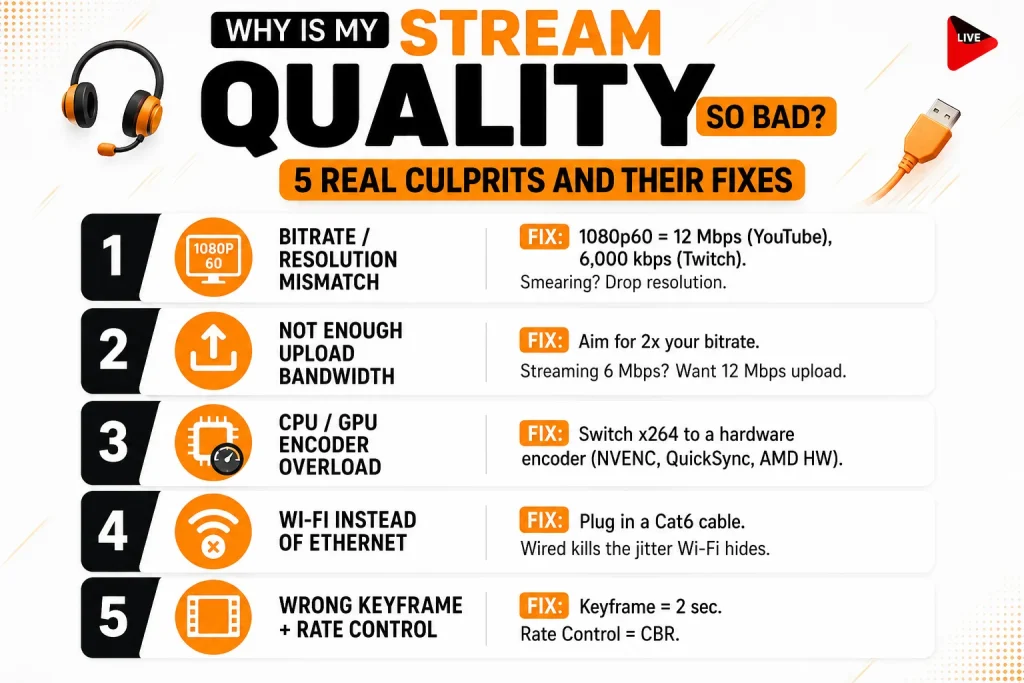
Bitrate and Resolution Mismatch
Bitrate is how much data your encoder sends every second. Too little, and your stream looks blocky the moment anything moves. Too much, and you push past your ISP’s upload limit or the platform’s cap, which then causes dropped frames.
For 1080p60, YouTube recommends 12 Mbps on H.264, while Twitch caps you around 6,000 kbps. For 720p60, aim for 4,500 kbps. If your picture smears during fast motion, drop the resolution instead of pushing bitrate past what the platform allows.
Not Enough Upload Bandwidth
Your stream needs real room to breathe on your connection. The rule most of us follow is simple: aim for roughly double your stream bitrate in real upload speed. So if you stream at 6 Mbps, you want a steady 12 Mbps or more, which leaves room for the dips no speed test ever shows.
Run three speed tests in the evening when your network is busiest, then trust the lowest number. Test on a wired connection if you can, because Wi-Fi adds packet loss the test will not catch. Pause any cloud backups like Dropbox, OneDrive, and iCloud before you go live.
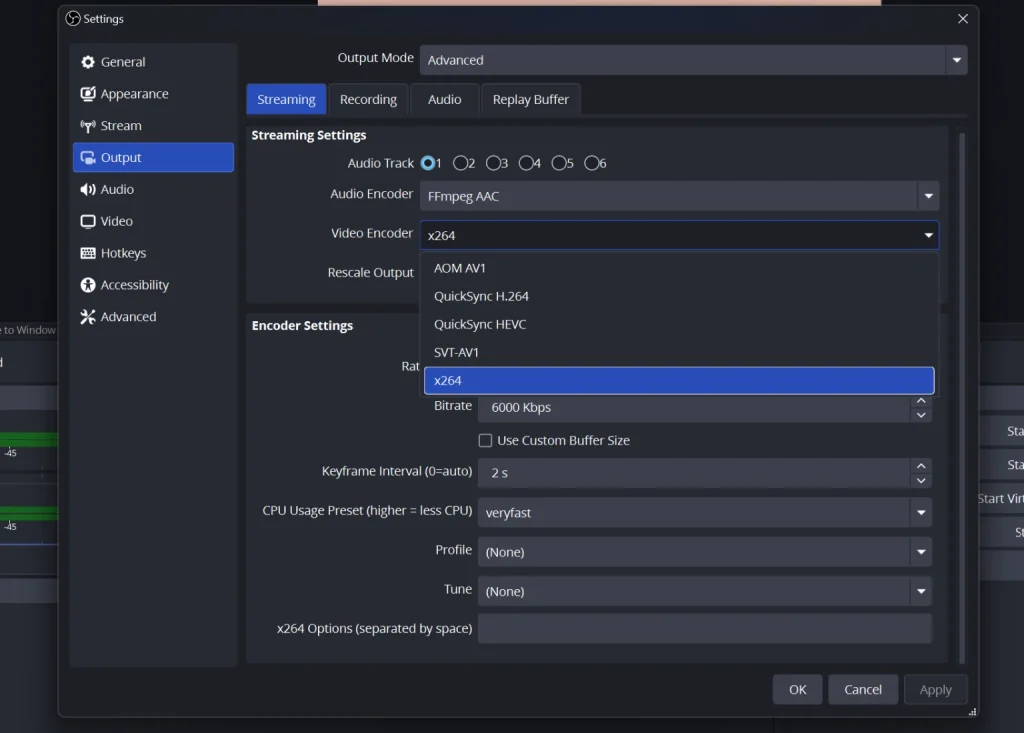
CPU or GPU Encoder Overload
That “Encoding overloaded” warning in OBS means your encoder cannot keep up. The x264 software encoder leans hard on your CPU, and the more pixels and frames you push, the worse it gets.
The fix is to move that work onto a dedicated chip. Open Settings, then Output, and set Output Mode to Advanced. On the Streaming tab, open the Video Encoder dropdown and pick your hardware encoder instead of x264: NVENC H.264 on Nvidia, QuickSync H.264 on Intel, or AMD HW H.264 on AMD. Click Apply, then OK.
Wi-Fi Instead of Ethernet
If you fix only one thing, make it this. Wi-Fi adds lag, jitter, and quiet little dropouts that no speed test will ever show you. A wired connection just does not have those problems.
Plug a Cat6 cable straight into your router. If you truly cannot, sit close to the router on the 5 GHz band with Wi-Fi 6 gear. Run a constant ping to your streaming server during a test and watch for any spikes above 50 ms.
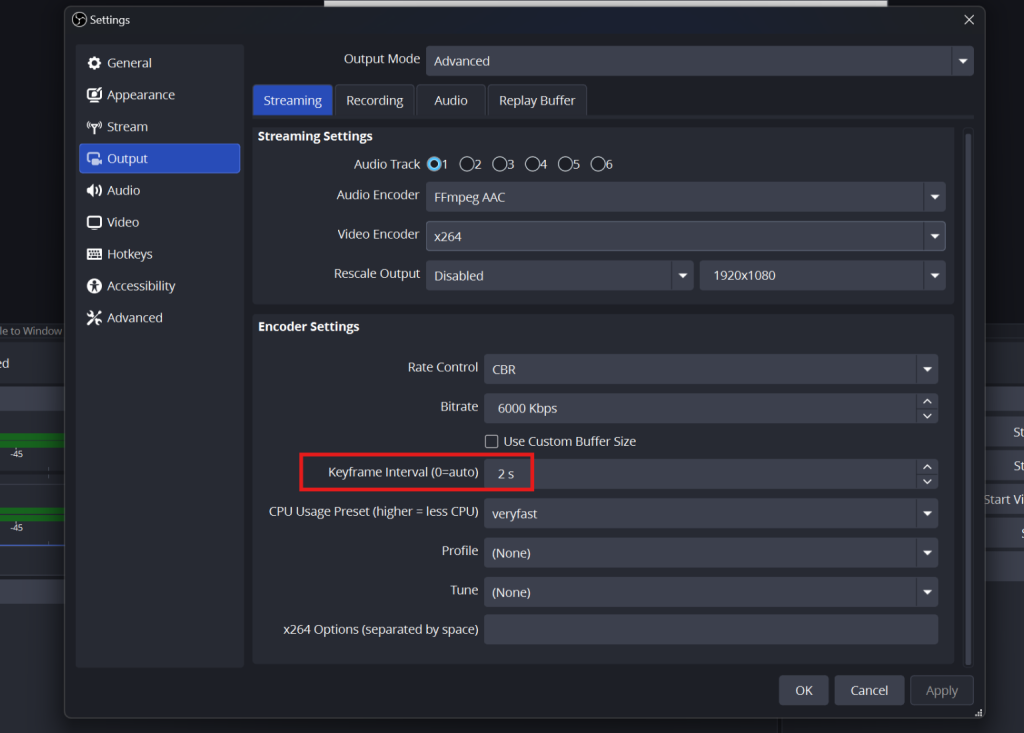
Incorrect Keyframe Interval and Rate Control
Twitch, YouTube, and Facebook all want a keyframe every 2 seconds and a CBR (constant bitrate) signal. OBS often defaults to “auto,” which can stretch keyframes out to 4 or 8 seconds and quietly break smooth playback for your viewers.
Open Settings, then Output, switch to Advanced mode, and set Keyframe Interval to 2. Set Rate Control to CBR. Get these two right and you solve the most common cause of viewers seeing buffering when your own screen looks perfectly fine.
How to Diagnose Stream Quality Issues With the OBS Stats Dock
The OBS Stats dock (View, then Stats) shows three frame-loss counters, and each one points to a different fix. I keep this dock pinned to my layout at all times. The OBS Project separates these three issues for a reason.
Rendering Lag Means GPU Pressure
“Frames missed due to rendering lag” means your GPU could not composite the scene in time. The fix is to cap your in-game framerate, lower your canvas resolution, and disable Hardware-Accelerated GPU Scheduling in Windows Display settings.
Heavy browser sources from alert services each run a full Chromium instance and eat real memory, so trim the ones you do not need.
Encoding Lag Means Encoder Pressure
“Skipped frames due to encoding lag” is the encoder waving a white flag. Switch to a hardware encoder if you are still on x264. If you must stay on x264, step the preset down one notch at a time, going faster, then very fast, then superfast.
If you still see encoding lag, drop output resolution before you drop framerate. A clean 720p60 beats a stuttering 1080p60 every time.
Network Lag Means Upload Pressure
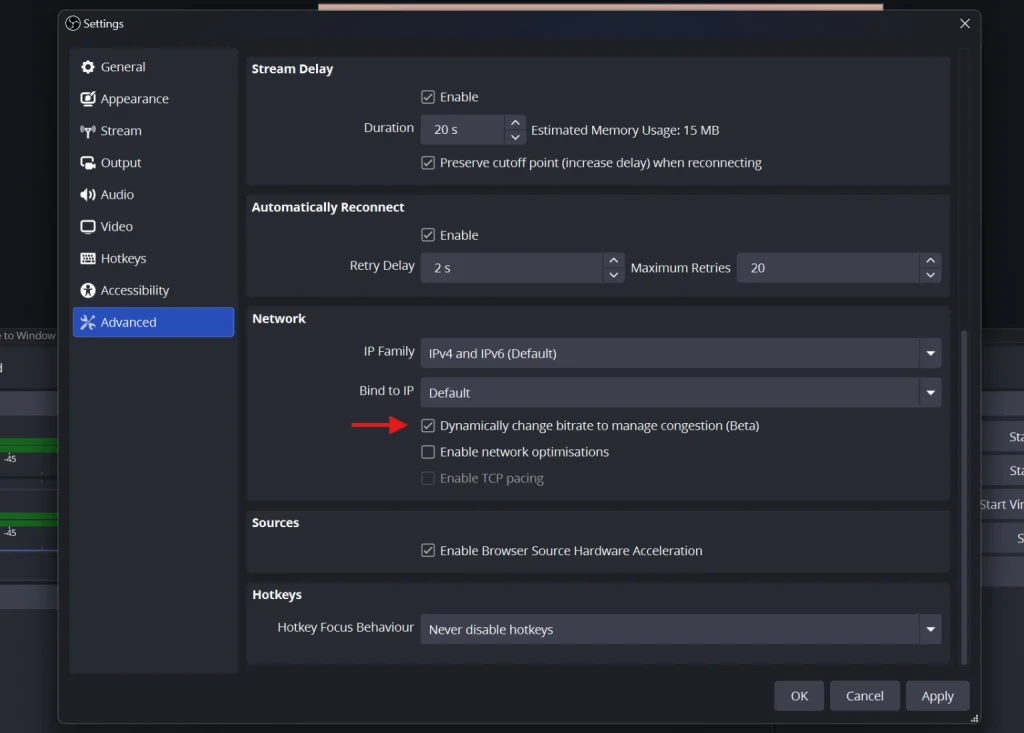
“Dropped Frames (Network)” climbing during a stream points to your ISP, router, or cable. OBS support notes that this counter reflects a connection or networking hardware problem, not a bug in OBS. Open Settings, then Advanced, and scroll to Network. Tick the box labeled “Dynamically change bitrate to manage congestion (Beta),” then click Apply, so OBS scales your bitrate down automatically when congestion hits.
If you are on Twitch, run Twitch Test and pick the server that scores closest to 100 quality.
How to Improve Streaming Quality on YouTube, Twitch, and Facebook
Every platform has its own quirks, and matching their official specs eliminates a huge class of streaming issues before they start. I pulled these numbers straight from YouTube Help, the Twitch broadcasting guidelines, and Meta Business Help.
YouTube Live Recommended Settings
YouTube is the most flexible major platform for streaming video quality. For 1080p60 in H.264, target 12 Mbps. For 720p60, target 6 Mbps. Keyframe interval 2 seconds, AAC audio at 128 kbps stereo, 44.1 kHz sample rate, and CBR. (YouTube Help)
YouTube transcodes everything to multiple renditions automatically, so do not push beyond the recommended ceiling. Extra bitrate gives you no visible benefit and increases your dropped-frame risk.
Twitch Broadcasting Guidelines
Twitch is stricter. Cap video at 6,000 kbps for all account tiers, use strict CBR, and stay on H.264. Audio should be AAC-LC at 160 kbps and 48 kHz.
One important nuance: only Twitch Partners get guaranteed transcoding. If you are not a Partner, mobile viewers and weak-Wi-Fi viewers must download your full source bitrate. Streaming 720p60 at 4,000 to 5,000 kbps instead of 1080p60 will keep more of your audience watching smoothly.
Facebook Live Specs
Facebook now supports 1080p60 at 4,500 to 9,000 kbps via H.264 Level 4.2. A keyframe every 2 seconds is required, and never beyond 4 seconds. Audio is AAC at 128 kbps stereo, 44.1 kHz, sent over RTMPS. (Meta Business Help)
How to Fix Audio Sync and Other Live Stream Problems
Audio drift, mystery stutter, and rejected streams have very specific root causes. None of them requires expensive gear to fix.
Audio Drift Over a Long Stream
If your audio slowly falls out of sync as the stream goes on, the usual cause is a sample-rate mismatch. Your microphone or interface runs at one rate, say 44.1 kHz, while OBS runs at another, like 48 kHz. The small gap adds up, and the longer you stream, the worse the lip-sync gets.
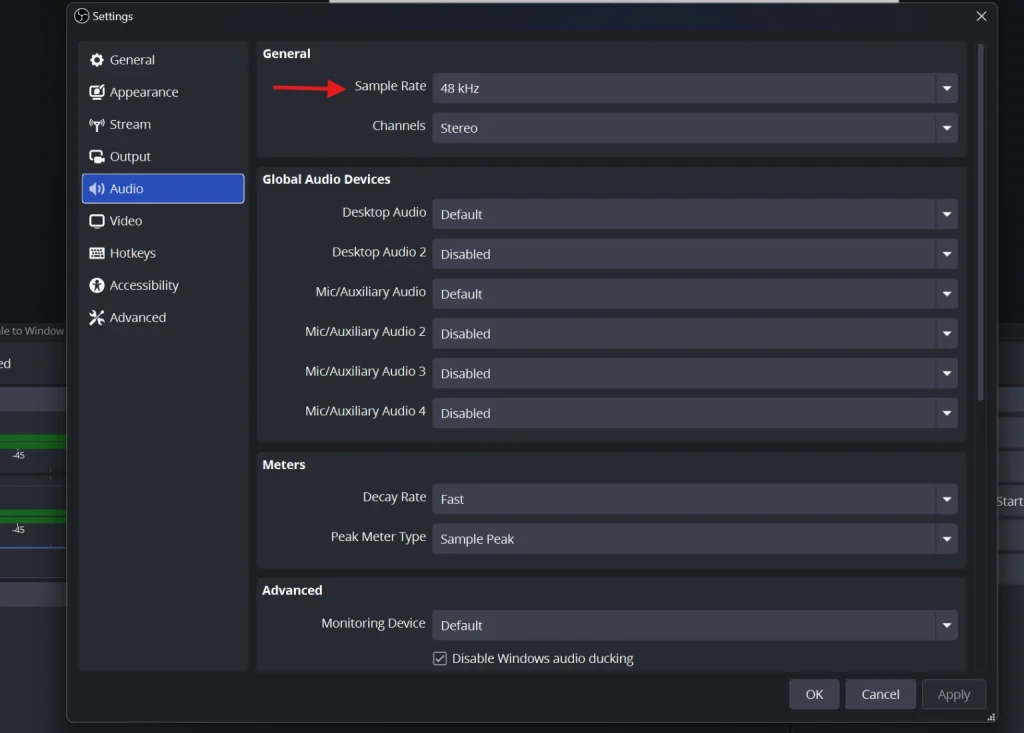
The fix is to make everything use the same rate. Open OBS, go to Settings, then Audio, and set the sample rate to 48 kHz.
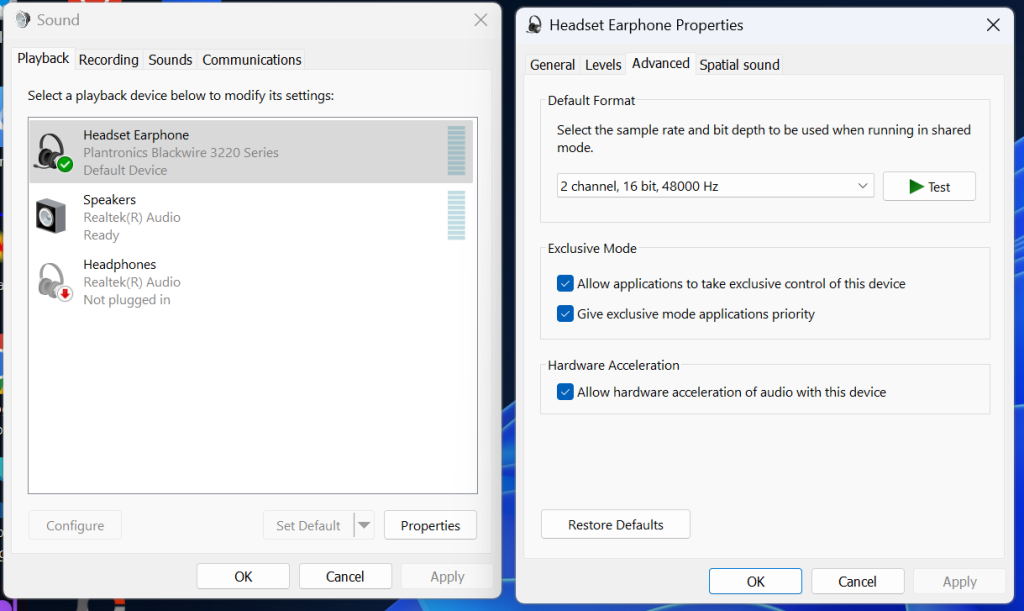
Next, set your Windows devices to the same rate. Right-click the speaker icon in your taskbar, choose Sound settings, then open More sound settings to reach the classic Sound window. Under the Playback and Recording tabs, right-click each device you use, open Properties, go to Advanced, and set the Default Format to a 48000 Hz option. Restart OBS so the change takes effect.
If a small delay still remains, you can correct it by hand. In the OBS audio mixer, open Advanced Audio Properties and nudge the Sync Offset for that source until the audio lines up
Constant Dropped Frames Despite Good Internet
If your network looks healthy but frames keep dropping, the culprit is often a USB bandwidth conflict. Capture cards, webcams, USB mics, and headsets all sharing one USB 2.0 controller will starve each other.
Open Windows Device Manager, switch View to Devices by Connection, and confirm your capture card sits on its own USB controller. Plug it directly into a rear motherboard port, not a hub or front-panel jack.
Stream Rejected or Unstable on the Platform
If YouTube Studio shows “stream not stable” or Facebook outright refuses your stream, three settings are almost always at fault. Keyframe interval must be 2 seconds, rate control must be CBR, and video codec must be H.264 inside the platform’s supported profile.
Confirm all three in your encoder before troubleshooting anything else. I have watched streamers spend hours on bandwidth tests when a single keyframe-interval change would have fixed everything.
How OneStream Live Solves the Hardest Streaming Issues
Here is where cloud-based live streaming software changes the equation. OneStream Live ingests one feed from your machine and fans it out to 45+ destinations from its own cloud infrastructure. Instead of running parallel encodes for Facebook, YouTube, Twitch, LinkedIn, and X all at once, your computer handles a single upload.
That alone eliminates two of the biggest reasons for bad video quality: CPU overload and saturated home upload. OneStream Live also applies Adaptive Bitrate Streaming, so each viewer receives a rendition matched to their device and connection.
Live Studio for Browser-Based Production
OneStream Live’s Live Studio runs entirely in your browser. You can host up to 16 guests, switch between up to 4 multi-cameras, and add overlays, tickers, and virtual backgrounds without taxing a local GPU. All compositing happens in the cloud, which is a huge relief on lower-end laptops that struggle with OBS scene rendering.
Pre-Recorded and 24/7 Streaming
You can schedule pre-recorded video up to 60 days in advance and run 24/7 YouTube channels straight from the OneStream Live cloud. Because the source file already lives on the servers, broadcast quality is bounded by your file, not by your live conditions. This is the most reliable way to eliminate every local variable that causes poor streaming quality.
External Encoders, Recording, and Mobile Apps
If you prefer OBS, vMix, Wirecast, or Streamlabs locally, OneStream Live takes your feed through its External RTMP Encoder feature as the single ingest. You can also record your live streams. The iOS and Android apps let you go live or manage scheduled streams from a phone, perfect for events and travel days.
How to Make My Stream Quality Better: My Final Checklist
Before every stream, I run the same short pre-flight. Speed test three times and stay under 75% of your measured upload. Set keyframe interval to 2 seconds and rate control to CBR. Pick a hardware encoder if you have one, and match sample rates at 48 kHz everywhere.
Pin the OBS Stats dock and watch all three frame counters during a 5-minute test. If rendering lag rises, fix the GPU. If encoding lag rises, switch encoders. If network drops rise, lower your bitrate or move to Ethernet. Most complaints about poor streaming quality disappear inside this single workflow.
Conclusion
So the next time you catch yourself asking why is my stream quality so bad, remember that the answer is almost never a mystery. It comes down to a handful of fixable things: your bitrate, your bandwidth, how hard your encoder is working, your connection, and a few platform settings. Read the OBS Stats dock first, let the counters tell you what is actually wrong, then fix that one thing instead of guessing.
Get those basics right, and most poor streaming quality simply stops happening. And when you want to take the load off your own machine entirely, a cloud platform like OneStream Live handles the encoding and the multistreaming for you, so a single upload reaches every destination clean and smooth.

Frequently Asked Questions
Buffering almost always comes down to your upload speed or an unstable connection. If your bitrate sits too close to your real upload ceiling, any small dip causes dropped frames. Test your speed on a wired connection and keep your bitrate to roughly half of what your upload can handle.
Higher resolution needs more bandwidth and more encoding power to look clean. If your internet or hardware cannot keep up, that 1080p stream turns blurry or choppy. A stable 720p often looks far better than a 1080p stream that keeps stuttering.
Yes. Wrong encoder settings, an outdated version, or too many heavy overlays can all drag your stream down. Check that your keyframe interval is 2 seconds, your rate control is CBR, and you are using a hardware encoder if your machine has one.
Audio drift usually traces back to a sample-rate mismatch between your devices and your software. Set everything to 48 kHz, in OBS and in your Windows sound settings, so they all run at the same rate. An overloaded CPU during encoding can cause the same problem, so watch your system load too.
Start by matching your bitrate to your platform and your real upload speed. Close background apps that eat bandwidth or CPU, switch to a wired connection, and confirm your encoder settings are correct for the platform. These few changes clear up most streaming issues people run into.
OneStream Live is a cloud-based live streaming solution to create, schedule, and multistream professional-looking live streams across 45+ social media platforms and the web simultaneously. For content-related queries and feedback, write to us at [email protected]. You’re also welcome to Write for Us!