Every big streamer you watch today once stared at a blank OBS screen and felt slightly lost. For any live streamer, OBS Studio is the most important tool to learn because it becomes the main pillar of your entire streaming journey. The interface can look complex at first, but once you understand each section, everything clicks. This guide explains how to use OBS Studio from the first download to your first live broadcast, so you can go from confused to confident in one sitting.
OBS Studio is completely free and open source, with no watermark, no subscription, and no time limit on recording or streaming.
The Auto-Configuration Wizard sets up your base settings automatically, so you do not need to start from scratch.
Scenes and Sources are the core of OBS. Scenes hold your layouts, and Sources are everything inside them.
Bad audio drives viewers away faster than bad video. Use Noise Suppression, Noise Gate, and Compressor filters stacked in that order.
For recording, record to MKV or Hybrid MP4 instead of plain MP4 to survive crashes.
OBS streams to one platform at a time. To go live on Twitch, YouTube, TikTok, and more simultaneously, you need a multistreaming tool like OneStream Live.
What is OBS Studio and Why Do Creators Trust it?
OBS Studio is free and open source software for live streaming and screen recording. It runs on Windows, macOS, and Linux, and it costs nothing, with no watermark and no time limit. That price tag of zero is a big reason it became the default choice for gamers, teachers, and businesses.
The OBS software also gives you full control over your video, your audio, and your layout. You can mix your webcam, your screen, your game, and your microphone into one clean broadcast. This OBS Studio tutorial walks you through each part, so once you understand how to use OBS Studio properly, you can record polished videos or stream live to almost any platform you want.
How to Download and Install OBS Studio
Your first real step is getting the OBS software onto your computer the safe way. Always download it from the official source so you avoid fake or bundled versions. The current stable release in 2026 is OBS Studio 32.1.2, and the website detects your system automatically.
Step 1: Go to the Official Website
Open your browser and type obsproject.com into the address bar. The homepage shows three big buttons for Windows, macOS, and Linux. Click the icon that matches your computer and the download starts on its own.
Step 2: Run the Installer
Open the file you just downloaded. On Windows it ends in .exe, and on macOS it is a .dmg file. Click through the setup screens, accept the default location, and let it finish. The whole install takes about a minute on most machines.
Step 3: Confirm the System Basics
OBS runs well on modest hardware, but a few basics help a lot. You want a recent graphics card, at least 8GB of RAM, and a stable internet connection for streaming. A wired Ethernet cable beats Wi-Fi every single time for live video.
How to Set Up OBS for the First Time
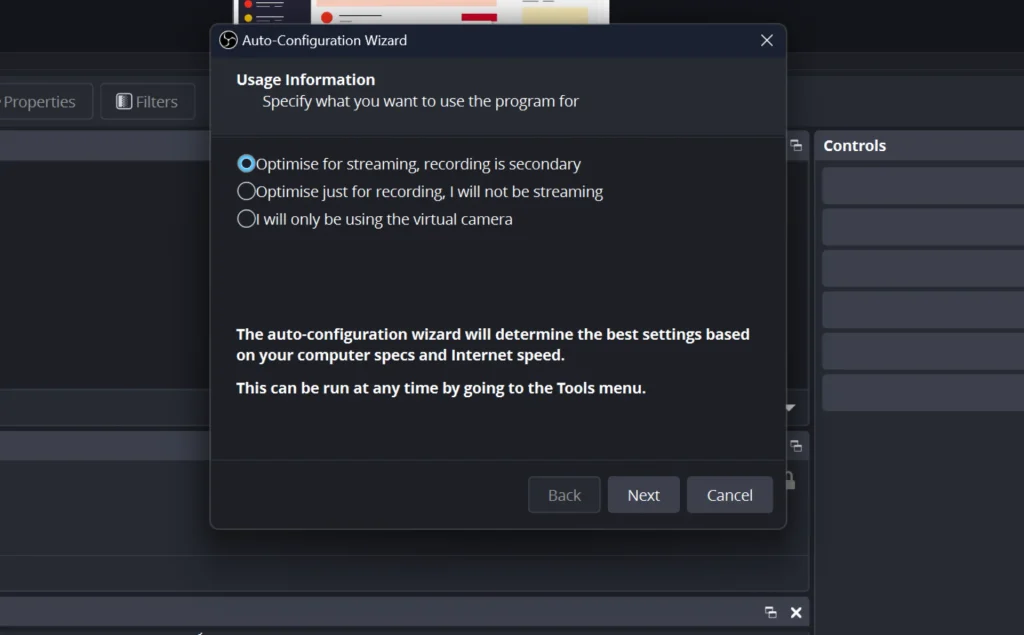
The first launch is where most beginners freeze, so let us slow down here. OBS greets you with a tool called the Auto-Configuration Wizard. This wizard is your friend because it picks smart starting settings based on your computer and your goal.
1. Let the Auto-Configuration Wizard Run
When the pop up appears, pick the option that says “Optimize for streaming, recording is secondary” if you plan to go live. If you only want to record your screen, choose the recording option instead. Click Next and let it think for a few seconds.
2. Set Your Base Resolution and FPS
The wizard asks for your canvas resolution and frame rate. For most users, 1920×1080 at 60 frames per second is the sweet spot. If your computer is older, drop to 30 frames per second for a smoother result.
3. Apply the Recommended Settings
OBS runs a quick test and shows you its suggested settings. Click “Apply Settings” and you land on the main screen. You can always change these later once you learn how to use OBS Studio in more detail.
Getting to Know the OBS Studio Interface
Before you press any record button, take ten seconds to read the screen. The OBS layout has five main boxes along the bottom, and each one has a clear job. Learning these names now makes every later step easier.
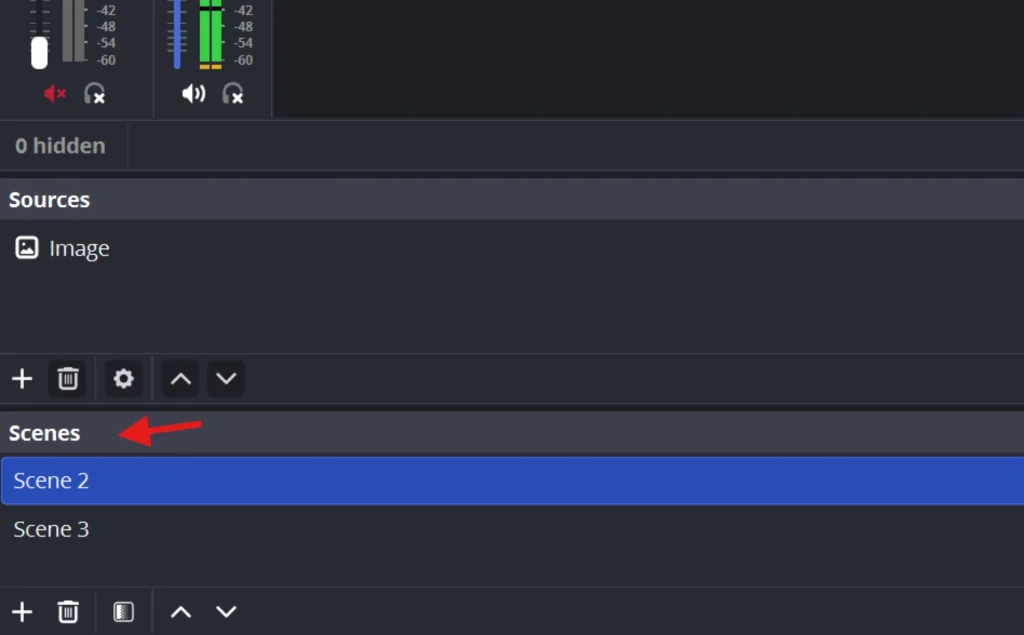
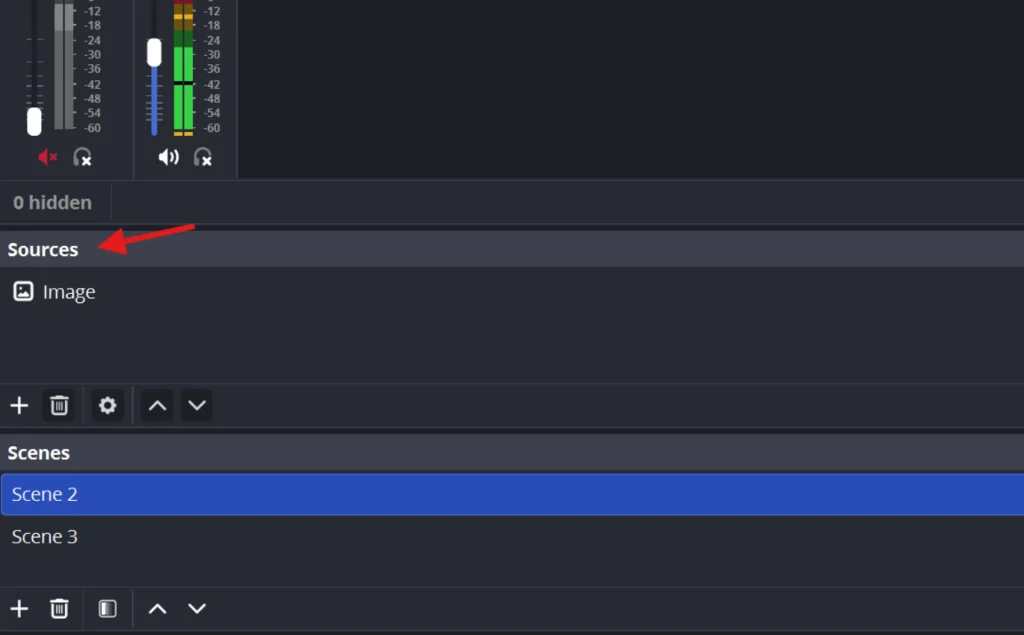
Scenes
The Scenes box on the far left holds your different layouts. Think of each scene as a single camera setup, like “Starting Soon,” “Gameplay,” or “Just Chatting.” You switch between them with one click during a stream.
Sources
The Sources box sits next to Scenes and holds everything inside that scene. A source can be your screen, your webcam, an image, or text. You stack and arrange these to build the picture your viewers see.
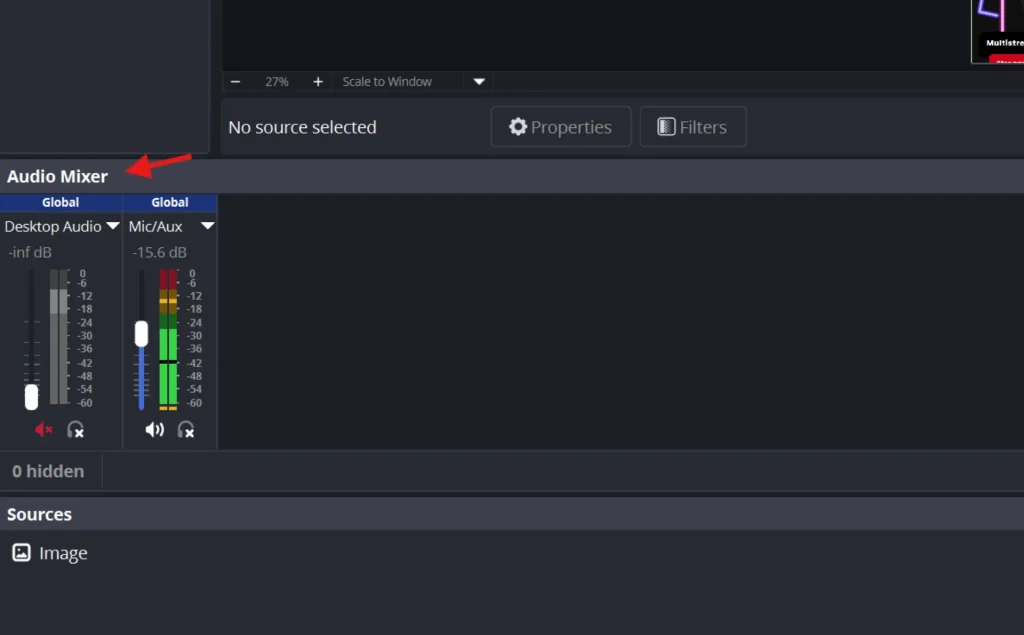
Audio Mixer
The Audio Mixer shows your sound levels as moving bars. Here you control your microphone volume and your desktop audio. Green is good, yellow is loud, and red means you are too loud.
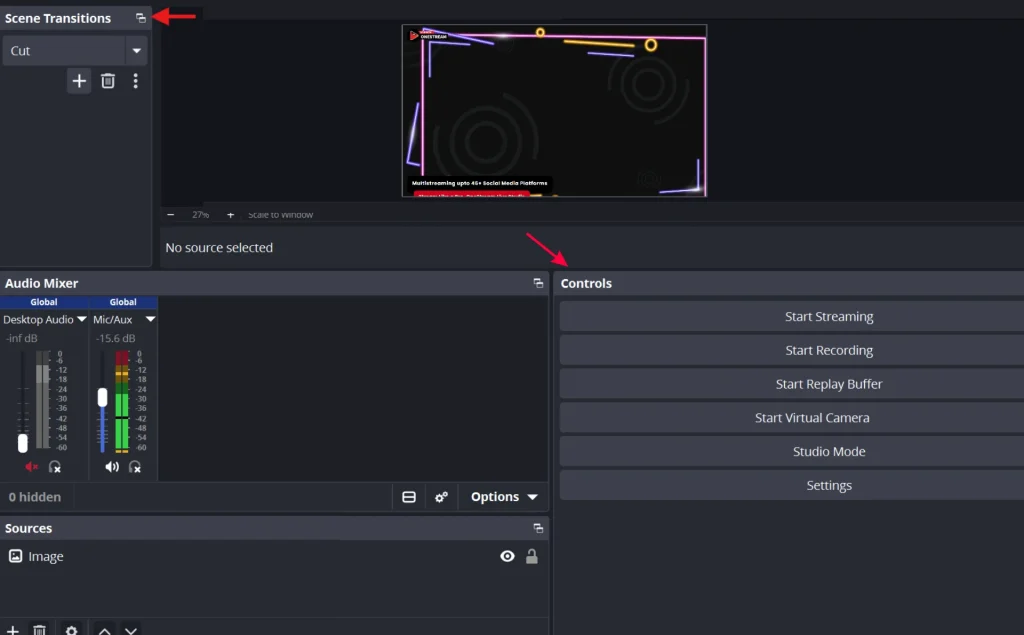
Scene Transitions and Controls
Scene Transitions decides how one scene fades into the next. The Controls box on the far right holds your most important buttons, like Start Streaming, Start Recording, and Settings. This is your command center.
How to Create Scenes and Add Sources
Now you build your first real layout, and this is the heart of how to use OBS Studio. Scenes and sources work together like a stage and its actors. You set the stage once, then reuse it forever.
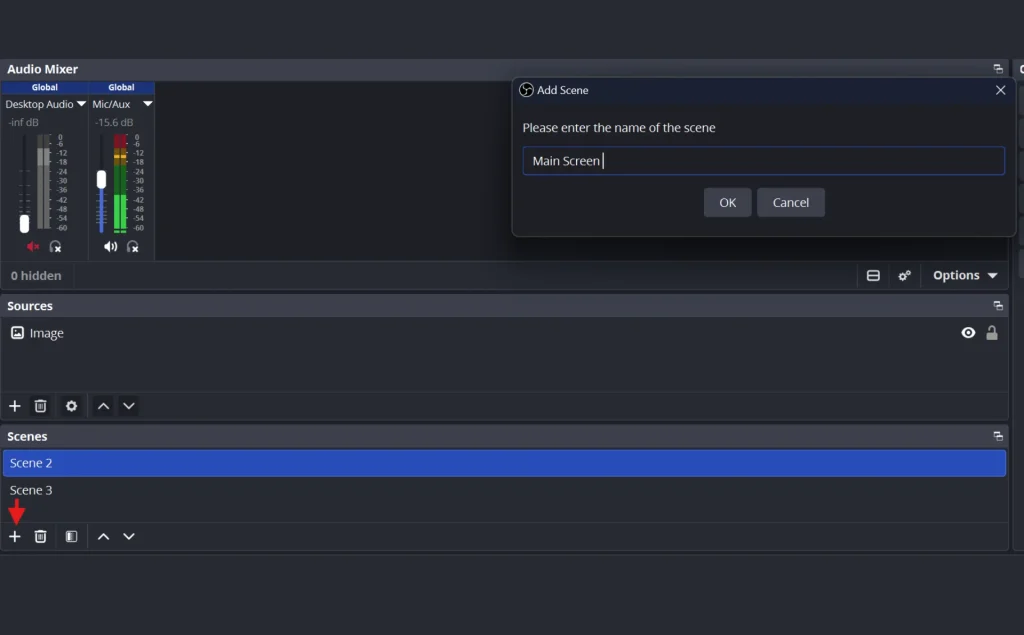
Step 1: Create a New Scene
Click the small plus sign at the bottom of the Scenes box. Type a clear name like “Main Screen” and press OK. Your new scene appears in the list, ready and empty.
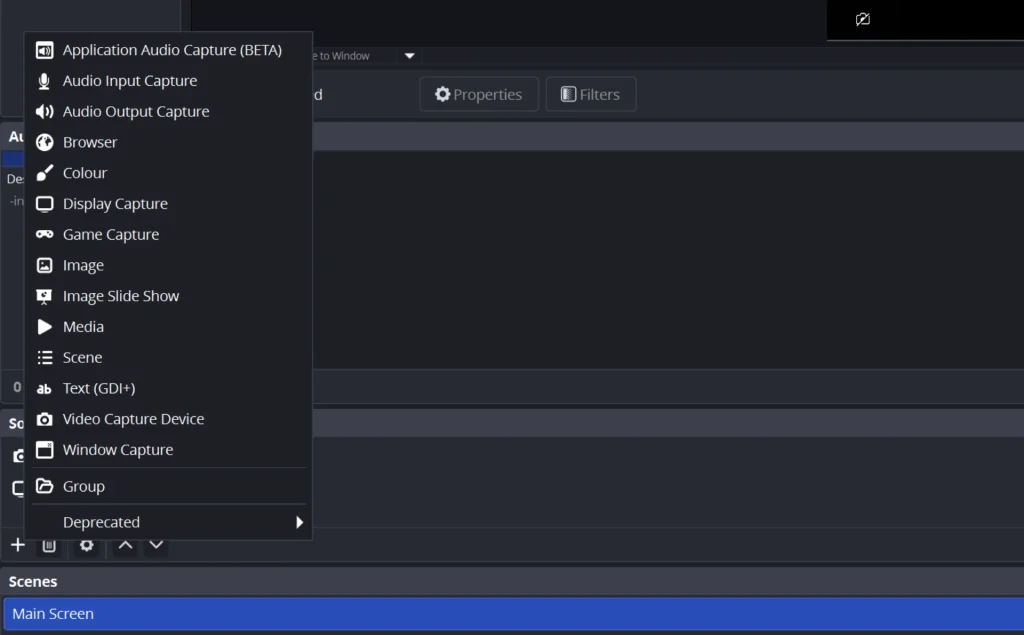
Step 2: Open the Sources Menu
Click the plus sign at the bottom of the Sources box. A menu pops up with every source type OBS offers. Each one pulls a different kind of content into your scene, so it helps to know what they all do before you start stacking them.
Step 3: Know What Each Source Type Does
Here is a quick rundown of every option in that menu so you can pick the right one fast.
Application Audio Capture (BETA)
Grabs sound from one single app, so you can add game audio while keeping a music app private.
Audio Input Capture
Your microphone source. Pick this to add a mic that is not already in your Audio Mixer.
Audio Output Capture
Captures your full desktop sound, so it covers system audio, alerts, and every app at once.
Browser
Loads any web page into your scene. This is how you add alerts and overlays from tools like StreamElements.
Colour
Adds a solid block of colour, handy as a clean background or a panel behind your webcam.
Display Capture
Shows your entire monitor. Best for tutorials and demos that jump between windows.
Game Capture
Hooks into a full-screen game and runs the smoothest. The go to choice for gameplay.
Image
Places a single still picture, like a logo or a “Be Right Back” graphic.
Image Slide Show
Cycles through a folder of images on a loop, great for sponsor logos.
Media
Plays a video or audio file, useful for intro clips and background loops.
Scene
Drops one whole scene inside another, so you can reuse a shared overlay everywhere.
Text (GDI+)
Types live words on screen for labels, titles, or your latest follower.
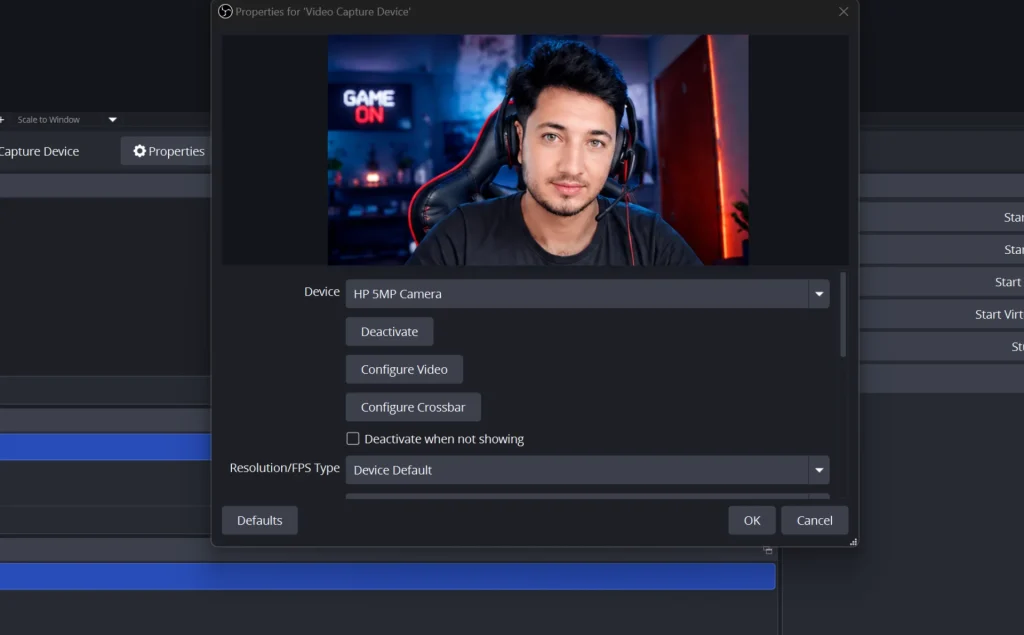
Video Capture Device
Your webcam or capture card source. Most face cam streams start here.
Window Capture
Shows only one chosen app and hides everything else, so private tabs stay off screen.
Step 4: Add Your First Source
For a basic stream, click the plus sign in the Sources Dock and select Display Capture or Game Capture. Type a short name like “My Screen” and click OK. Your screen now appears in the preview window above.
Step 5: Add Your Webcam
To add a webcam, click the plus sign in the source and choose “Video Capture Device”. Select your webcam from the dropdown menu and click OK. Drag the corners of the camera box to resize it and place it in a corner.
Step 6: Resize and Position Your Sources
Click on your webcam in the preview and drag the red corner handles to make it smaller. Then drag it to a bottom corner so it sits neatly over your main content. Sources higher in the Sources list appear on top, so drag your webcam above your screen capture if it gets hidden.
Best OBS Settings for Streaming
This section answers a question every new streamer asks, so let us get specific. The best OBS settings for streaming balance sharp video against a stable connection. Push too hard and your stream stutters, so these numbers keep you safe.
1. Open Output Settings
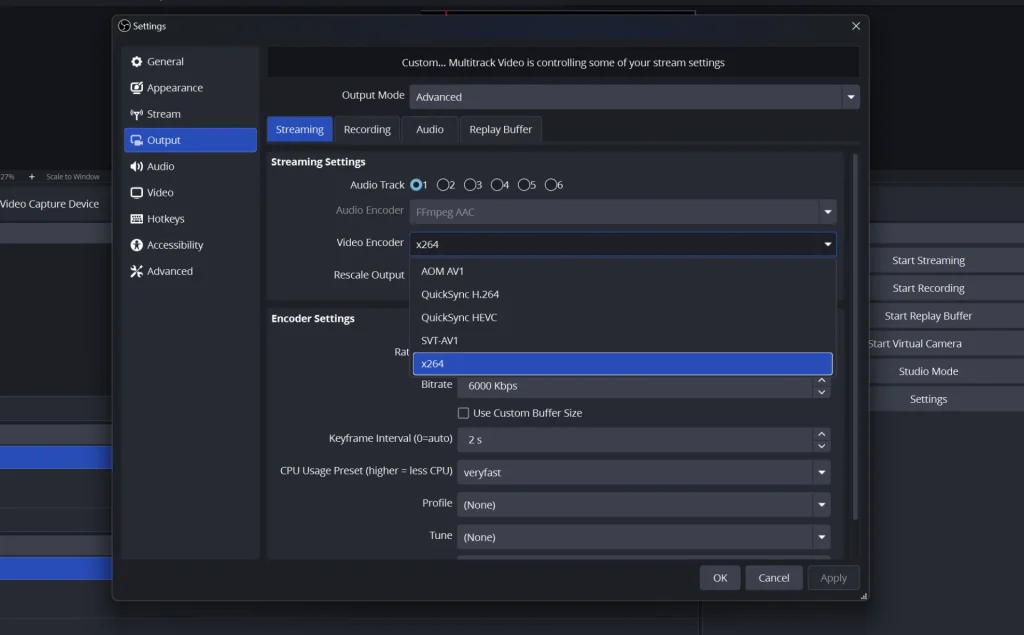
Click “Settings” in the Controls box, then click the “Output” tab on the left. Change the Output Mode at the top from “Simple” to “Advanced” once you feel ready. Advanced mode unlocks the controls the pros use.
2. Step 2: Pick Your Encoder
Look for the “Video Encoder” dropdown. If you have an NVIDIA graphics card, choose NVENC because it shifts the hard work onto your GPU and frees up your processor.
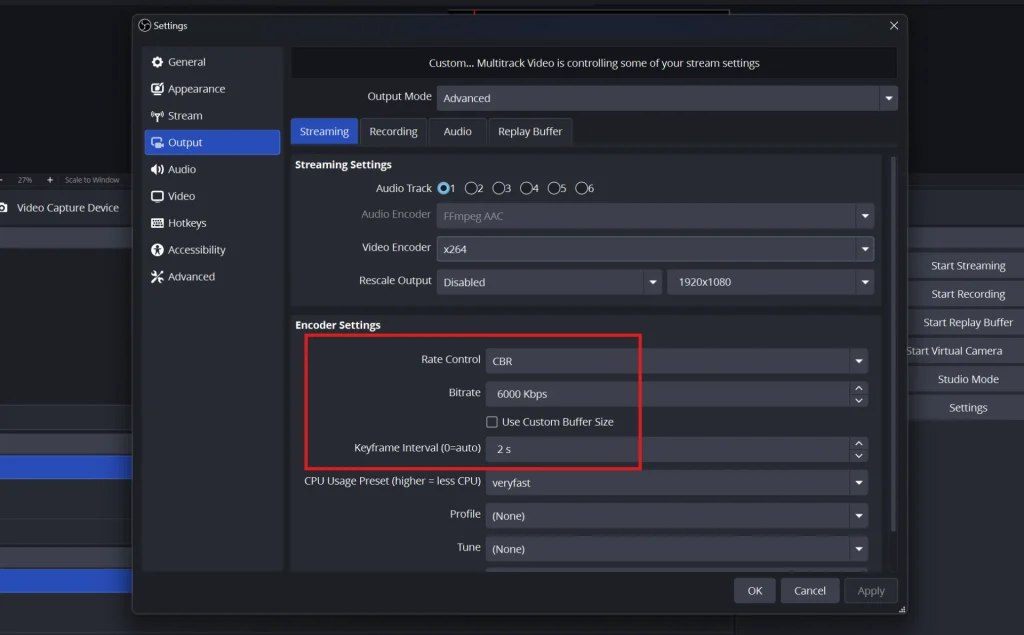
3. Set Your Bitrate
Bitrate controls how much data your stream sends, which decides clarity. For 1080p at 60 frames per second, set your video bitrate to 6000 Kbps, which is the standard cap on Twitch. Set “Rate Control” to CBR and “Keyframe Interval” to 2 for a stable connection.
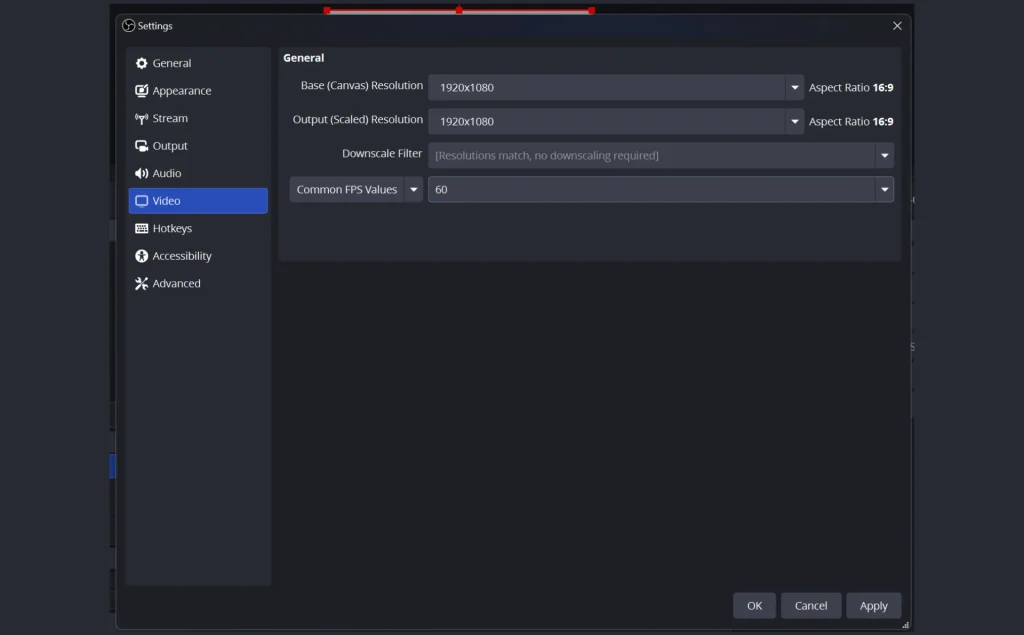
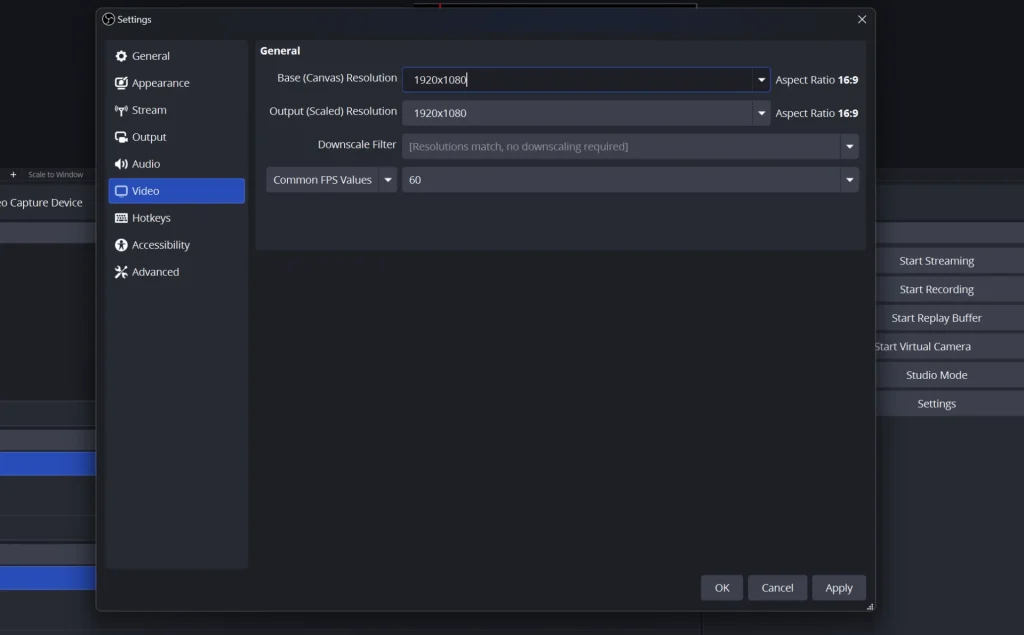
4. Confirm Resolution and FPS
Open the “Video” tab next. Set both your Base Canvas and Output resolution to 1920×1080, and set your frame rate to 60. If you ever see stutter, lower the output to 1280×720 and the picture stays clean.
OBS Audio Settings That Sound Professional
Bad audio makes viewers leave faster than bad video, so this part matters. Smart OBS audio settings remove background hum and keep your voice clear. You do not need any expensive device for this; you just need the right boxes ticked.
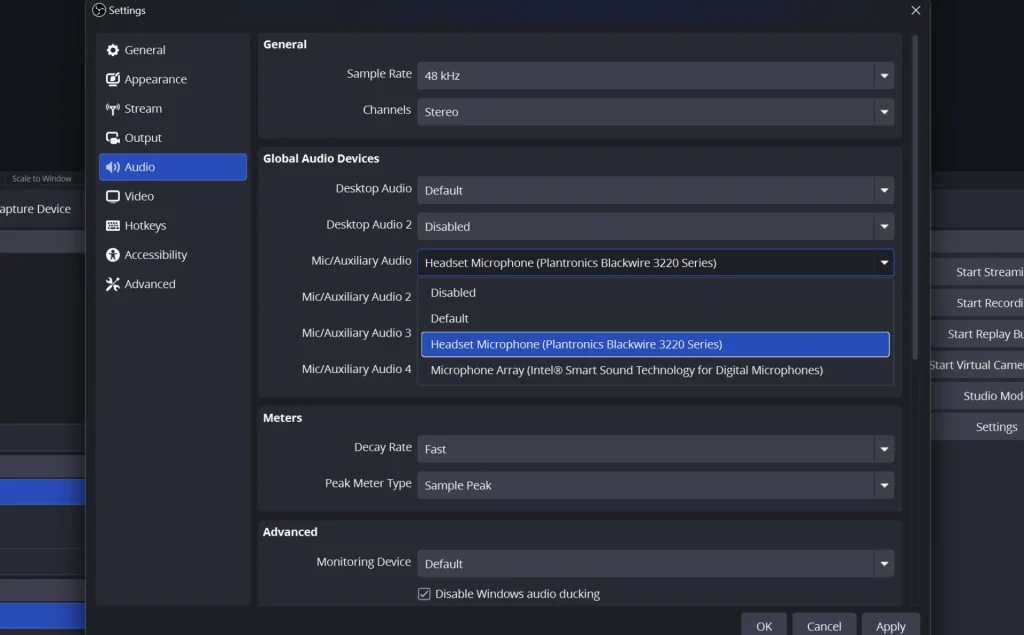
Step 1: Choose Your Devices
Open “Settings” and click the “Audio” tab. Set your “Sample Rate” to 48 kHz and your channels to Stereo. Under “Mic/Auxiliary Audio,” select your actual microphone instead of “Default” so OBS always grabs the right one.
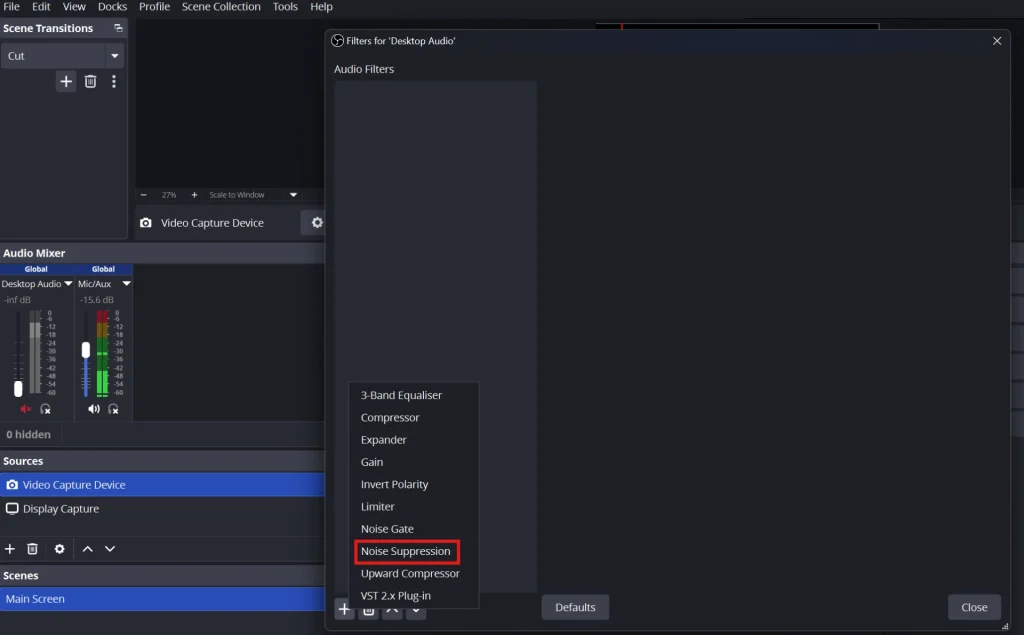
Step 2: Add a Noise Suppression Filter
Right click on the Audio Mixer and pick “Filters.” Click the plus sign and add “Noise Suppression” to kill fan and room noise.
Step 3: Stack Your Filters in Order
For the cleanest sound, add filters in this order: Noise Suppression, then Noise Gate, then Compressor. The Noise Gate mutes your mic when you are silent, and the Compressor evens out loud and soft moments. Set your input so your voice peaks around minus 12 decibels, not in the red.
How to Set Up OBS for Recording
Plenty of people use OBS purely to record, never to stream live. Learning how to set up OBS for recording gives you clean video files for YouTube, tutorials, or editing. The settings differ slightly from streaming, so follow these.
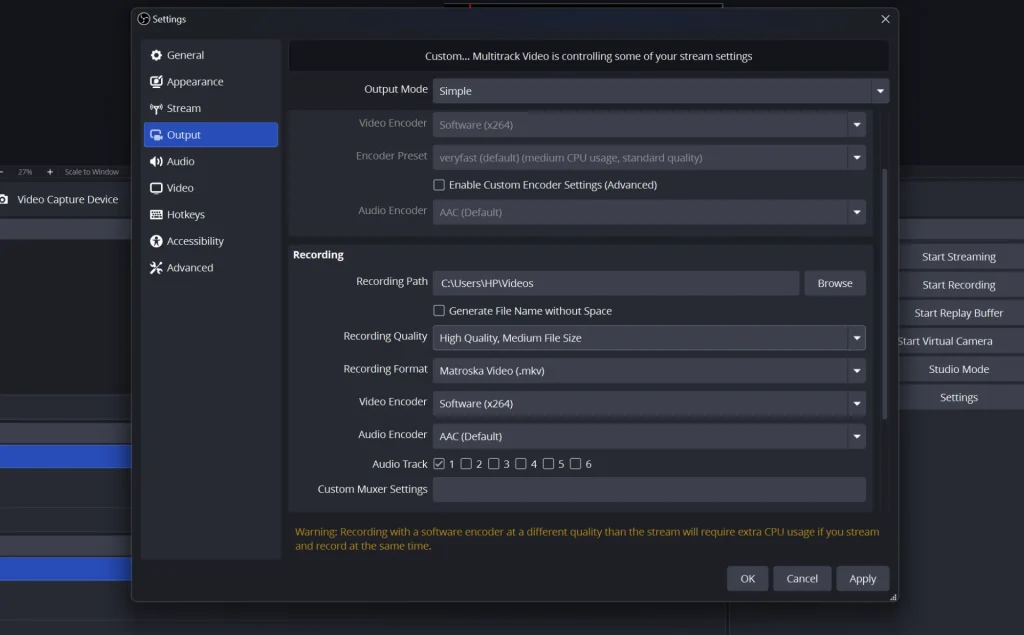
1. Open the Recording Settings
Click “Settings,” then “Output,” and find the “Recording” section. If you are in Simple mode, you will see a “Recording Quality” dropdown. Choose “High Quality, Medium File Size” for a strong balance.
2. Choose Your Format
Set your “Recording Format” to MKV or Hybrid MP4 instead of plain MP4. Both formats protect your footage if OBS crashes during a long session, whereas a standard MP4 file would corrupt fully and become unrecoverable. MKV is the most reliable option, while Hybrid MP4 gives you the added convenience of a more widely supported file format.
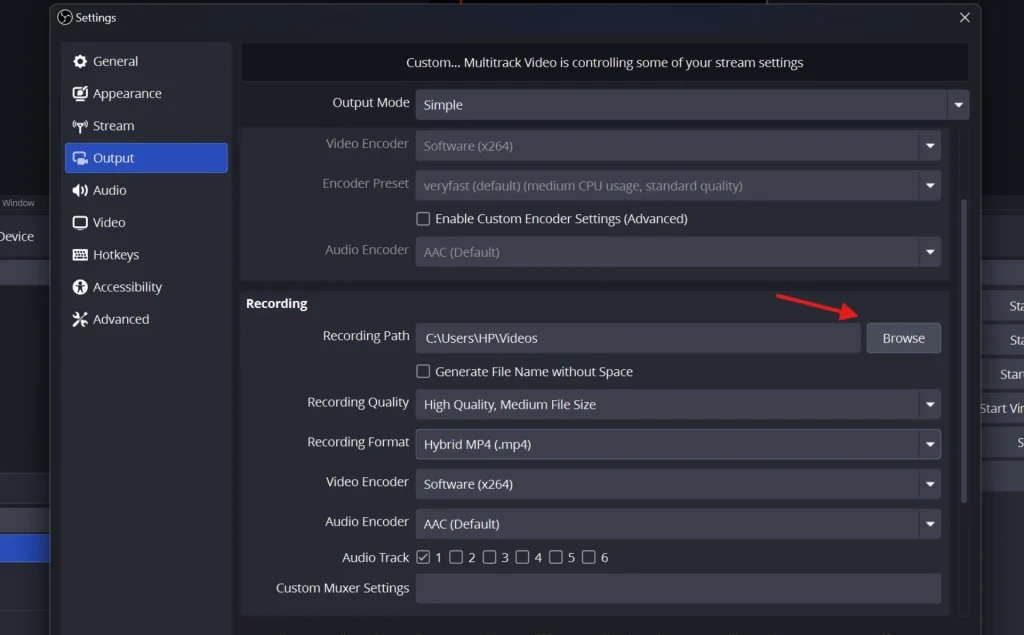
3. Pick Where Files Save
Click “Browse” next to the “Recording Path” and choose a folder you will remember. A dedicated “OBS Recordings” folder on your desktop keeps things tidy. Click “Apply” and then “OK” to lock it in.
4. Start Your OBS Screen Recording
Press the “Start Recording” button in the Controls box whenever you are ready. OBS records everything in your active scene without any time limit. Press “Stop Recording” and your finished OBS screen recording waits in the folder you picked.
How to Connect OBS to Twitch
Twitch is still the biggest home for live streamers and holds around 51 percent of total hours watched according to recent data. Learning how to connect OBS to Twitch takes about two minutes. There are two ways to do it, and one is far easier.
Step 1: Open Stream Settings
Click “Settings” in OBS and select the “Stream” tab. At the top you will see a “Service” dropdown. Click it and select “Twitch” from the list.
Step 2: Connect Your Account
Click the “Connect Account” button, which is the recommended method. A login window opens where you type your Twitch details and approve access. This method also unlocks handy chat and stats panels right inside OBS.
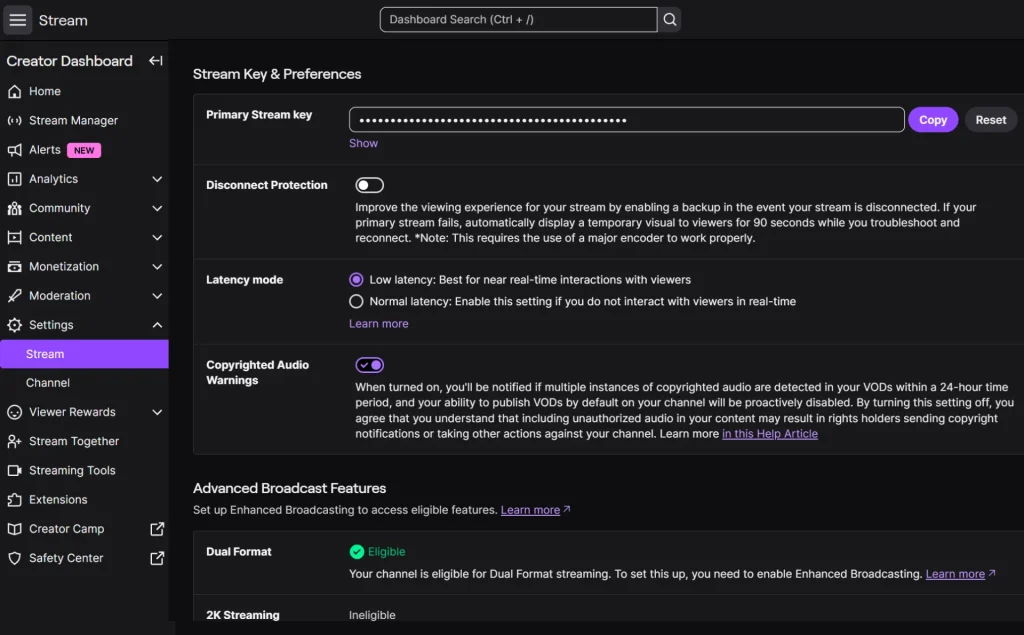
Step 3: Or Use a Stream Key Instead
If you prefer the manual route, click “Use Stream Key” instead. Log in to Twitch, open your Creator Dashboard, go to Settings, then Stream, and copy your “Primary Stream Key.” Paste it into the OBS box and click OK. For more details, read our detailed guide onhow to find your Twitch stream key.
Step 4: Go Live
Press “Start Streaming” in the Controls box and you are live on Twitch. Open your Twitch channel in a browser to see your broadcast. Always test with a quiet practice stream before a big event.
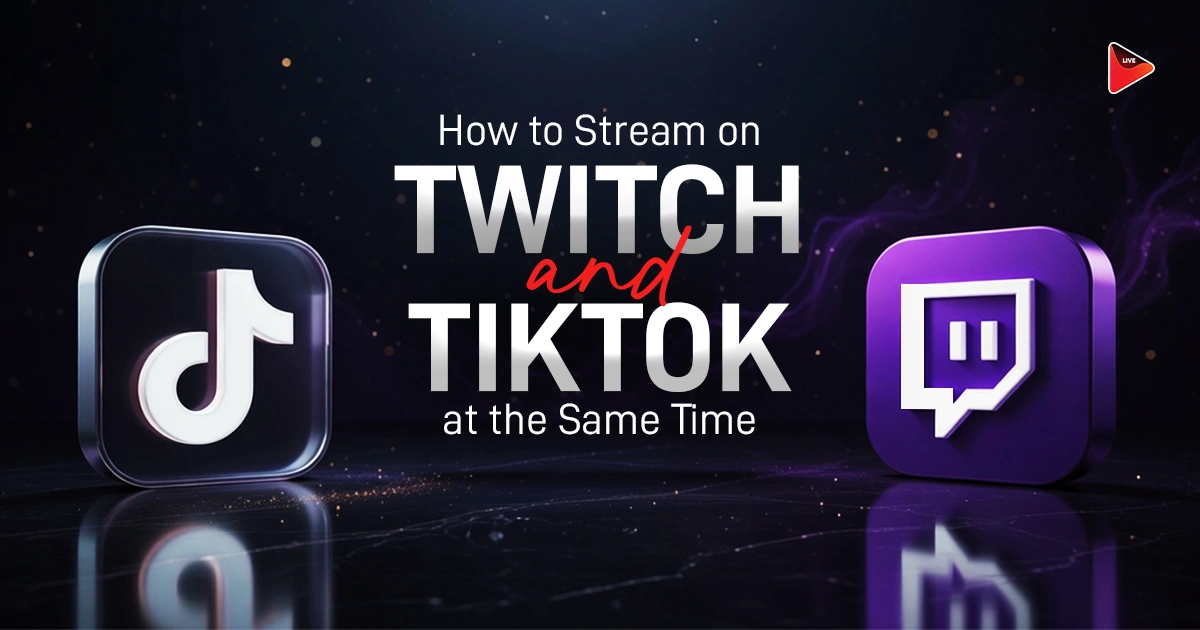
How to Stream on TikTok With OBS
TikTok Live has become one of the fastest growing platforms for live streamers. The setup in OBS uses a custom RTMP server and a stream key, much like other platforms. We have a complete step-by-step guide on this topic, so check out our detailed blog onhow to stream on TikTok with OBS for the full walkthrough.
How to Multistream on OBS
Here is a truth that surprises many people who ask how to multistream on OBS. By itself, OBS sends your stream to only one platform at a time. To reach Twitch, YouTube, and TikTok together, you need a little help.
1. Understand the Limit
OBS has one main streaming output, so it points at a single destination. So multistreaming needs an outside tool.
2. Bring in OneStream Live
This is where OneStream Live makes your life simple. OneStream Live is a cloud based multistreaming platform that takes one stream from OBS and pushes it out to over 45 destinations at once.
3. Connect OBS to OneStream Live
Log in to your OneStream Live dashboard and pick the “RTMPEncoder” option as your source. OneStream Live gives you a Server URL and a Stream Key. Paste these into the OBS “Stream” settings under the “Custom” service, exactly like the Twitch steps above.
4. Pick Your Platforms and Go Live
Inside OneStream Live, select every platform you want, like Facebook, YouTube, Twitch, and LinkedIn together. Press “Start Streaming” in OBS, and OneStream Live spreads your single broadcast everywhere at once. You get more reach without buying a stronger computer or a faster connection.
Common OBS Problems and Quick Fixes
Even a perfect OBS streaming setup hits a snag now and then. These quick answers solve the issues beginners run into most. Keep this section handy for your first few streams.
Why Does OBS Show a Black Screen?
If Game Capture shows black, close OBS, right click its icon, and choose “Run as Administrator.” If Display Capture shows black on a laptop, open Windows Settings, then System, then Display, then Graphics, and set OBS to the same GPU as your display. Some anti-cheat software can also block Game Capture, so try Window Capture as a backup in that case.
Why Does OBS Drop Frames?
Dropped frames almost always point to your internet connection. Switch from Wi-Fi to a wired Ethernet cable for an instant improvement. You can also lower your bitrate a little so your upload keeps up.
Why Does OBS Say "Encoding Overloaded"?
This warning means your computer cannot compress the video fast enough. Switch to a hardware encoder like NVENC, or drop your output resolution to 720p. Lowering your frame rate to 30 also takes the pressure off.
How to Use OBS Studio Like a Pro: Final Tips
You now know how to use OBS Studio from a fresh install all the way to a live broadcast. A few habits separate smooth streamers from stressed ones, so keep these in mind. Small tweaks today save big headaches later.
Save your scenes and settings as a “Scene Collection” and a “Profile” so you never rebuild them. Set keyboard hotkeys for switching scenes, which makes you look polished on camera. Always run a private test stream before any important event so you catch problems early.
Most importantly, remember that one OBS broadcast can travel a lot further with the right partner. Pair your OBS streaming setup with OneStream Live, and a single click sends your content to every platform your audience lives on. That is how small creators start reaching big rooms.
Yes, OBS Studio is completely free and open source, with no watermark, no subscription, and no time limit. You can record and stream as much as you want at no cost.
Not really. OBS runs on modest hardware, though a decent graphics card and 8GB of RAM help. Using a hardware encoder like NVENC keeps things smooth on weaker machines.
The easiest way is a cloud tool like OneStream Live. You connect OBS once, then OneStream Live sends your single stream to 45+ platforms at the same time.
OneStream Live is a cloud-based live streaming solution to create, schedule, and multistream professional-looking live streams across 45+ social media platforms and the web simultaneously. For content-related queries and feedback, write to us at [email protected]. You’re also welcome to Write for Us!
Kalim is a Digital Content Writer at OneStream Live, dedicated to creating SEO-optimized content. When he's not writing, you can find him lost in his passion for music and singing.