Many creators and live streamers have faced this moment. After spending hours recording or editing, a file can suddenly go missing because of a crash, an accidental delete, or a failed save. Situations like this can be discouraging, but if you use OBS, it is often still possible to recover OBS recordings when the right steps are taken in time. OBS Studio does not protect finished recordings by default, so quick action matters. This article explains how to recover deleted recordings created in OBS and where to look first.
Most OBS recording losses happen during crashes, forced shutdowns, or save issues.
Always check the OBS recording folder before assuming a file is lost.
MKV recordings are easier to recover than MP4 after interruptions.
Recently deleted recordings may still exist in the Recycle Bin or Trash.
Data recovery software helps when OBS recordings are permanently deleted.
Proper settings and clean shutdowns help reduce recording loss.
Common Reasons OBS Recordings Get Lost
From our experience, most OBS recording losses happen during normal workflows rather than rare system failures. In many cases, users assume the file is gone, while in reality, OBS fails to complete the save process or stores the file in an unexpected location. This often creates confusion about where OBS recordings go, especially after long sessions or sudden interruptions.
The most common situations we encounter include:

- Accidental deletion after a session ends
- Unexpected OBS shutdown during file save
- OBS is stuck on stopping recording, which blocks proper file finalization
- Storage space shortage during a session
- Recording path change
- Forced OBS closure before save completion
Another factor that affects the ability to recover OBS recordings relates to the recording format used by OBS. MKV files usually remain usable after interruptions, while MP4 files often become unusable if OBS fails to close the container correctly. This difference directly affects whether recovery remains possible.
Similar situations appear in a Reddit discussion where users describe recordings that disappear after OBS freezes or stops at “Stopping recording.” These cases show that file loss often follows repeatable technical patterns rather than isolated faults.
For this reason, the first step involves locating OBS recordings and checking whether the file still exists in the save path. When this check shows that the recording no longer exists, the next step requires a different approach.
At this stage, the key task is to check whether the OBS recording still exists in the active save path. Many files appear lost only because OBS stored them in a different folder than expected. If the recording does not appear in any standard or custom location, the situation changes.
When the file no longer exists in the save path, recovery requires software that can work with deleted data. There are many such tools available, so a list of reliable video recovery tools helps narrow the choice before we demonstrate recovery of permanently deleted OBS recordings with one specific application.
Many OBS users also use the software for live streaming in addition to local recording. In these cases, OBS can be connected to OneStream Live by entering a server URL and stream key in the RTMP settings. OBS then sends a single stream, which OneStream Live distributes to platforms such as YouTube, Facebook, LinkedIn, and Twitch.

Where Does OBS Save Recordings
OBS Studio always saves recordings to a specific folder on your system, but this location is not fixed. Many users assume the file is lost when it was actually saved to a different directory. To recover OBS recordings effectively, it is important to confirm the active save folder before any recovery attempt.
To open the current recording location directly from OBS:
1. Launch OBS Studio
2. Open the File menu in the top navigation bar
3. Click Show Recordings
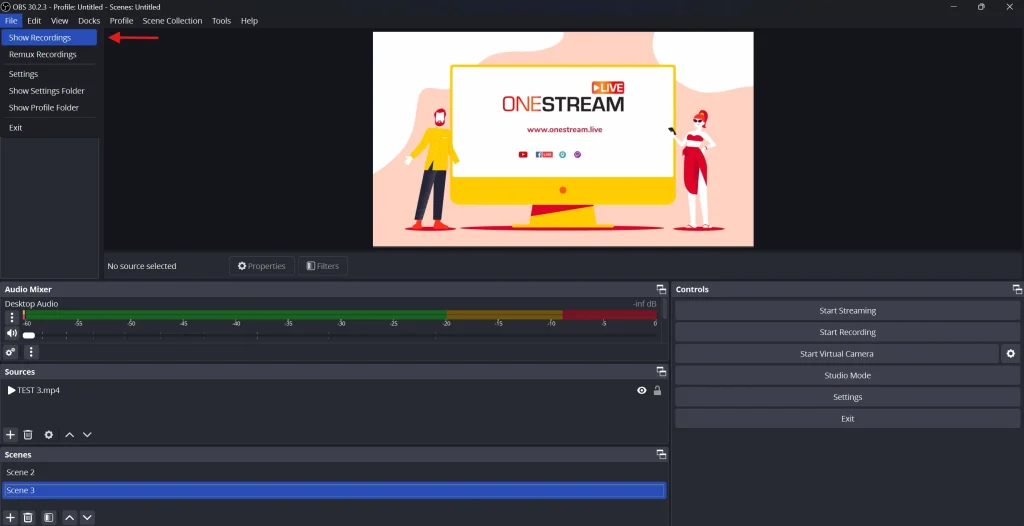
OBS opens the exact folder where recent recordings are stored. This step confirms where OBS recordings go for the current configuration and often resolves the issue immediately.
If the folder does not contain the expected file, review the save path manually:
1. Open Settings in OBS
2. Select the Output section from the sidebar
3. Open the Recording tab
4. Review the Recording Path field
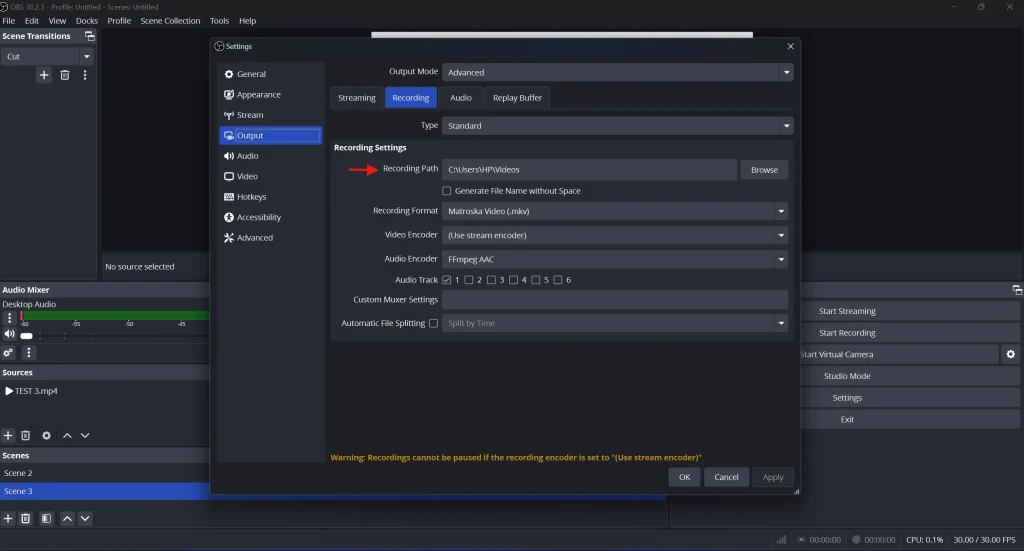
This path shows where OBS recordings are saved on your system. If the location points to an external drive or a custom folder, open it directly in File Explorer or Finder to confirm whether the file exists.
Read More: How to Live Stream Using OBS Studio
How to Recover Deleted OBS Recordings
Deleted OBS recordings fall into two categories: files that remain in system storage and files removed from the file system. The first method below covers the simplest case.
Method 1: Recover Deleted Recordings from the Recycle Bin or Trash
Most operating systems move removed files to a temporary storage area, which allows fast deleted recording recovery without extra tools. Below are the exact actions for both Windows and macOS.
On Windows:
1. Open the Recycle Bin from the desktop. If it is not visible, open Start and search for “Recycle Bin.”
2. Sort items by Date deleted or use the search field to locate the OBS recording.
3. Check the file extension, such as .mkv or .mp4, to confirm it matches the OBS recording format used during capture.
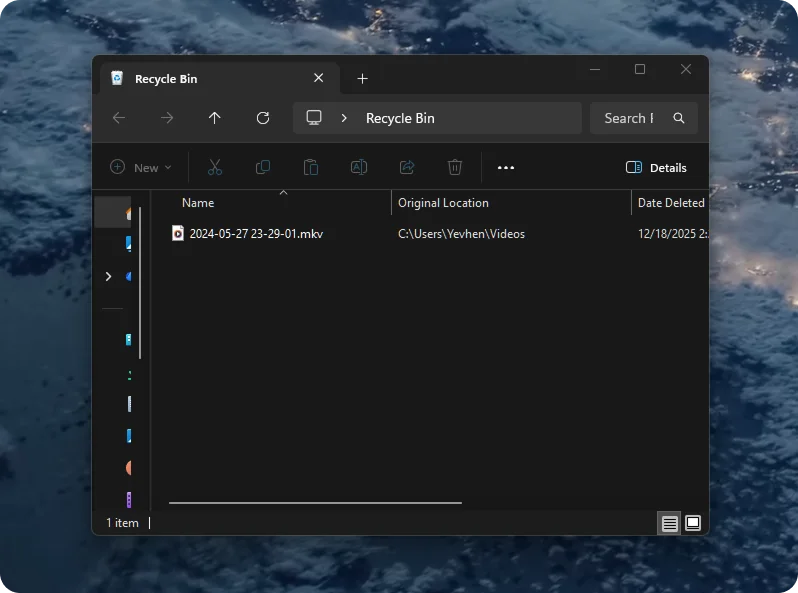
4. Right-click the file and select Restore. Windows returns the recording to its original folder.
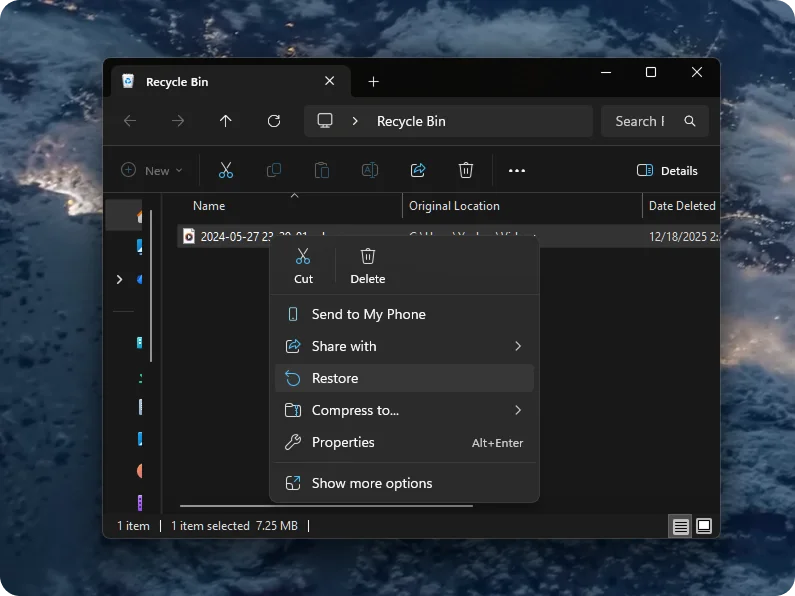
5. Open OBS and select File → Show Recordings to confirm the file appears in the correct location
On macOS:
1. Open Trash from the Dock.
2. Use Finder search inside Trash if many files appear, then locate video files such as .mkv or .mp4.
3. Right-click the recording and select Put Back, or drag the file to a safe folder such as Movies.
4. Check the file size in Finder, then open the video to confirm playback.
6. Open OBS and review Settings → Output → Recording to confirm the save path.
When a recording appears in the Recycle Bin or Trash, restoration finishes immediately, and no further actions are required. If the file does not appear there, the next method explains how to proceed after permanent deletion.
Method 2: Recover Deleted OBS Recordings with Data Recovery Software
When an OBS recording no longer appears in the Recycle Bin or Trash, the file usually counts as permanently removed at the system level.
A dedicated data recovery software tool allows access to file traces that no longer appear in the file system and supports recovery when built-in options fail.
OBS records video primarily in MKV, MP4, FLV, MOV, and TS containers. During remux, conversion, repair, or recovery, recordings may also appear as AVI or MPEG-based files. OBS records video primarily in MKV, MP4, FLV, MOV, and TS containers. During remux, conversion, repair, or recovery, recordings may also appear as AVI or MPEG-based files. Disk Drill supports these video formats and allows recovery of OBS recordings even when the original container does not finalize correctly.
To attempt recovery with software:
1. Download and install Disk Drill on a drive other than the one where OBS recordings were stored.
2. Open Disk Drill and select the disk that stores OBS recordings. In the main window, look under Storage Devices and choose the drive where OBS saved files, most often the system drive (for example, Local Disk (C:) on Windows).
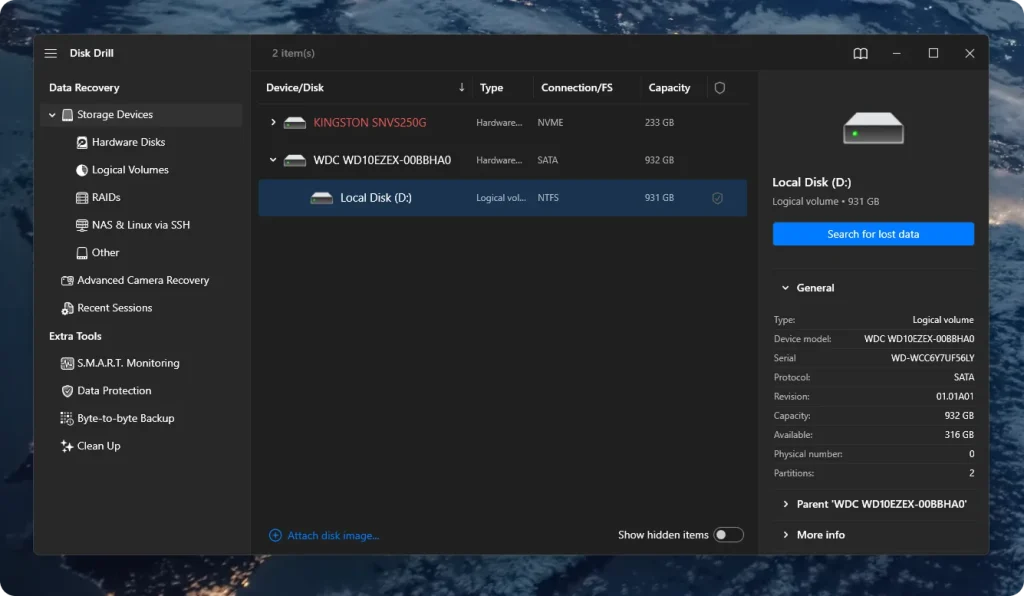
3. Start the scan. Click the Search for lost data button on the right side of the window. Disk Drill will begin scanning the selected disk for deleted files.
4. Wait for scan results to appear. You do not need to wait until the scan finishes. Once files start appearing, click Review found items in the lower-right corner.
5. Filter results by video files. In the left sidebar, select Videos to narrow results. You can also use the search bar to filter by extensions such as .mkv, .mp4, .flv, or .mov, which OBS commonly uses.
6. Preview files before recovery. Click a file and use the Preview option. A working preview usually indicates the file can be restored successfully.
7. Recover the recording. Select the desired OBS recording and click Recover. Choose a different drive or external storage as the recovery destination, then confirm the action.
This method works best when recovery starts soon after deletion and the same disk receives minimal new data writes. Continued disk use may overwrite file traces and reduce recovery chances.
Final Summary
At the end, we want to say one simple thing: most OBS recording losses follow clear patterns, and many of them remain preventable with attention to settings and routine habits. To recover OBS recordings successfully, it helps to pause, review the situation, and act in a clear order rather than rush into tools.
In practice, recovery works best after confirmation of the save path, use of stable formats such as MKV, and sufficient free space on the recording drive. Allow OBS to complete the save process after each session, especially after long recordings. For important content, even a basic backup copy adds protection.
Some cases fall outside the main flow. Files that exist but fail to open often point to damage rather than deletion. Other common issues include recordings saved to unexpected folders, interruptions during shutdown, or OBS stuck at the stop stage. In most cases, prevention and clear checks solve more problems than recovery alone.
If OBS is also part of your live streaming setup, a single broadcast can be sent to multiple platforms through OneStream Live. OBS connects to OneStream Live using standard RTMP settings and allows the stream to reach all your social media accounts at the same time.

Frequently Asked Questions
To change where OBS saves recordings, open OBS Studio, click Settings, go to the Output tab, and modify the Recording Path field to point to your desired folder. This lets you control where future recordings are stored and can help avoid confusion if you think files are missing.
No. OBS Studio does not automatically delete recordings unless you set up an automated deletion rule or use a third‑party tool. Once saved, recordings remain on your storage until you move or delete them yourself.
Formatting a drive erases its contents, so recovering OBS recordings becomes difficult. The chances of recovery are greatly reduced after formatting, but specialized data‑recovery tools may still be able to retrieve some files.
MP4 recordings often become corrupted if OBS crashes because the MP4 container stores essential information at the end of the file. FLV or MKV formats, on the other hand, are designed to start and stop at any time and tend to survive crashes. To increase the likelihood of recovering recordings, use FLV or MKV for long sessions and convert to MP4 afterward if needed.
OneStream Live is a cloud-based live streaming solution to create, schedule, and multistream professional-looking live streams across 45+ social media platforms and the web simultaneously. For content-related queries and feedback, write to us at [email protected]. You’re also welcome to Write for Us!