
OBS Studio is powerful, free, open-source streaming software that empowers creators worldwide to broadcast their content easily and professionally. It offers a comprehensive toolkit for producing high-quality live streams and recordings, complete with multi-scene setups, audio mixing, and a vast array of customization options.
This guide is your one-stop resource for OBS Studio, offering step-by-step instructions, tips and tricks, and insights into getting the most out of your live streaming setup. From how to set up OBS to advanced features, we will cover everything you need to start your live streaming journey.
OBS Studio Mode Explained
OBS Studio boasts two main modes that cater to your broadcasting and recording needs:
- Studio Mode: OBS Studio Mode is your rehearsal space for those seeking a more controlled broadcast. By switching to Studio Mode, you split your screen into ‘Preview’ and ‘Live’ views. This allows you to make changes, preview transitions, and adjust scenes without the audience ever seeing the behind-the-scenes work. When you are satisfied, a simple click transitions the scene to live. It is like having a broadcast studio at your fingertips — a feature that demonstrates OBS is more than a simple streaming software; it is a professional broadcasting platform.
- Live Mode: In live mode, what you see is what you are broadcasting. This straightforward approach is ideal for those confident in their setup or running simpler streams.
How to Set Up OBS Studio?
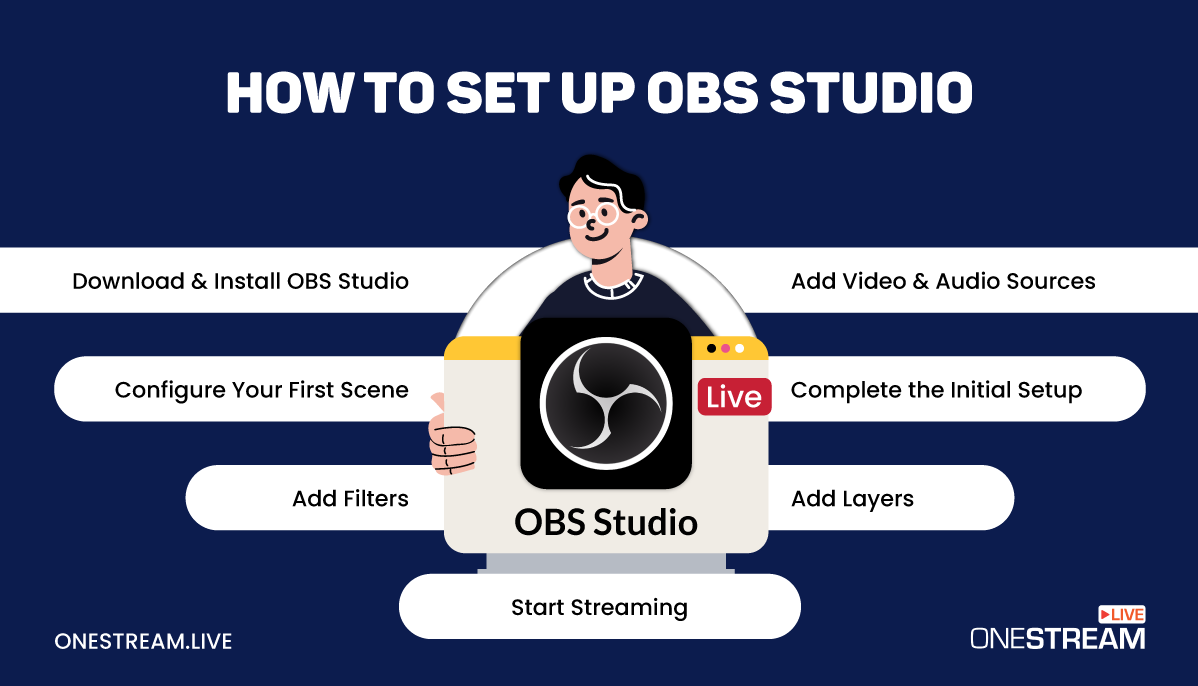
Download and Install OBS Studio
Begin your OBS Studio journey by visiting the official website to download the version suited for your operating system. Next, open the downloaded file and proceed to install. Installation is straightforward; just follow the prompts, and you’ll be ready to stream in no time.
During the OBS setup process, you will be presented with the option to add extra plugins. It is generally advised not to select any at this stage. Once your OBS setup is installed, you can start OBS Studio immediately from the installation prompt or by clicking the new desktop icon that will be created.
Complete Initial Setup and Interface Overview
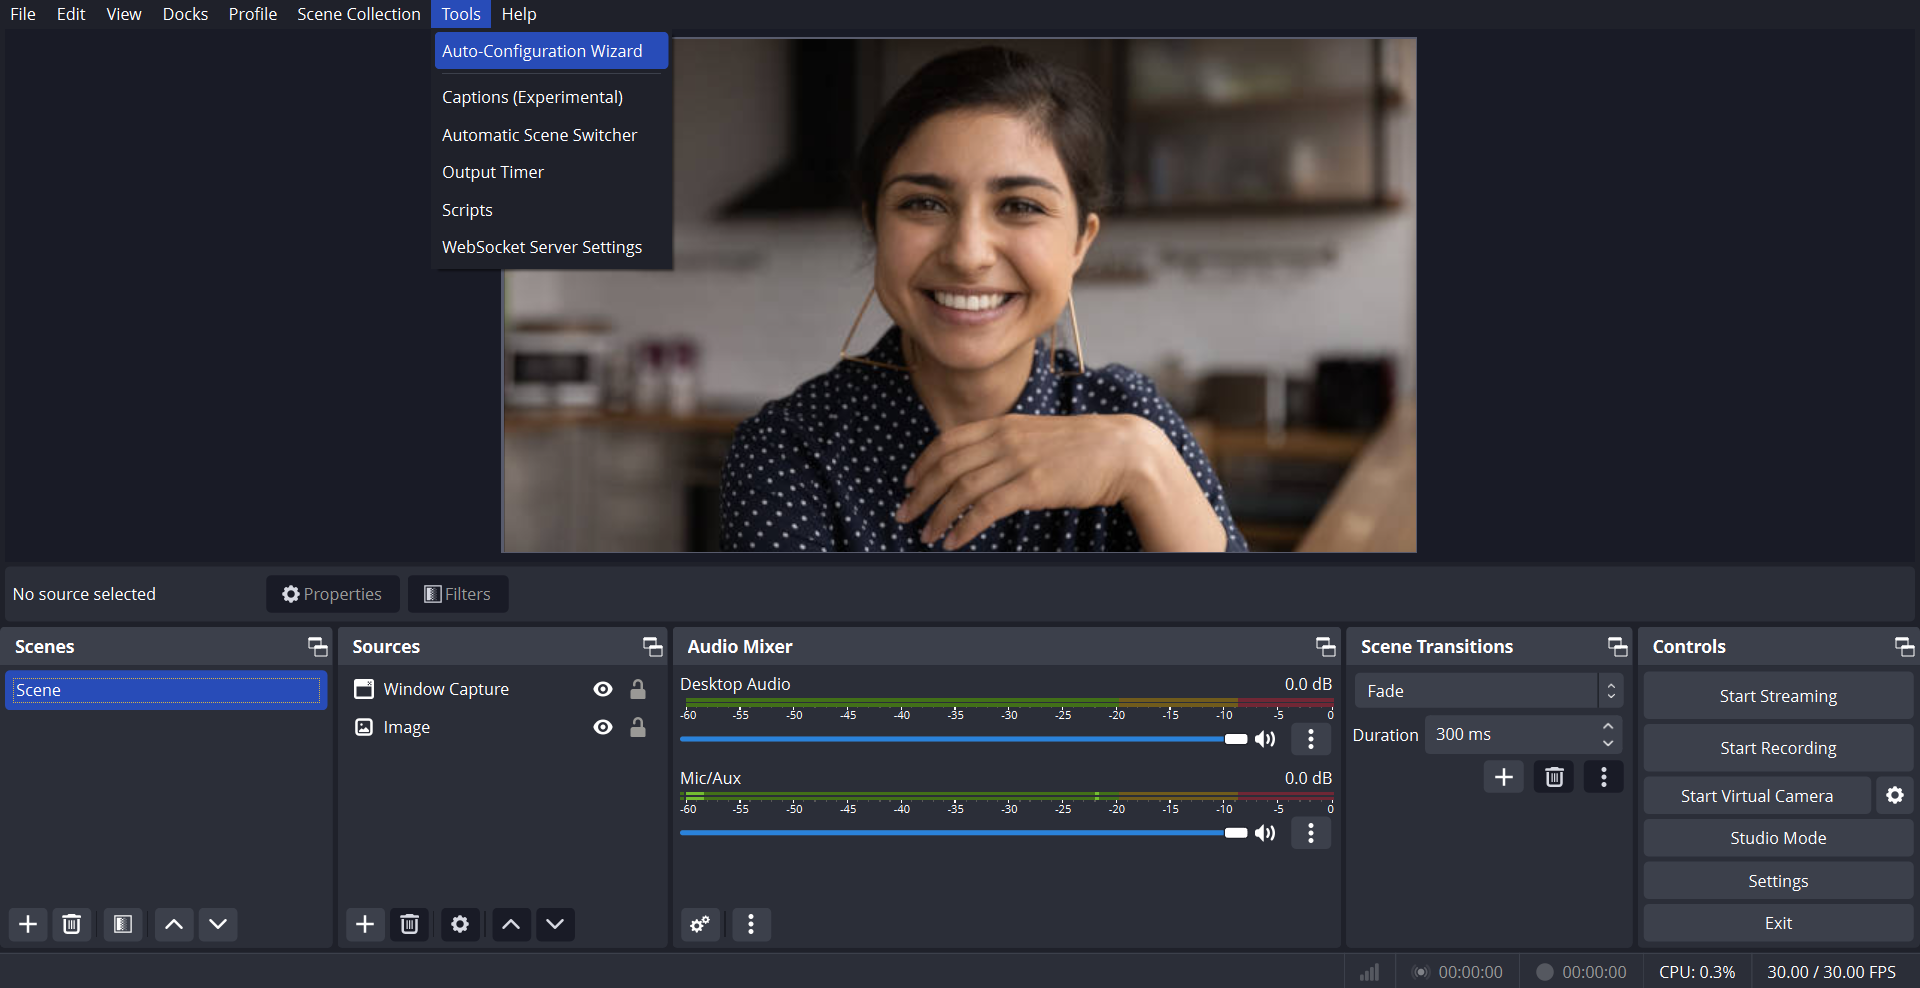
Once installed, open OBS Studio and take a moment to orient yourself. The default layout presents you with several windows, so familiarize yourself with these crucial areas:
- Scenes: These are the content arrangements for different parts of your broadcast.
- Sources: The individual media elements, like cameras or game capture, that make up a scene.
- Audio Mixer: Controls for adjusting the volume of your sources, ensuring clear audio.
- Controls: The dashboard for starting/stopping your stream, accessing settings, and more.
Upon opening OBS Studio for the first time, you will be prompted by the Auto-Configuration Wizard. This handy tool performs a series of tests on your system to determine the most suitable OBS setup for your live streaming needs, such as resolution and frame rate settings, ensuring a smooth start to your streaming journey. If you are eager to stream promptly, the Auto-Configuration Wizard is your go-to tool, which can be found under the ‘Tools’ menu. Remember, nothing is set in stone; you can manually adjust these settings later to match your particular needs better.
Configure Your First Scene
A scene is where the magic happens in OBS Studio. You broadcast a collection of audio and visual layers — known in OBS as ‘sources’ — to your viewers. Your first venture into scene creation for your OBS setup will involve selecting from various source options to build the desired layout for your live stream.
When you launch OBS, an empty scene awaits in the ‘Scenes’ box, typically found at the bottom left. Feel free to experiment by adding new scenes, renaming, or removing the default to reflect better the content you are creating, whether it is a gaming walkthrough or a live podcast. With each scene, you are essentially setting up a unique environment that can be seamlessly switched during your live session, providing varied visual experiences for your audience.
Note that only one selected scene will be streamed at a time.
Add Video and Audio Sources
The next step in this OBS Studio tutorial is to curate your audio and visual ensemble. Your stream’s lifeblood is its audio and video, which you can adeptly handle in your OBS setup. By default, OBS picks up your primary audio inputs and outputs, but delving into the ‘Audio Mixer’ section allows you to see the activity of your microphones and desktop audio. For more control, the ‘Settings’ menu is your gateway to selecting specific audio devices, ensuring your audience hears you loud and clear.
As for the video, a black preview screen signals that it is time to connect a video source to your OBS setup. This is where you bring your content to life. Right-click in the ‘Sources’ box to add a new video source.
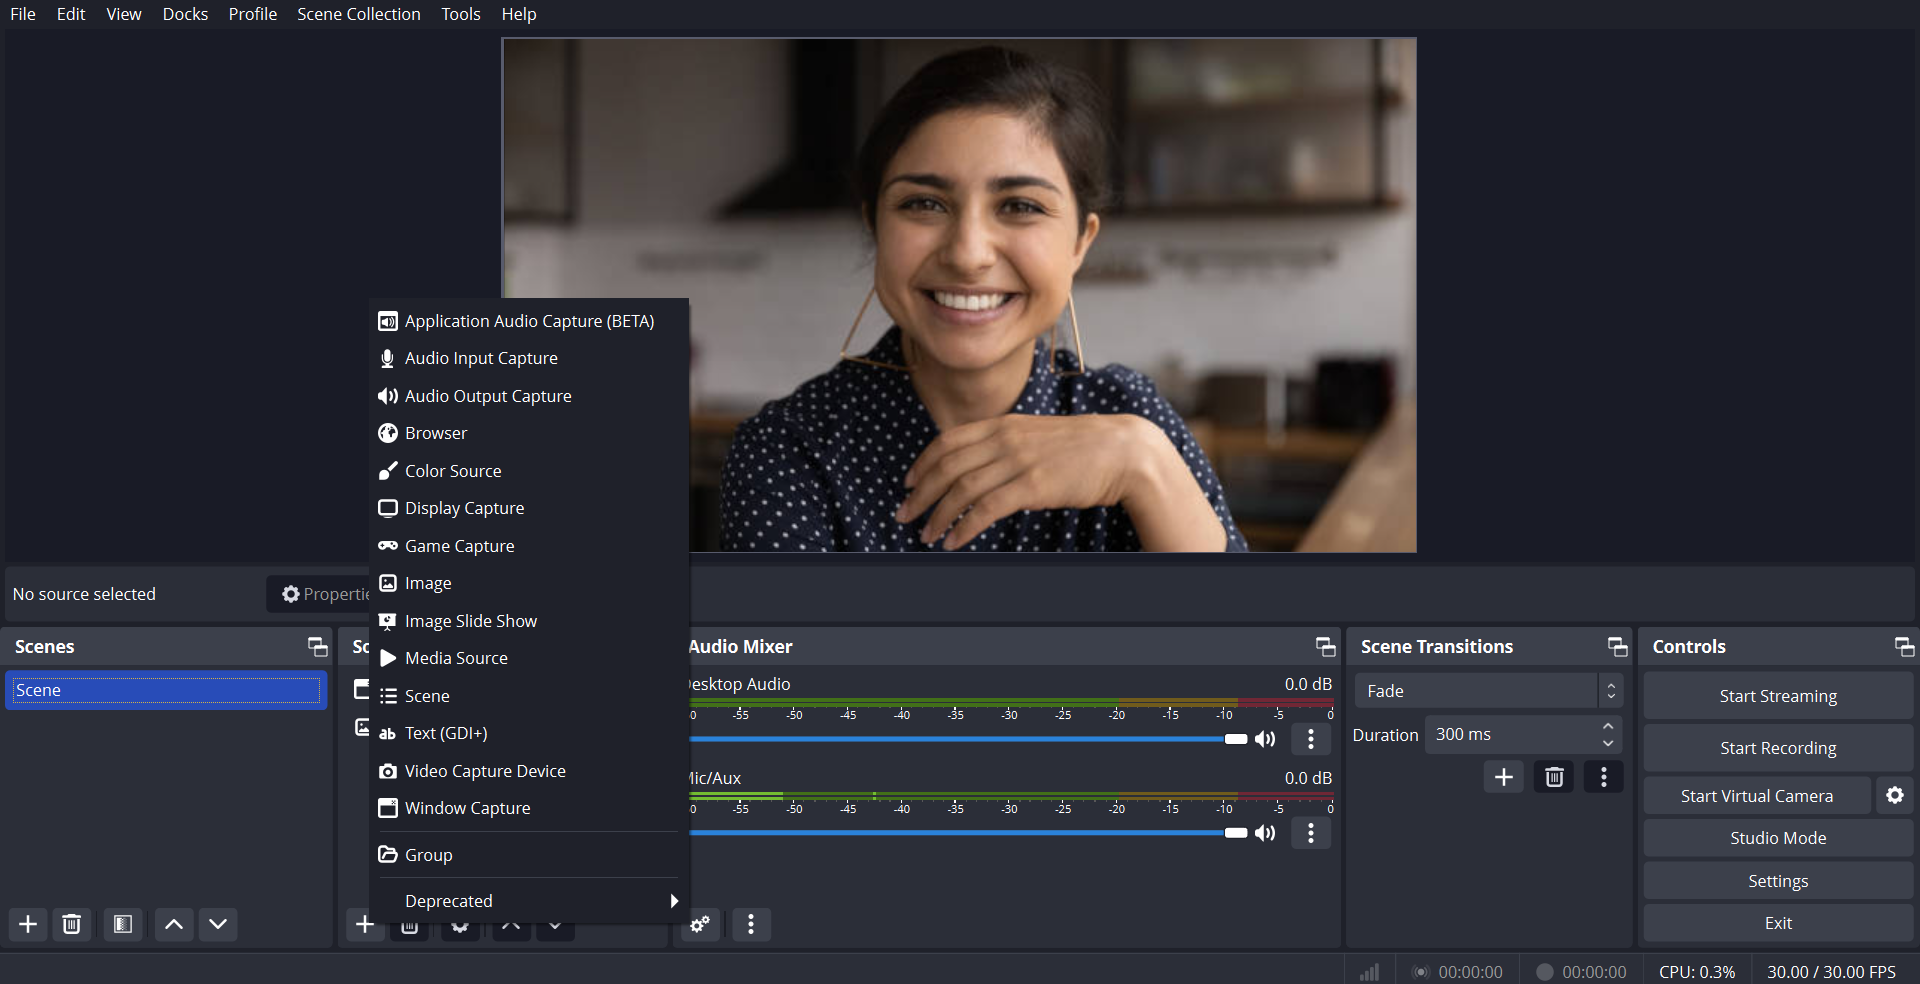
Add Layers
Think of OBS Studio’s layers as the depth of field in photography: each layer adds context and focus to your broadcast. Each source added stacks on top of the other, layer by layer. For example, if you are a gamer, you will likely want your ‘Game Capture’ below your ‘Video Capture Device’ (webcam) source in your OBS setup so your audience can see your gameplay and reactions. The preview window is your rehearsal space — ensure everything is positioned right before the final act.
Adjusting layers is a breeze; click and drag within the ‘Sources’ list. The ordering here is crucial — the topmost source in the list will be front and center on your stream. This layering technique is an essential skill, one of the many tips and tricks in your OBS Studio tutorial repertoire.
Apply Filters
This section of the OBS Studio tutorial covers enhancing your audio with OBS audio filters. Once your layers are in place, it is time to add some flair. Filters are to OBS what spices are to cooking — they enhance the experience. Right-click on any source, select ‘Filters,’ and you will find a suite of options. For audio, you might add compression, noise suppression, or a noise gate. Video filters include Chroma Key for green screens, image correction, and more.
OBS does not just stop at built-in filters. The power of this streaming software is its extensibility; many custom plugins are available that can add even more capabilities. From color correction to advanced audio processing, the potential to elevate your stream’s production with these tips and tricks is enormous.
How to Start Streaming from OBS Studio
Kicking off your live stream with OBS Studio is an easy process. Here is a step-by-step OBS Studio tutorial on how to get your live content out to the world.
Direct Streaming to a Single Platform
- Selecting Your Platform: Open OBS Studio and navigate to the ‘Settings’ area. From there, head over to the ‘Stream’ tab, where you will find a dropdown menu under ‘Service.’ This is where you will choose the platform, like YouTube, that you want to stream to.
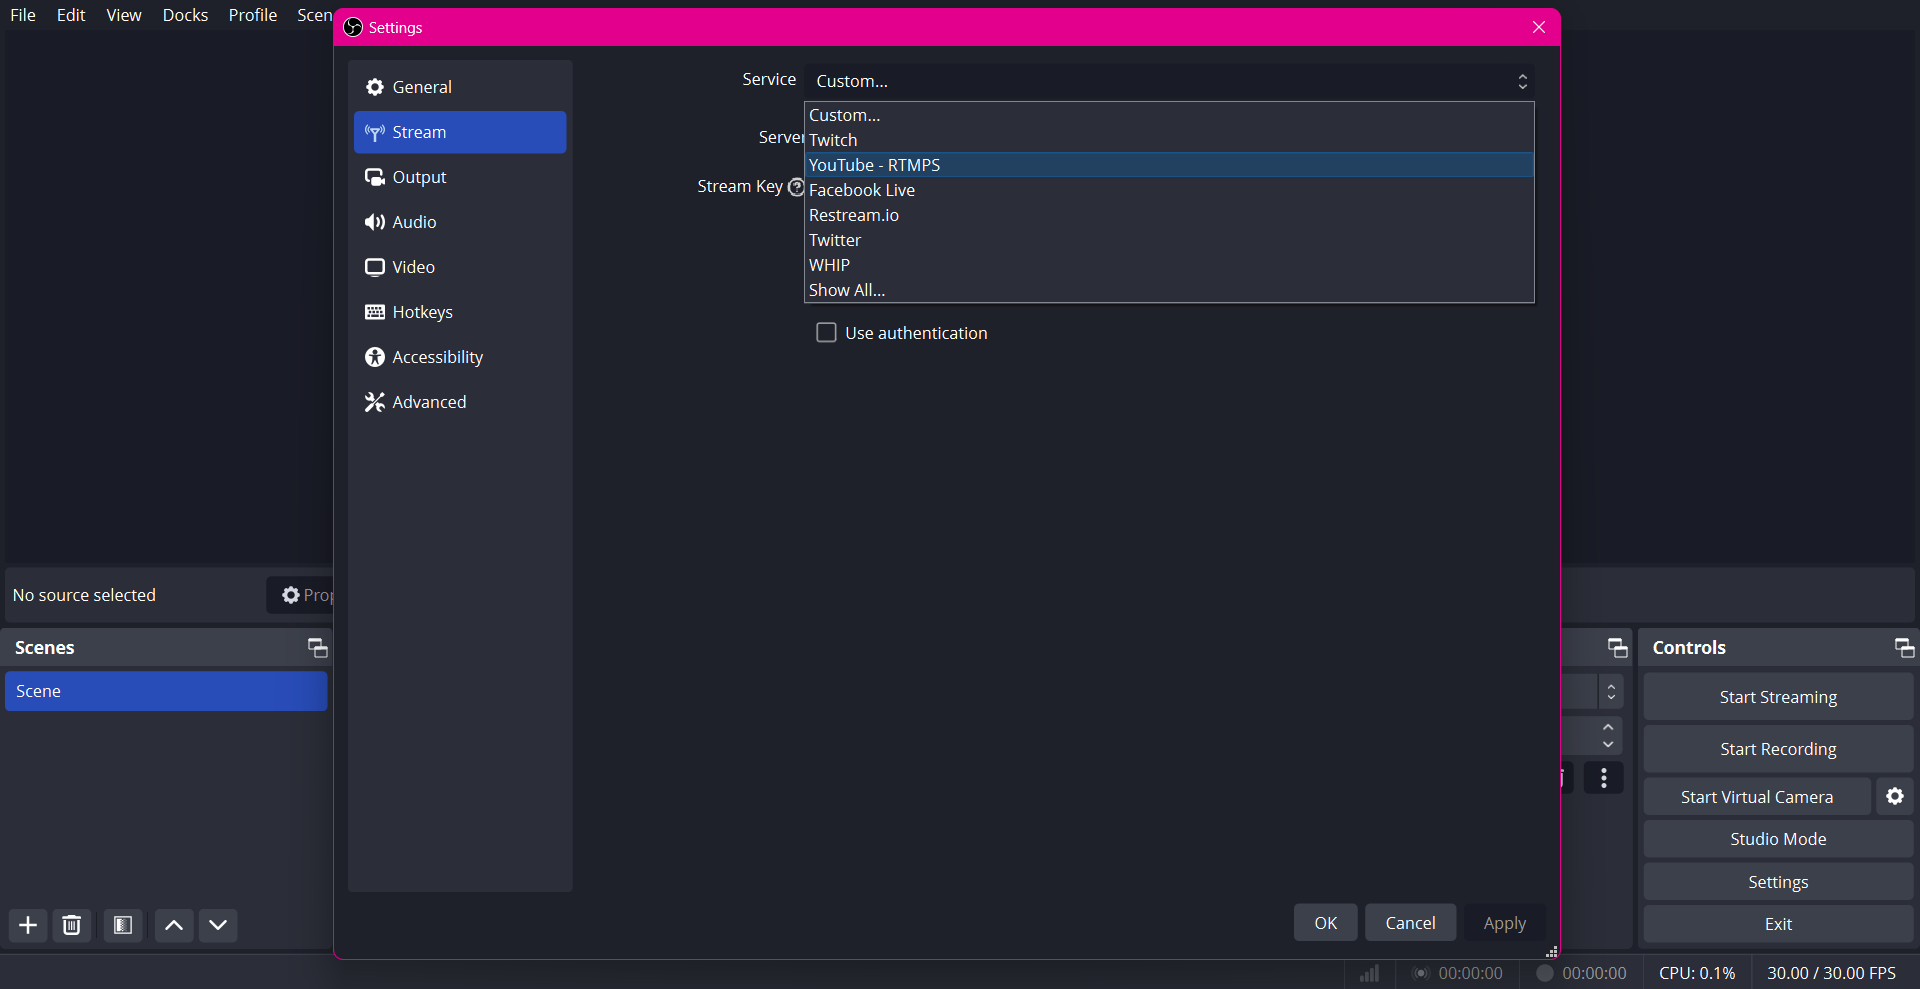
- Entering Your Stream Key: Each streaming service provides a unique Stream Key that OBS Studio needs to broadcast your content. Paste your Stream Key into the designated field in the OBS setup. This key links your OBS stream with your account on the chosen platform.
- Going Live: With your Stream Key in place, apply the settings. You will find the ‘OK’ button to save your configurations. Now, with a simple click of the ‘Start Streaming’ button in OBS Studio, you will be live, sharing your content with viewers on your selected platform.
Finding Your Stream Key in OBS Studio
Your Stream Key is the bridge between OBS and your streaming destination. If you are unsure where to find it, each platform typically has it located in the account or channel settings. Look for a ‘Get Stream Key’ option or visit your account dashboard on your streaming platform to find this crucial piece of information.
How to Stream to Multiple Platforms from OBS using OneStream Live
Although OBS does not natively support multi-platform streaming, there is a workaround:
- Using OneStream Live with OBS: In the same ‘Stream’ settings within OBS, you can choose Custom as your service. Enter the Stream Key provided by OneStream Live to connect OBS to their service.
- Streaming to Multiple Platforms: OneStream Live acts as a relay, simultaneously taking your single stream from OBS and multistreaming it across various platforms. This can include heavyweights like YouTube, Facebook, and Twitter.
By following these guidelines, your OBS Studio setup will be ready to reach an audience on any scale, from focused single-platform streams to widespread broadcasts over multiple channels. This flexibility makes OBS a potent live streaming software empowering you to connect with viewers wherever they prefer.
Concluding Your Ultimate OBS Studio Guide
And there you have it—your ultimate OBS guide, pointing you toward successful live streaming. We have covered the nuts and bolts of setting up scenes, finessed our OBS setup, and picked up a treasure trove of tips and tricks along the way.
And hey, isn’t it cool how you can go from zero to hero in your content creation game with a bit of tweaking, clicking, and dragging? Just remember, the more you play around with OBS, the better you will get.
So, as we wrap up this OBS guide, you are not just walking away with a new streaming software skillset but stepping into the spotlight with the know-how to craft brilliant content.
Ready to hit ‘Start Streaming’? Let the good times roll!
OneStream Live is a cloud-based live streaming solution to create, schedule, and multistream professional-looking live streams across 45+ social media platforms and the web simultaneously. For content-related queries and feedback, write to us at [email protected]. You’re also welcome to Write for Us!