Live streaming explainer videos has a dirty little secret: it’s messy. We praise the “authenticity” of going live, but we ignore the fact that authenticity often looks like 10 minutes of fixing a microphone, three minutes of “can you hear me?”, and a solid hour of talking heads that slowly drains the will to live from your audience.
If you want retention, you don’t need more raw footage. You need polish. You need a commercial break that doesn’t feel like a commercial.
For years, marketers have treated how-to videos like landing page furniture—something you park on your homepage to reduce bounce rates. But if you aren’t using them inside your live broadcasts, you are leaving money (and attention) on the table. Here is how to start using them to keep your live audience glued to the screen.
- High-quality pre-recorded assets prevent viewer drop-off during long broadcasts.
- Simplify complex B2B concepts using short animated clips.
- Deploy product demonstrations mid-stream to reset engagement.
- Use playlist streaming features to loop introductory content and warm up the audience.
- Drive real-time sales by syncing visual case studies with clickable call-to-action buttons on hosted live pages.
Why Explainer Videos Work Live
Most creators think explanatory videos are just for SaaS startups trying to justify their pricing. In a live stream context, however, they serve a different master: Cognitive Relief.
When you are live for 60 minutes, your audience’s attention span is fighting a losing battle against TikTok notifications. A well-placed, 60-second animated video acts as a palate cleanser. It resets the room.
It allows you, the host, to take a breath (or a sip of water) while a high-production asset delivers your core value proposition perfectly. But before you can stream it, you have to make it. And this is where most streamers fail, as they try to do it all live.
You need to record your high-fidelity assets before you go live. High-quality studios like Kasra Design specialize in crafting these kinds of videos to match your brand and objectives perfectly, ensuring that when you do hit “broadcast” on OneStream Live, your content looks like a Super Bowl commercial.
3 Types of Best Explainer Videos
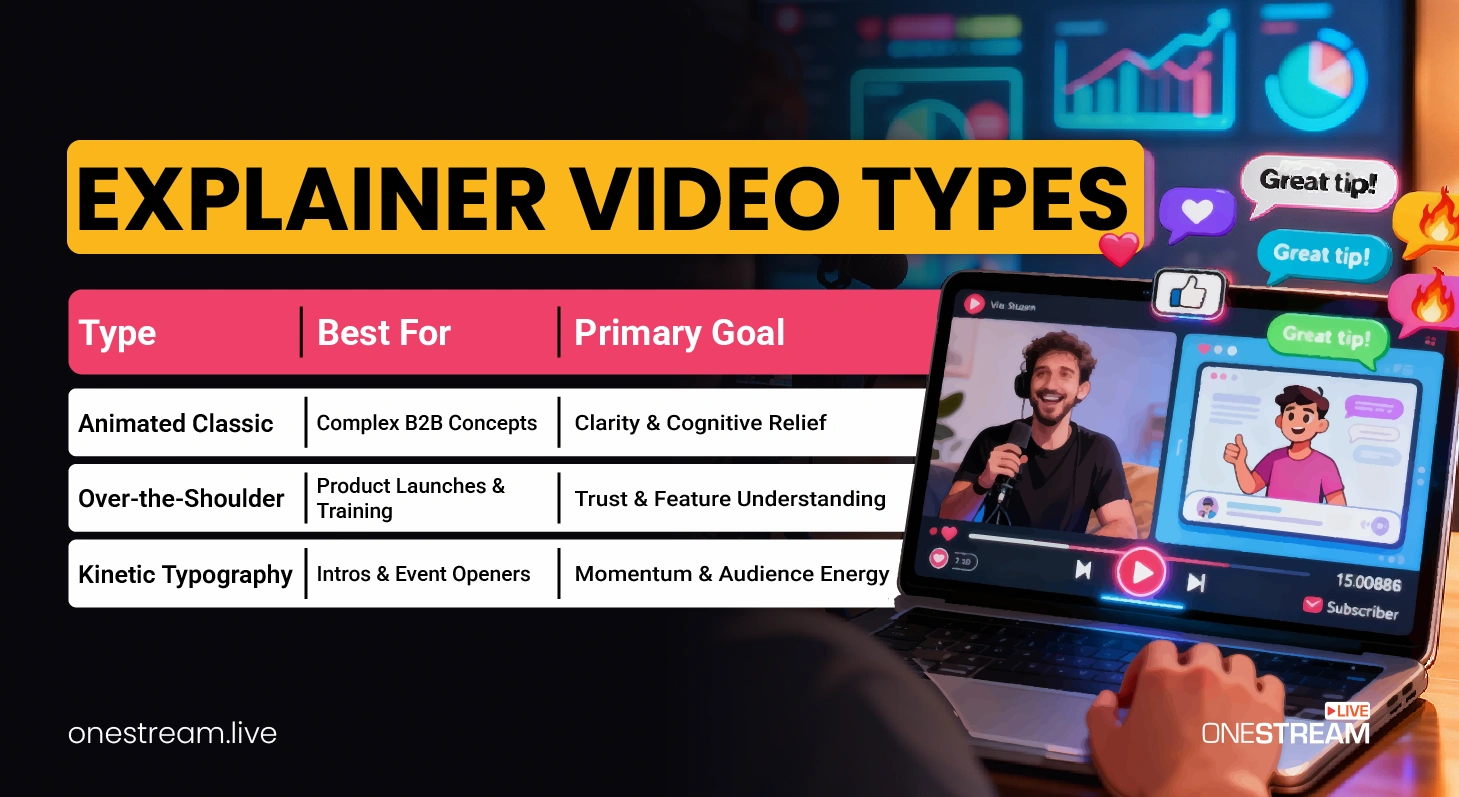
The data shows that “animation” is a high-volume search term, but don’t get tunnel vision. Your stream needs specific types of content depending on your goal.
1. The “Problem-Agitate-Solve” (The Animated Classic)
- Best for: Complex B2B software or abstract concepts.
- Why it works: If you are explaining a concept like “blockchain logistics” live, half your chat will tune out. Animated explainer video examples prove that visuals can simplify complex ideas in seconds. Use this to bridge the gap between “what we do” and “why you should care.”
2. The “Over-the-Shoulder” Walkthrough
- Best for: Product launches and training.
- Why it works: This isn’t a hype reel. This is a product explainer video that respects the viewer’s intelligence. Record your screen, show the workflow, and keep it under 90 seconds. It functions as proof of life for your product.
3. The “Kinetic Typography” Hype Reel
- Best for: Intros and event openers.
- Why it works: Sometimes you don’t need a voiceover; you just need energy. Fast text, loud music, and quick cuts. It wakes people up.
Strategic Placement: The “Run of Show”
You have your video. Now, where do you put it? If you just play it at the start, you’re wasting it. Here is the placement strategy for maximum impact.
1. The Pre-Roll (The “Waiting Room” Video)
Don’t let your viewers stare at a static “Starting Soon” screen. That’s dead air.
- The Move: Schedule a looping explainer video that runs for the 5 minutes leading up to your show.
- OneStream Live Tool: Use the Playlist Streaming feature. You can queue your explainer to loop before the main event starts, ensuring that early birds get your value proposition immediately.
2. The Mid-Stream Reset (The “Bathroom Break”)
45 minutes in, engagement drops. This is the danger zone.
- The Move: “I’m going to show you exactly how this works, watch this 60-second clip.”
- OneStream Live Tool: This is where OneStream Live Studio shines. You don’t need to fiddle with OBS scene switchers. Use the Media Sharing feature to pull your pre-uploaded explainer video directly into the stream. It plays in HD (not choppy screen-share quality), and you can mute your mic to take that necessary sip of coffee.
3. The Closer (The Conversion Engine)
Never end a stream with just “thanks for watching.”
- The Move: Play a testimonial or case study explainer while you post the checkout link in the chat.
- OneStream Live Tool: If you are using Hosted Live Pages, this is your power play. While the video plays, the Clickable Call-to-Action Button on your branded page should be glowing. You aren’t just entertaining; you are directing traffic.
How to Make an Explainer Video (Without a Hollywood Budget)
Let’s address the elephant in the room here: how to make an explainer video? This question is riddled with bad advice about expensive agencies. You don’t need Pixar; you need clarity.
Step 1: The Script is King
If your script is bad, the animation won’t save you.
The Formula:
- The Hook (0-5s): “Stop doing X.”
- The Pain (5-20s): “Here is why X is costing you money.”
- The Solution (20-40s): “Here is our tool.”
- The Proof (40-50s): “It worked for them.”
- The CTA (50-60s): “Go here.”
Pro Tip: Keep it under 150 words for a 60-second video.
Step 2: The Visuals
You have options here.
- Explainer Video Makers: Tools like Vyond or Canva are fine for basics.
- Stock Footage: Sometimes a well-edited montage of stock clips with a strong voiceover beats a cheap cartoon.
- Screen Recording: For software, this is the gold standard. It’s cheap, honest, and effective.
Step 3: The Audio
Bad audio kills credibility faster than bad video. If you are recording a voiceover, use a dedicated mic, not your laptop’s built-in microphone. This connects back to your recording workflow as clean audio is non-negotiable.
Streaming Your Explainer Videos on OneStream Live
You have the asset. Now, how do you broadcast it without technical glitches? Let’s look at the OneStream Live tools that handle this.
Scenario A: The “Live Studio” Approach
You are hosting a talk show and want to cut to a video.
- Enter the OneStream Live Studio.
- Go to the Media tab.
- Upload your explainer video file (MP4/MOV) before the show.
- When the moment is right, click the video. It takes over the screen automatically.
- Bonus: Use Intervals (custom countdowns) if you need a specific break timer.
Scenario B: The “Pre-Recorded” Premiere
You don’t want to be on camera at all. You just want to stream the video as if it were live.
- Upload your video to OneStream Live Cloud Storage (or import from Google Drive/Dropbox).
- Use the Advanced Scheduling tool.
- Pick your date and time.
- Select your destinations (YouTube, Facebook, LinkedIn, Twitch—up to 45 platforms).
- The system broadcasts it for you. You can sit in the chat and answer questions while the video does the work.
Scenario C: The Hybrid “Simulive”
You want the engagement of live but the safety of pre-recorded.
- Record your intro and outro live.
- Sandwich your product explainer videos in the middle using the Playlist feature.
- This gives you the “live” notification on social platforms but the production value of a studio edit.
Measuring Success: Did It Convert?
Converting viewers is important. Don’t just look at view counts. Look at retention graphs.
- Did people drop off during the video? (Your script is too long).
- Did people click the link after the video? (Your CTA is working).
If you are using OneStream Live’s Embed Player on your own website, you have even more control. You can password-protect the stream for exclusive product reveals or use the Universal Player Chat to answer questions specifically about the video content in real-time.
The Bottom Line
The days of “rough around the edges” live streams are numbered. Audiences demand value, and they demand it quickly. Explainer videos are a respect signal that tells your audience, “I value your time enough to script, edit, and produce this information clearly.”
So, stop rambling. Script it. Record it. Stream it.
Ready to upgrade your broadcast quality?

FAQs
In live streaming, this is a pre-produced, short video clip inserted into a broadcast to clarify complex ideas, showcase products, or provide a professional break. It effectively functions as a high-value commercial that resets audience attention and boosts retention rates.
For live streams, the sweet spot is between 60 and 90 seconds. Anything longer risks killing the “live” momentum and boring the chat; anything shorter often fails to fully articulate the value proposition or solve the viewer’s problem.
Focus on a tight script and clear audio first. You can use affordable screen recording software for software demos or combine stock footage with a professional voiceover. These methods create high-converting assets without the cost of a full animation studio.
Yes. Using OneStream Live’s Advanced Scheduling tool, you can upload finished video assets and broadcast them simultaneously to over 45 platforms—including YouTube, Facebook, and Twitch—without needing to be present on camera.
Follow the “Problem-Agitate-Solve” formula. Start with a 5-second hook identifying the viewer’s pain point, explain why that problem is costing them money, present your tool as the solution, and end with a clear Call-to-Action (CTA), all within 150 words.
OneStream Live is a cloud-based live streaming solution to create, schedule, and multistream professional-looking live streams across 45+ social media platforms and the web simultaneously. For content-related queries and feedback, write to us at [email protected]. You’re also welcome to Write for Us!