
Live streaming only works because it happens in real time. The moment your stream breaks, that advantage disappears. If viewers face buffering, audio drift, or disconnections, the value of going live drops to zero. Stream Testing prevents those failures before they happen. A proper stream test verifies your video signal chain, audio sync, and network stability before your audience ever sees you.
This guide shows you how to test stream reliability from start to finish. You will learn five practical best practices and a structured approach to running a reliable live stream every time.
A proper stream test checks your full workflow, not just your camera and mic. Test your network, encoding, and platform delivery together.
Always run a streaming speed test and leave upload headroom. Stable upload matters more than peak numbers.
Test under real conditions. Include motion, scene switching, overlays, and normal speaking during your live streaming test.
Use private or bandwidth test modes to test stream delivery without notifying your audience.
Review results and test regularly. Save recordings, track bitrate and warnings, and compare performance over time.
What a Proper Stream Test Should Cover
If you are an intermediate creator or technical streamer, you probably already check your camera and mic before going live. But most stream failures don’t happen there. They usually occur in the gaps between systems, like using the wrong ingest server, an encoder that only overloads when your actual game scene appears, audio that sounds fine in your headphones but ends up out of sync in the recording, or a platform health warning you never noticed.
A complete live streaming test is simply a controlled rehearsal. It helps you understand how to test stream reliability from start to finish. Instead of just checking individual components, you are testing the entire workflow as one connected system.
For most setups, your Stream Testing process should cover:
Network capacity and stability (upload headroom, latency, and jitter).
Live streaming is upload-dependent, and platform ingest servers are unforgiving if your connection can not consistently handle your bitrate. YouTube recommends running a streaming speed test to confirm your upload capacity and testing with audio and motion similar to your actual stream. This helps ensure your connection performs well under realistic conditions.
Encoder settings and platform requirements (bitrate, keyframe interval, codec).
Platforms actively evaluate the quality of your stream ingest and may display warnings if something is misconfigured. YouTube provides recommended bitrate ranges and encoder settings, including using CBR (Constant Bitrate) and a 2-second keyframe interval. Verifying these during your test broadcast helps prevent quality or stability issues later.
Platform health indicators.
YouTube’s Live Control Room shows real-time stream health and error messages, along with guidance on how to fix problems. Monitoring these indicators during a test live stream ensures you catch issues before your audience does.
A proper stream test should catch the small but critical issues that most often disrupt a smooth viewing experience.
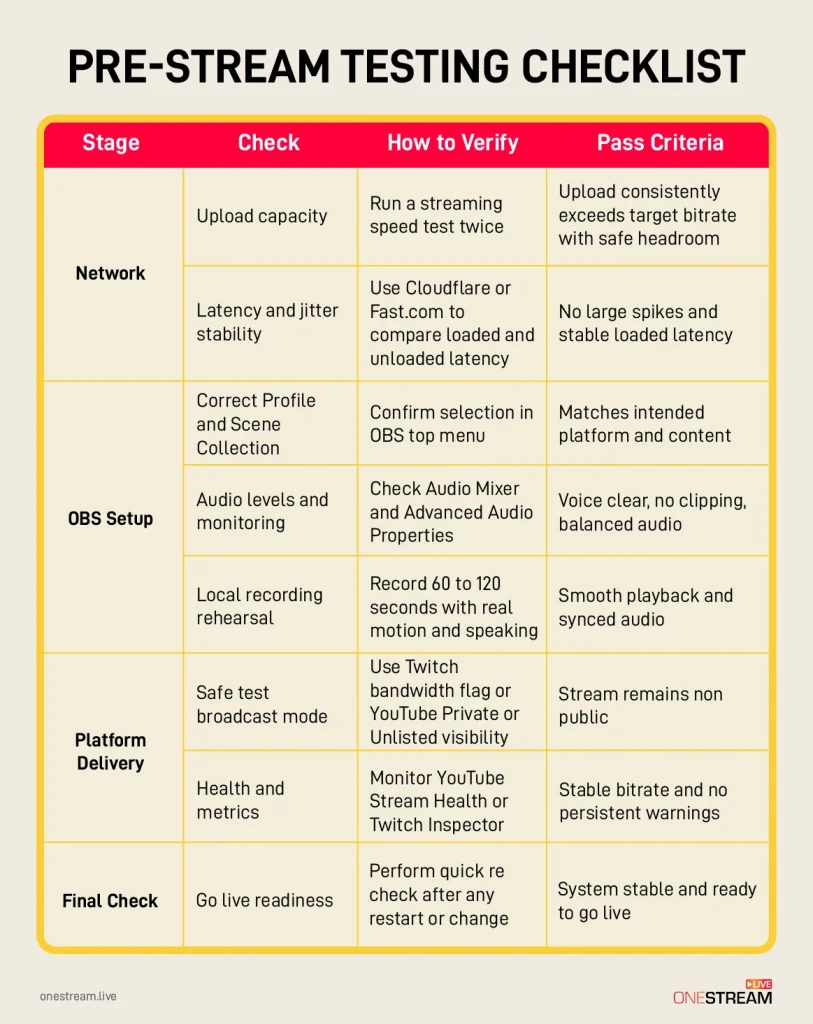
Pre-Stream Testing Checklist
Run through this pre-stream testing checklist to verify your setup and avoid common streaming issues before going live.
The 5 Best Live Stream Testing Practices
Stream Testing only works when you treat it as a process, not a quick check. Following the same steps every time reduces mistakes before you go live.
1. Standardise a Repeatable Pre-Stream Workflow
A workflow is more reliable than memory. Memory fails under pressure, especially before going live. A fixed process reduces variation between streaming sessions. Clear stages also help you trace problems quickly.
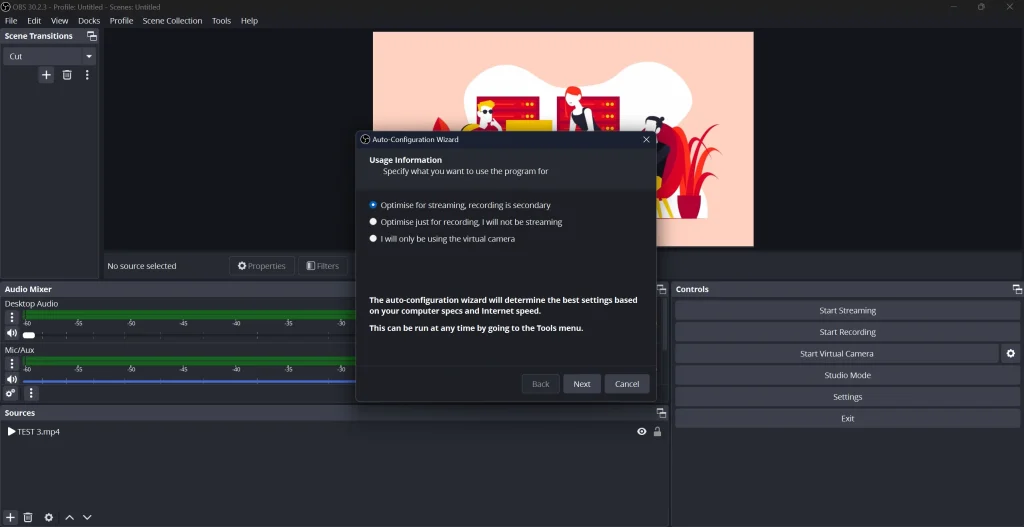
Create one known good test Scene Collection in OBS and reuse it every time. Run the OBS Auto Configuration Wizard after hardware or network changes. The wizard adjusts your settings based on your system and streaming goals. This creates a stable baseline for every stream test.
Follow the same pre stream sequence before each broadcast. Start with a network check and run a streaming speed test. Use a wired connection whenever possible for better stability. Then open the correct OBS Profile and Scene Collection.
Record 60 to 120 seconds with real motion and speaking. Review the file carefully for audio balance, sync, and smooth playback. Fix any issues before running a private or unlisted test live stream. Check platform health metrics and confirm bitrate stability before you go live.
Avoid testing a static screen only. Always include real motion and voice during your test stream. Never skip the local recording rehearsal step.
2. Treat the Network as a First-Class Dependency
Your network is the foundation of every live stream. Most stutters are caused by unstable upload or Wi Fi interference. Many streamers blame OBS when the real issue is the connection. Dropped frames usually mean your upload cannot sustain the set bitrate.
Live streaming depends on upload speed, not download speed. A strong streaming speed test should focus on upload stability and latency. Use Ethernet whenever possible for serious testing. Wired connections are more stable than Wi Fi.
Run at least two different speed tests before you stream. One test should measure basic upload capacity. Another test should reveal latency and jitter under load. Repeat tests at the same time you normally go live.
Always leave headroom above your chosen bitrate. Your upload should consistently exceed your stream bitrate. Do not set bitrate based on your highest result. Use your stable average result instead.
Avoid matching bitrate to your maximum upload capacity. That leaves no margin for congestion or other devices. Never rely on a single test result. A proper live streaming test checks consistency, not just peak numbers.
3. Validate Encoding Headroom Under Real Load
A stream that works on desktop may fail during real gameplay. Encoding load increases when scenes become complex. Alerts, overlays, and fast motion increase GPU and CPU usage. Your stream test must reflect real conditions.
Always test using the same game or application you normally stream. Use the same scene complexity and transitions. Include animated overlays and camera movement during the test. Do not test using a static screen only.
Start with a two minute local recording test in OBS. Switch scenes and trigger alerts during recording. Speak normally and create realistic motion. Review the file for smooth playback and frame stability.
Watch for encoder overload warnings or skipped frames. Check the OBS Stats window during your test. High CPU or GPU usage indicates limited encoding headroom. Stable output means your system can handle the load.
If overload appears, reduce output resolution first. Lower the frame rate if 60 frames per second is unstable. Do not rely only on lowering bitrate to fix overload. Bitrate mainly affects network delivery, not encoding strain.
Avoid changing the Base Canvas resolution casually. Canvas changes complicate capture settings and asset scaling. Keep your layout stable and adjust output settings instead.
4. Do an End-to-End Test Stream Without Going Live
A proper test stream should pass through the real platform ingest servers. It should also trigger the platform health monitoring systems. The goal is to validate delivery without notifying your audience. Your live test should remain private and controlled.
On Twitch, use the bandwidth test flag. Add ?bandwidthtest=true after your stream key in OBS. This prevents the stream from appearing publicly. Review stability and bitrate graphs inside Twitch Inspector.
On YouTube, set stream visibility to Private or Unlisted in Live Control Room. Start streaming from OBS after confirming visibility settings. Monitor Stream Health and review any error messages shown. Use these indicators to confirm stable ingestion and bitrate consistency.
Always confirm privacy settings before starting the test. Scheduled streams may notify subscribers if set to public. Check stream status and health before ending the session. An end to end test ensures your signal reaches the platform correctly before you go live.
5. Review Results and Test Regularly
Stream Testing becomes more valuable when you compare results over time. A single test shows current performance only. Repeated tests reveal patterns and hidden weaknesses. Tracking changes improves long term stream reliability.
After every live test, save one local recording. Label the file with the date and OBS Profile name. Write down bitrate, frame rate, and resolution used. Note any platform health warnings during the test stream.
Capture screenshots of key graphs when possible. Save Twitch Inspector results or YouTube Stream Health panels. These records help you compare stability across different sessions. Clear documentation reduces guesswork during future troubleshooting.
If you want to see how a Twitch test stream looks in practice, read our detailed Twitch test stream step by step guide.
Test briefly before every stream. Spend five to eight minutes on a quick recording and a short private live test. Run a longer full test once each week at your normal stream time. This reveals peak hour network behavior.
Always test again after major changes. Hardware upgrades and driver updates can affect encoding stability. New overlays or capture devices can increase system load. A scheduled testing cadence keeps your live streaming process predictable and controlled.
Quick Implementation: How to Run a Test Stream Without Going Public
These steps show how to test stream stability safely before any public broadcast.
1. How to Test OBS Without Going Live
Start with a local streaming video test inside OBS.
Click Start Recording and record for one to two minutes.
Review the file for audio sync, dropped frames, and visual smoothness.
This simple stream test catches most production issues before any live test.
2. Twitch: How to Test Stream Without Going Live
Use this method for a safe Twitch test broadcast.
Append ?bandwidthtest=true to your stream key in OBS.
Start streaming and monitor performance inside Twitch Inspector.
This allows a full live test without appearing publicly.
3. YouTube Test Stream Setup
Create or reuse a stream in YouTube Studio.
Set visibility to Private or Unlisted before starting.
Begin your YouTube test stream and monitor Stream Health in Live Control Room.
This confirms bitrate stability and ingestion health during your live streaming test.
Pro Tip: Set your YouTube destination to Private or Unlisted inside OneStream Studio before starting your test stream. Switch it to Public after everything is verified.

Troubleshooting Common Stream Testing Failures
Even after a proper stream test, issues can appear. Use this guide to identify problems and understand how to fix them.
Audio Sync Issues
Symptoms:
Your voice leads or lags behind your camera. Game audio drifts out of sync.
How to fix:
Confirm audio monitoring in Advanced Audio Properties.
Record a short clap test to measure the delay.
Apply a Sync Offset to the affected source if needed.
Resolve frame drops before adjusting sync again.
Bitrate Drops and Dropped Frames
Symptoms:
OBS reports dropped frames. The stream disconnects or buffers.
Cause:
Your upload cannot consistently sustain the selected bitrate.
How to fix:
Lower bitrate to match stable upload capacity.
Switch to wired Ethernet if possible.
Run a private test stream and verify stability in platform health tools.
Encoding Overload or Rendering Drops
Symptoms:
Encoding overloaded warning appears. Frames are skipped despite stable internet.
How to fix:
Reduce output resolution first.
Lower frame rate if needed.
Simplify scenes and overlays during testing.
Gradually reintroduce complexity once stable.
Playback Buffering for Viewers
Symptoms:
Viewers experience buffering even when OBS looks stable.
How to fix:
Check Stream Health in YouTube or Twitch Inspector.
Review latency settings on YouTube.
Confirm upload stability using a streaming speed test.
Conclusion
Live streaming gives you only one chance. If your stream breaks, viewers leave. Run your stream test, check your streaming speed test results, review platform health, and adjust your settings before you go live.
Once your stream is tested and stable, you can connect your encoder to OneStream Live using RTMP. Now you can send the same tested stream to multiple platforms from one place. One setup. One tested stream. Wider reach.

FAQs About Stream Testing
Testing helps catch audio, video, internet, and platform issues early, so your live stream does not fail in front of viewers.
You should test at least 24 hours before the event and again 30–60 minutes before going live to catch last-minute issues.
Always test audio clarity, video quality, internet stability, stream destination settings, and overlays or graphics.
A private or unlisted test stream is best because it lets you test everything without confusing or disappointing your audience.
No test is perfect, but proper testing dramatically reduces the risk of crashes, sync issues, and platform-side failures.
OneStream Live is a cloud-based live streaming solution to create, schedule, and multistream professional-looking live streams across 45+ social media platforms and the web simultaneously. For content-related queries and feedback, write to us at [email protected]. You’re also welcome to Write for Us!