Streaming to YouTube via OBS Studio requires configuring a local compositor to handshake with YouTube’s RTMPS or HLS ingest servers. While OBS Studio offers granular control over bitrate, scenes, and audio mixing, its default settings often rely on legacy H.264 codecs that waste bandwidth.
For 2026, the workflow has evolved: creators now prioritize vertical canvases for Shorts integration, utilize HEVC for bandwidth efficiency, and deploy cloud-based redistribution to bypass local upload bottlenecks. This guide details the technical configuration for a high-fidelity YouTube broadcast, from requesting API access to optimizing Keyframe Intervals for OneStream Live’s ingest.
Before jumping into OBS streaming, let’s first get your YouTube ready to work with the software.
If you haven’t streamed on YouTube before, you’ll need to request access to YouTube streaming.
To do this, you need to access YouTube from your browser and then click the “Create” button with a “+” icon.
After this, it’ll take you to this page:
After you request access, you’ll be prompted to a page for phone verification. Once you verify with your phone number, you will get a 24-hour countdown before you can go live.
These video encoders, like OBS, continuously release new updates to ensure compatibility with the platform requirements and bug fixes. Make sure you’re running the latest version to keep your stream smooth.
Your upload speed matters for keeping the streaming smooth. How much upload speed you need depends on the resolution and frame rate of your stream. Here’s what YouTube Live recommends for upload speed:
| Resolution / Frame Rate | Recommended Bitrate (H.264) | Recommended Upload Speed |
|---|---|---|
| 4K / 2160p @60fps | 35 Mbps | 65 Mbps |
| 4K / 2160p @30fps | 30 Mbps | 55 Mbps |
| 1440p @60fps | 24 Mbps | 45 Mbps |
| 1440p @30fps | 15 Mbps | 30 Mbps |
| 1080p @60fps | 12 Mbps | 25 Mbps |
| 1080p @30fps | 10 Mbps | 20 Mbps |
| 720p @60fps | 6 Mbps | 12 Mbps |
| 240p–720p @30fps | 4 Mbps | 8 Mbps |
Note: If you are using OneStream Live, you only need the bandwidth for one high-quality upload (e.g., 10 Mbps), regardless of how many destinations you reach. This is your primary bandwidth advantage.
Once you’re done with everything above, it’s time to learn how to stream on OBS for YouTube.
There are two ways to connect your YouTube account to OBS for streaming.
1. Using the YouTube Stream Key for OBS (Manual Method)
This is the classic and most used method. To connect your YouTube stream key with OBS, follow these steps:
You’ll get 2 main YouTube server options in OBS labelled as:
Primary YouTube Ingest Server: This is the main server you stream to.
Backup YouTube Ingest Server: This is a fail-safe server, and it’s only used if the primary server fails. You use this server if you’re streaming important events like launches and webinars. So if your first primary server goes down for some reason, the encoder sends the same stream to the backup server for an uninterrupted experience.
In this guide, we’ll use the primary server. After you choose the server, you’ll get the option “Use Stream Key” like shown here:
After you click the “Use Stream Key” button, you’ll get a box to paste your YouTube stream key like this:
You can manually get the key from YouTube Live Control Room, or you can simply click here in your OBS:
This will take you to the YouTube Studio to get your stream key. Once you’re redirected to YouTube, you can copy your stream key from here:
Copy and paste your stream key into your OBS, and now you’ve connected the encoder with YouTube.
Before going live, you can change your stream details like Title, Category, Thumbnail, and Privacy settings from here:
2. Stream via YouTube Account (OBS YouTube Integration Method)
This is a faster and recommended method for people who just want to go live quickly.
In your OBS stream settings, you simply need to click on “Connect Account” like shown in the snapshot:
After this, you’ll be prompted to connect your Google/YouTube account and authorize it for OBS. Once done, you’ll see your account connected as:
You can change your stream details like Title, Category, Thumbnail, and Privacy settings from here:
With these two methods, you know now how to connect OBS to YouTube easily.
Now that we’re connected OBS with YouTube, let’s adjust OBS settings for YouTube streaming. We’ll adjust two types of settings in OBS: Output settings and Video settings.
For output, you can go to File > Settings > Output, and you’ll see these settings:
For Video, you go to File > Settings > Video, and you’ll see these settings:
You can apply the following OBS YouTube streaming settings to your desired stream quality:
For Standard Quality – 480p
High Quality (HD) – 720p
For Full HD – 1080p
For Ultra (QHD) – 1440p
Once you’ve applied settings for your desired output quality, hit apply and come back to the main interface.
Scenes
Scenes in OBS basically let you switch between what you choose to show on your stream. Scenes are connected to your sources. For example, if you’re casually gaming and interacting with your fans, you can create two scenes:
Scene 1: For game capture
Scene 2: Chat window to interact with your audience
You can add as many scenes as you want from here:
Sources
OBS allows you add specific sources for capture. You can capture a specific window or the entire screen. Here’s how to do this:
Under the sources window, click the “+” icon to add a capture source like this:
You’ll get this list:
Choose the name of the source for future streams:
Choose “capture specific window” (recommended if you keep minimizing)
Note: If you’re going with “capture specific window,” make sure you have that application opened, or it won’t appear in the list.
Then, from the “window” dropdown list, choose the game/application you want to stream:
All set, you’re done setting up your scenes and sources for the stream.
With short-form content on the rise, specifically considering YouTube Shorts, creators now focus on both horizontal and vertical format streaming. The good thing about OBS is that its functionality can be extended with plugins. You can use the Aitum Vertical plugin for horizontal and vertical canvases at the same time from a single instance. It will help you achieve:
To enable this plugin, you need to:
After installation, you’ll get a list of new options in the Docks dropdow,n like:
The vertical preview will appear alongside the main screen preview. You’ll find it with controls like:
Poor stream audio just puts everything else in the backseat. That’s why audio settings are as important as video. Here are some quick audio settings you can apply to improve your stream’s overall quality.
Enable “Audio Mixer” by clicking the option “Docks” in the menu bar and checking the “Audio Mixer” option, like this:
Then, you’ll get this window for audio settings:
To improve your microphone output, you can click the “three dots” icon:
Go into the filters:
Open the filters list:
Apply the following filters:
Here’s what they do:
Compressor: It helps to even out the volume level of your choice so loud noises don’t scare your audience, and quiet noises can be heard easily.
Gain: Choose this one if your microphone capture threshold is way too low; gain boosts the microphone capture and ensures you’re always audible.
Noise Gate: This filter cuts out any audio below a threshold. This is perfect to avoid capturing any background noise when you’re not speaking.
Noise Suppression: This prevents your microphone from capturing unwanted background noise like distant chatter, keyboard typing, etc.
Now that you have your visual and audio settings perfected for YouTube, it’s time to go live. Do a final check to ensure everything is in place:
Once you’ve ensured all this, it’s time to go live. You can simply click the “start streaming” button to start your broadcast like this:
A generic stream won’t cut it in 2026, specifically when you have your competitors providing a polished and branded experience. The good part about OBS is that it gives you full control over your stream personalization. Here’s what you can do to make it look more polished for YouTube:
You can add various types of overlays like stream frame/border, lower thirds, alert boxes and social media handles. Make sure you have PNG files with transparent backgrounds for overlay elements.
To add overlays:
This one is important for streamers who constantly interact with their viewers. Thanks to OBS, you don’t have to switch between windows to engage with your audience.
Here’s how to integrate your YouTube chat with OBS:
2. Then go to the YouTube live stream page, and you’ll find a live chat window on the right side like this:
However, if you don’t see it, you can enable it by clicking the stream details “Edit” button. Then, in the Customization section, make sure the Live Chat option is checked.
3. Then click the “Three Dots” option in the chat window, top right, and click “Popout Chat”.
4. Then copy the URL from the chat window and paste it into your OBS Browser Source:
Adjust the width and height to fit your layout.
Adding music and sound effects can uplift the vibe of your stream. Just make sure you don’t use copyrighted sounds. Here’s how you can keep it safe:
Here’s how to add background music in OBS:
If you keep switching between scenes, this one’s for you. Adding transitions between scenes ensures a smooth streaming experience for your viewers.
Here are tips for adding transitions:
Yes, OBS is powerful, but is it easy? No, does it overwhelm new users? Yes. A content creator who needs to focus on consistency can’t keep juggling with countless complex options in the OBS interface. That’s where OneStream Live stands as a smart alternative to avoid all the complexities and just go live with a few clicks. It lives on the web, you’re not download anything, and the best of all? You can broadcast simultaneously to over 45+ platforms, something no OBS plugin or extension can achieve on its own.
Here’s how easy it is to go live on YouTube using OneStream Live:
3. Customize your stream with overlays, branding, or tickers
4. Schedule or start the live stream instantly
Most people just add their scenes and sources without caring much about their stream settings that actually matter. In 2026, top streamers are providing quality content with a polished look. Therefore, to compete and engage your audience, you need to ensure the right settings are in place with thoughtful personalization.
Once you know how to stream with OBS, the next step is to scale up your content strategy. While OBS does give you flexibility, it comes with limitations. What if you could send the same OBS polished stream to more than one platform? That’s exactly what OneStream Live does for you. You can stream to 45+ platforms using your OBS perfected stream and engage your audience everywhere.
To stream to the Shorts feed, your canvas must be in a 9:16 aspect ratio (e.g., 1080×1920). In OBS, go to Settings > Video and change the “Base Resolution” to 1080×1920. For a pro setup, use the Aitum Vertical Plugin to stream both horizontal (16:9) and vertical (9:16) simultaneously without running two instances of OBS.
You must strictly set your Keyframe Interval to 2 seconds. While OBS defaults to “Auto” (0), leaving this setting often causes stream instability or “Health” warnings on the YouTube dashboard. If you are sending your stream to OneStream Live, a 2-second interval is mandatory for smooth restreaming to other platforms like Twitch or Facebook.
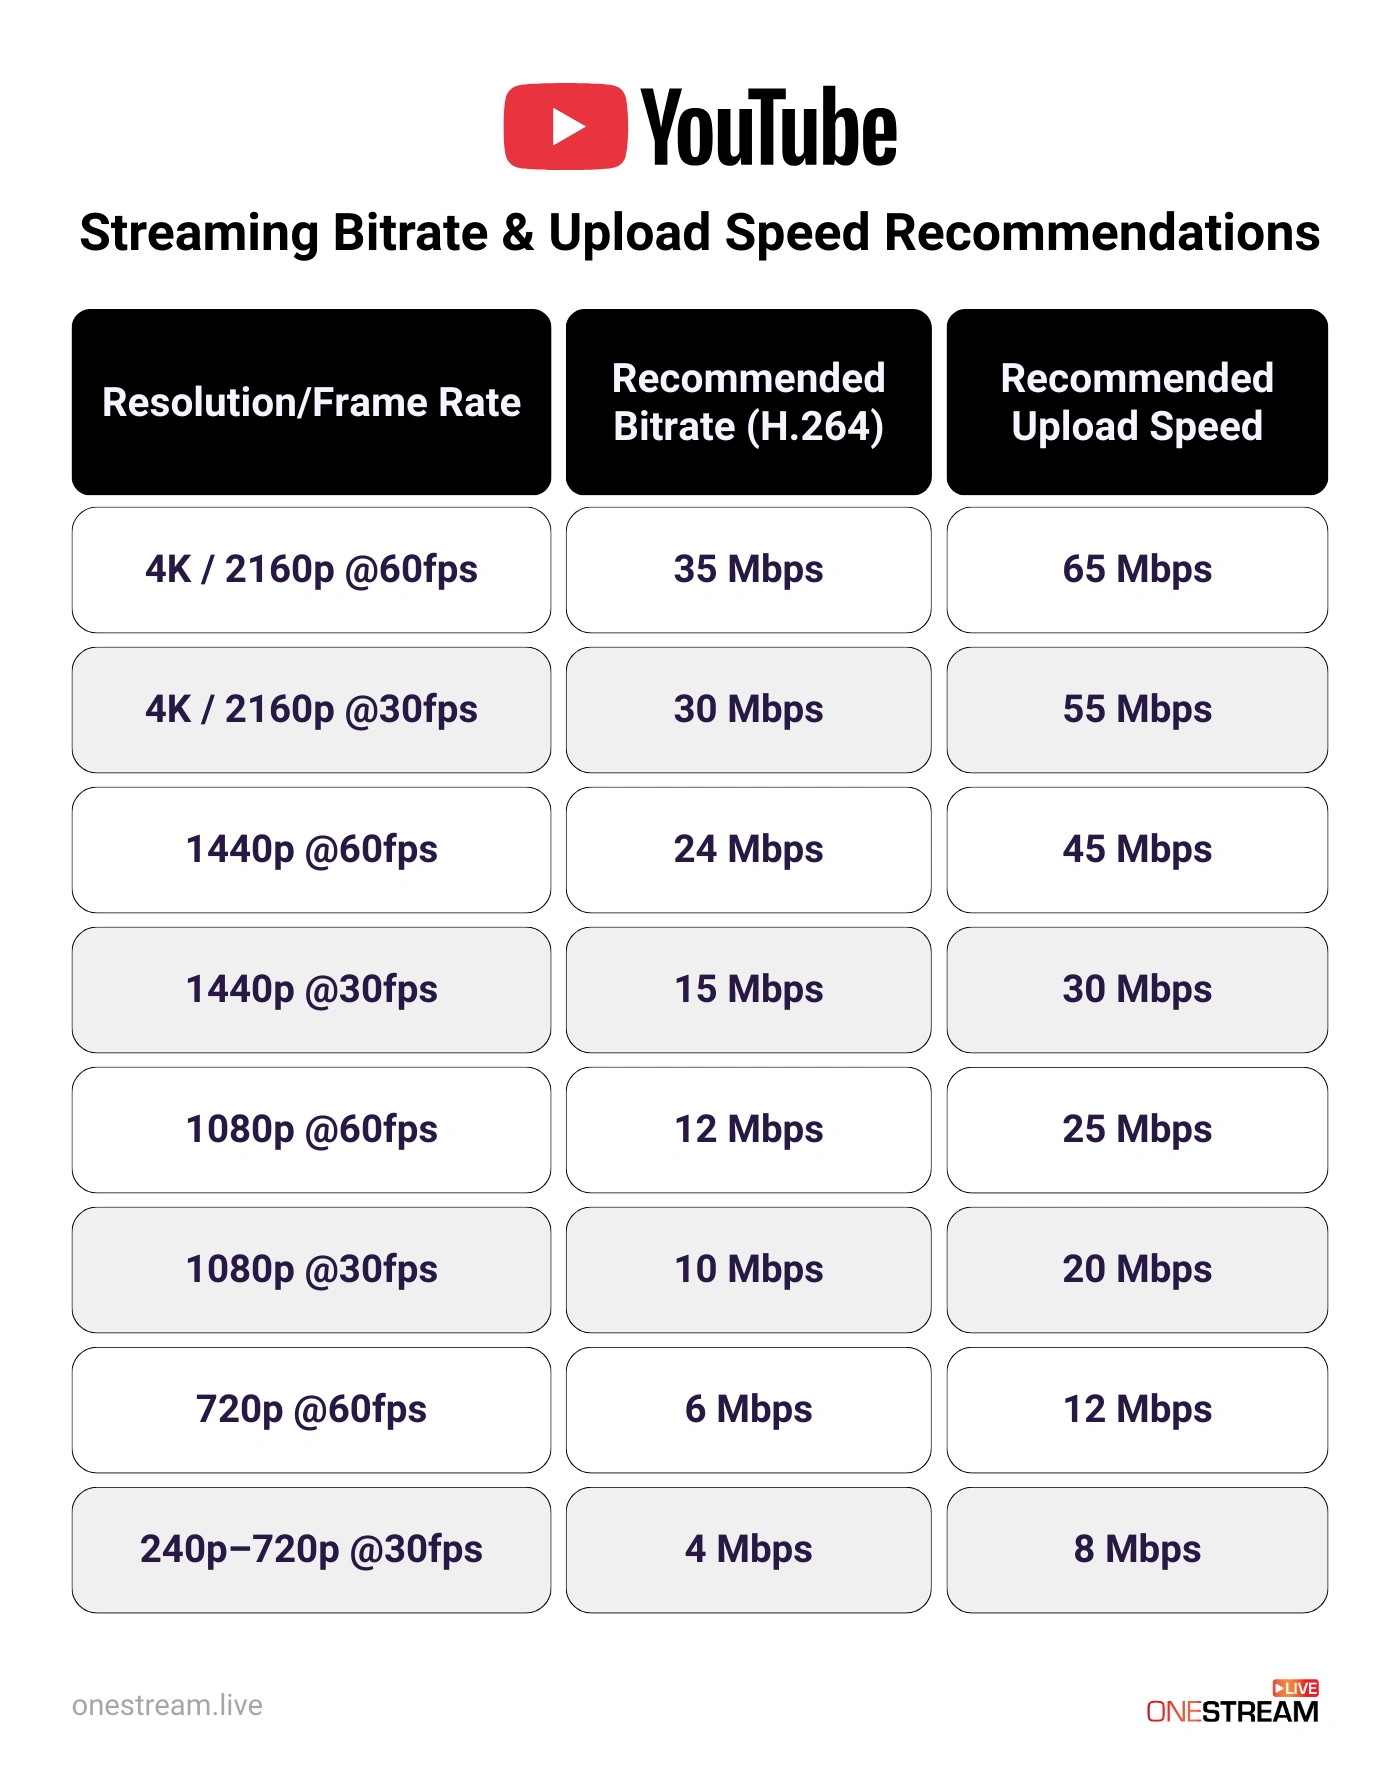
Pixelation usually happens when your bitrate is too low for the complexity of the scene. For high-motion gaming at 1080p60, H.264 requires at least 8,000–10,000 Kbps. To fix this without increasing bandwidth, switch your encoder to NVIDIA NVENC HEVC (H.265), which provides better visual clarity at the same bitrate.
While YouTube supports AV1 ingest directly, most multistreaming destinations (like Twitch and LinkedIn) do not fully support it yet. If you are using OneStream Live to broadcast everywhere, we recommend using HEVC (H.265). It offers superior quality over H.264 and is widely compatible with our cloud transcoding engine.
This error means your PC cannot generate video frames fast enough.
OneStream Live is a cloud-based live streaming solution to create, schedule, and multistream professional-looking live streams across 45+ social media platforms and the web simultaneously. For content-related queries and feedback, write to us at [email protected]. You’re also welcome to Write for Us!
Stay in the Loop