
Over 7 million channels stream on Twitch every month. New streamers need community support to gain momentum. Twitch donations let viewers support creators directly. It helps you grow faster without relying only on ads or subscriptions. Even small contributions can fund better gear or upgrade your stream. Donations also build stronger connections between you and your audience. Viewers feel more involved when they contribute to your growth. This guide shows how to set up donations on Twitch in a few simple steps. Follow these tips to add a Twitch donation button, link PayPal to Twitch, and start earning from your stream.

Learn how to set up donations on Twitch step by step
Use PayPal or Streamlabs to accept donations from viewers
Add a donation panel and button to your Twitch profile easily
Set alerts and goals to increase tips during your stream
Reach more fans and get more support using OneStream Live
Benefits of Twitch Donations for Creators
Donations on Twitch can turn a streaming hobby into a source of income. Here are some of the most beneficial aspects that are listed below and can help content creators:
Direct Support and Income
For many live streamers and especially for new streamers, viewer donations are a primary way to earn income. This extra revenue can help them pay for better gear, games, and streaming expenses. It also diversifies your income beyond Twitch ads, subscriptions or any other revenue streams.
Community Engagement
Twitch donations create a two-way relationship between you and your audience. Viewers feel connected when they tip their favorite Twitch streamer. A donation on Twitch is a fan’s way to say thank you for great content. This strengthens community loyalty and keeps viewers coming back.
Improved Stream Quality
A content creator can reinvest those donations into their channel. You might upgrade your PC, buy a new mic, or add overlays. This leads to better content for viewers. Donations essentially help fund channel upgrades so it is a win-win for you and your audience.
By taking advantage of these benefits, even smaller creators can start growing their channels. Next, we will explore the methods of Twitch donation setup and a step-by-step guide.
Twitch Donation Methods: Bits vs External Donations
Twitch offers multiple ways for viewers to donate or tip streamers. It’s important to understand these options before setting up donations:
Twitch Bits (Cheering)
Twitch Bits are an official Twitch currency for donations. Viewers purchase Bits (e.g. 500 Bits = $5) and “Cheer” in chat to tip you. Cheering triggers special chat badges and alerts.
Note: You must be a Twitch Affiliate or Partner to enable Bits on your channel.
Subscriptions
While not exactly donations, subscriptions are another revenue feature of Twitch. Viewers subscribe monthly to support you and get perks. Twitch shares sub revenue with streamers (typically 50/50 for Affiliates).
Subscriptions are common for larger channels, but donations (one-time tips) often play a bigger role for new or smaller streamers.
External Donation Links
This is the most popular method for new streamers. You create a donation link using PayPal or a third-party service (Streamlabs, StreamElements, Ko-fi, etc.). Then you add a Twitch donation panel on your channel that links to that external donation page.
Viewers click the link to send you money directly. This method works for all streamers (no Affiliate status needed) and gives you full control of donations. We’ll focus on this approach in the step-by-step guide.
Most creators use a mix of these methods. For example, you can accept PayPal tips alongside Twitch Bits.
Now, let’s get into setting up donations on Twitch with a simple step-by-step process.
How to Set Up Donations on Twitch (Step-by-Step Guide)
Setting up Twitch donations is easier than it sounds and you can do it in just a few steps. Follow these steps to add a Twitch donation button to your channel and start accepting tips:
Step 1: Choose a Donation Method
First, decide how you want to receive donations. A simple option is PayPal, since many viewers have PayPal accounts. You can use a PayPal.me link for a quick setup.
Alternatively, you can use third-party tipping platforms like Streamlabs or StreamElements, which provide a dedicated donation page (and extra features like alerts). New streamers often start with PayPal for their donation setup.
Step 2: Create Your Donation Link
If you chose PayPal, set up a PayPal.me link for donations. This is a personal payment URL that directs to your PayPal account. For example, PayPal.me/YourName can be your Twitch donation link. Copy your donation link. We will add it to your Twitch page next.
Pro tip: Use a PayPal Business account for privacy so viewers don’t see your real name on receipts.
Step 3: Add a Twitch Donation Panel
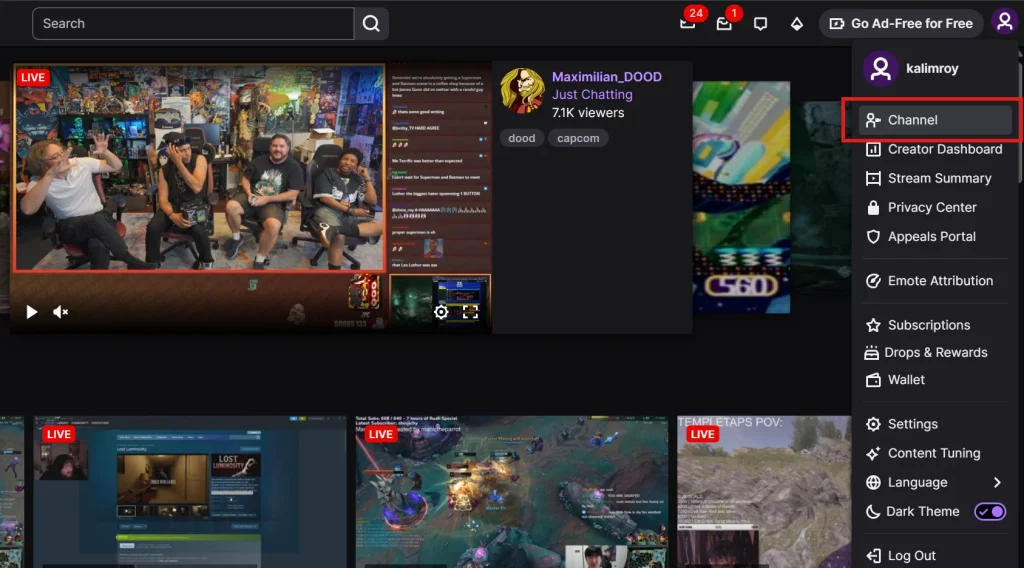
Now, integrate that donation link into your Twitch channel profile. On a computer, go to your Twitch channel page and click the “About” tab.
Toggle the switch that says “Edit Panels” to ON.
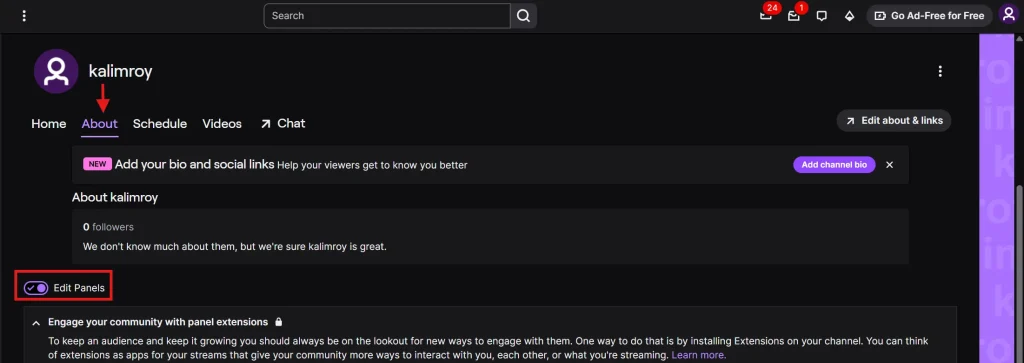
Click the “+” sign and choose “Add a Text or Image Panel”.
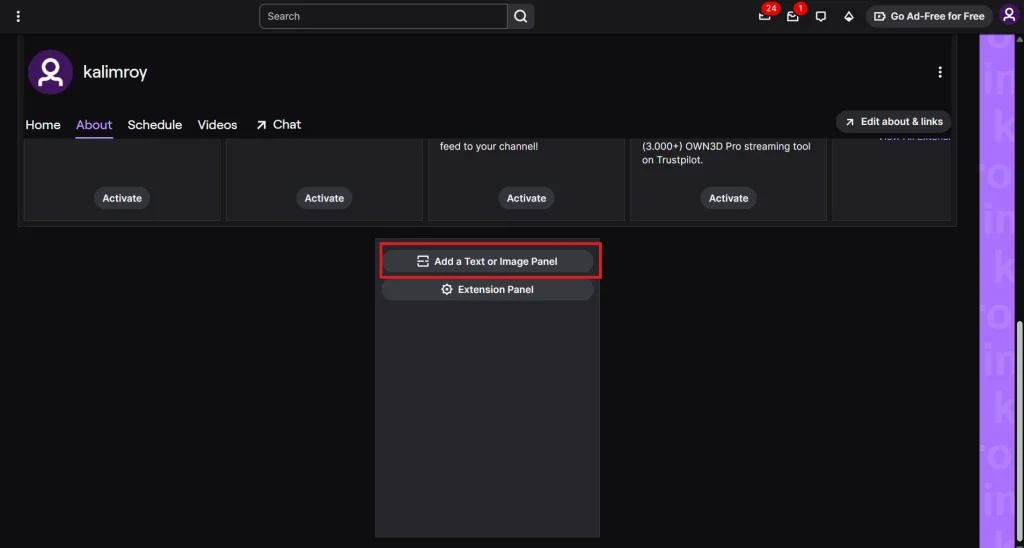
This will create a new panel where you can enter a title, image, description, and a link. Give it a title like “Donate” or “Support the Stream”. In the description or image link field, paste your PayPal.me or Streamlabs donation link.

Finally, save the panel. Your Twitch donation panel (a clickable donation button) will now appear on your channel page for viewers. Above is the screenshot of Twitch’s channel panel editor. It shows where to add a panel title, an image (for a donate button), and your donation link in the description.
Setting up this donation panel on Twitch will provide viewers a clear button to click and donate.
Step 4: Set Donation Alerts (Optional)
Donation alerts aren’t required, but they are highly recommended. Alerts are on-screen notifications that pop up when someone donates. They make donating fun and reward the donor with recognition. You can use Streamlabs or StreamElements to set up an alert widget.
When a donation happens, an alert with your chosen image/sound will play on your stream. This encourages others to donate because they see their name and message acknowledged in real time. Even a simple alert (“Thank you [name] for the donation!”) can boost engagement.
Step 5: Share Your Donation Link
Make sure viewers know about your new donation option. Mention during your stream that you have a donate button. You can also use a chat command (via a bot) that posts your donation link in chat periodically.
Additionally, consider adding the link to your social media bios or YouTube descriptions if you multistream. The easier it is to find, the more likely people will use it. Educate your viewers on how to donate on Twitch by pointing out the donation panel or providing the direct link. Many viewers are happy to support if reminded gently.
Step 6: Test and Thank
Do a test donation yourself (or have a friend try) to make sure that everything works. Once confirmed, you’re ready to receive real donations on Twitch. As donations come in, always thank your donors.
A simple shoutout or on-screen message goes a long way in making donors feel appreciated. Gratitude encourages others to chip in as well. Make donation acknowledgments a part of your stream routine.
By completing these steps, you have successfully completed your Twitch donation setup. Your Twitch donation link is live, and viewers can start supporting you with tips right away.
How to Enable Donations on Twitch Mobile
You cannot add donation panels using the Twitch mobile app. To enable donations, use the Twitch website on a computer. Add your donation panel and link from there. Mobile viewers can tap the donation link on your profile. They can also use the “!donate” chat command.
How to Get Donations on Twitch (Tips for Streamers)
Now you have added the donation button on your channel but simply adding a donation button does not guarantee that viewers will donate to you. You can get donations on Twitch when you engage your audience and encourage them to support you.
Here are some expert tips on how to get donations on Twitch:
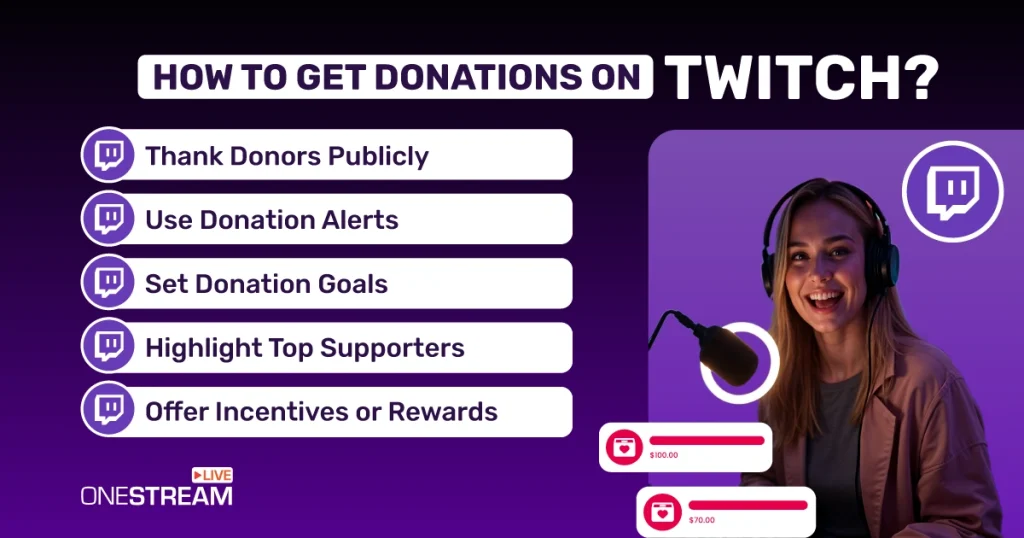
Enable Donation Alerts and Recognize Donors
We mentioned alerts earlier because they are so powerful and you can get more donations. Set up a fun alert notification for each tip. When someone donates, thank them live on stream.
A cheerful shoutout or on-screen message (“New donation from Alex! Thank you!”) makes the donor feel valued. This public recognition often prompts others to donate as well so you create a positive feedback loop.
Set Donation Goals
People love to see progress and be part of something. So you can add a donation goal bar to your stream. As donations come in, the progress bar fills up. Viewers can visually see their contribution helping reach the goal. Goals give viewers a concrete reason to donate.
Highlight Top Donors or Create a “Hall of Fame”
Dedicate a panel or a section on your stream to list top donors or recent donors. For instance, show the username of the highest donor of the day or month. This donation panel acts as a Hall of Fame and provides social proof that others are donating.
New viewers might be inspired to donate when they see a list of supporters. It signals that your channel is worth supporting. It also rewards loyal fans with a moment of fame.
Offer Incentives or Rewards
To make your donors more involved you can offer perks or special content when donation milestones are reached. These fun rewards give viewers an extra reason to contribute.
Explain How Donations Help
Be transparent about why you are asking for donations. Mention in your panel description or verbally on stream how you will use the funds. You can explain that you need it to improve your stream quality, cover living expenses, or donate a portion to charity.
The purpose is to let people know the purpose and it also builds trust. Viewers are more willing to give if they know how their money will be used to improve content or make a difference.
Engage and Build Community
The more connected your audience feels, the more likely they are to support you. Do interactive streams, chat with your viewers, and create a friendly environment. Sometimes simply being consistent and appreciative can encourage viewers to donate without you asking.
As your community grows, the donations often grow with it. Remember, donations on Twitch are a testament to fan loyalty and engagement.
By following these tips, you will not only set up donations but also maximize your chances of receiving support.
Multistream to Reach More Donors
They say two is better than one. Going live on both Twitch and YouTube at the same time gives you a better chance to reach more people. But don’t forget big platforms like Facebook, Instagram, and others. With OneStream Live, you can stream to over 45 platforms at once.
More platforms mean more viewers and more chances to get donations. Some fans prefer YouTube, some use Facebook, and some only watch Twitch. OneStream Live helps you reach them all at the same time, so you can grow your community and get support from more people.
You can even add your own logo, overlays, and backgrounds to make your stream look more professional.
Conclusion and Next Steps
Setting up donations on Twitch can really help new streamers grow. In this guide, you have learned how to set up a donation link, add a Twitch donation panel and encourage support from your viewers. These steps make it easier for fans to support your content. Always remember to stay connected with your community and thank every viewer who sends a tip, no matter how small.
Donations on Twitch can help you turn your passion into a sustainable venture. But don’t stop at just one platform. To truly increase your reach and income you can start multi-streaming with OneStream Live. It’s an effective way to grow your audience across Twitch and beyond. It gives you more opportunities to get donations and more chances to grow and receive support.
Start your streaming journey with the right setup and an open mind for expansion.

FAQs About How to Set Up Donations on Twitch
You don’t need a minimum follower count to accept donations. You can set up third-party tools like PayPal, Ko-fi, or Streamlabs from day one.
Yes, but it takes time. You’ll need a mix of donations, subs, ad revenue, and sponsorships and a consistent viewer base.
It depends. Viewers can donate via Bits (Twitch’s currency) or through third-party tips. Twitch takes a cut of Bits, but third-party donations go directly to the streamer (minus payment fees).
Yes. Affiliates get access to Bits and subs, but you can still accept PayPal or Streamlabs donations without joining the Affiliate program.
Using third-party platforms like PayPal, Ko-fi, or Streamlabs is the easiest and most direct way to do so. Just create a donation link and add it to your Twitch bio or panels.
Nope. You don’t need Twitch verification or Affiliate status to start taking donations through external platforms.
OneStream Live is a cloud-based live streaming solution to create, schedule, and multistream professional-looking live streams across 45+ social media platforms and the web simultaneously. For content-related queries and feedback, write to us at [email protected]. You’re also welcome to Write for Us!