
Why do you make a video? There is always a purpose, and that purpose is to give your audience something they want to watch. We are in a very competitive era where everyone is a videographer. People just open their phone camera and start recording, so the competition is very high. One way to improve your content is by polishing it through video editing. If you are a beginner, this guide will share practical recording and video editing tips that will help you create better videos. Let’s get started on learning how to edit videos that people love to watch.
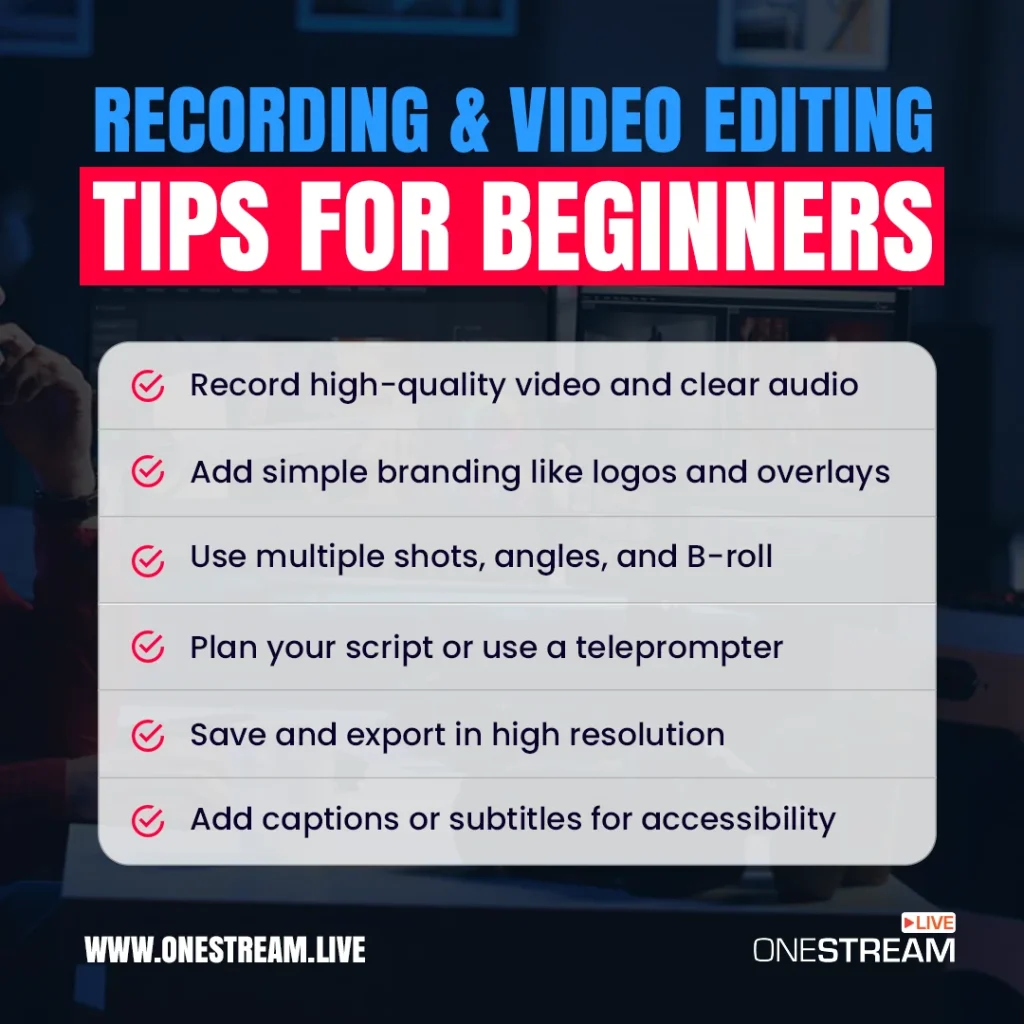
Always record high-quality video and clear audio before editing.
Add simple branding like logos and overlays to give your videos a professional touch.
Use different shots, angles, and B-roll to keep content engaging.
Plan your script and use a teleprompter to stay focused.
Add captions or subtitles to reach more viewers and improve watch time.
Why Are Recording and Video Editing Important?
Video content is everywhere online. Over 500 hours of video are uploaded to YouTube every minute, so simply hitting record and uploading a video is not enough to impress viewers.
Recording video footage is just the first step and good editing transforms raw clips into a complete attention-grabbing story. Every cut, transition, and music track you add can enhance the viewing experience. With practice, even simple video editing techniques can turn an ordinary clip into a polished piece of content.
Great editing also helps you hold the audience’s attention. For example, many YouTube video editing tips highlight that you have mere seconds to hook viewers. Effective edits, such as trimming dull moments and adding subtitles or effects, keep people watching.
In short, editing video content well is crucial for engagement and delivering your message clearly.
Best Recording and Video Editing Tips for Beginners
Below are some of the best recording and video editing tips for beginners. You will learn to prepare high-quality footage and apply finishing touches with these tips.
Follow these video editing tips and tricks to make your videos look professional, even if you’re just starting out.
1. Always Record High-Quality Audio and Video
Good editing starts with good material. Blurry footage or muffled sound is hard to fix, even with advanced editing tools. Always capture the highest quality video and audio you can. Use the best camera and microphone available to you.
This doesn’t require a Hollywood studio; a modern smartphone, a good quality webcam in good light can record sharp video, and an affordable external mic can give clear audio. Also, film in a well-lit, quiet environment to avoid grainy visuals or noisy audio. These simple video tips during filming will save you headaches in editing.
What to Do
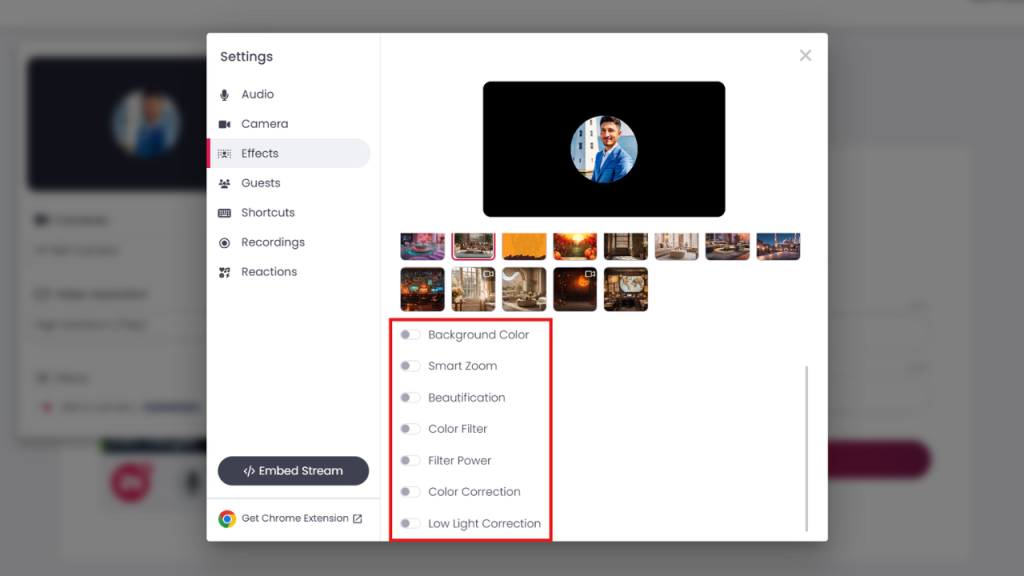
Before you begin editing, make sure your raw footage is top-notch. In OneStream Live Studio, you can easily set up high-quality recordings. Choose your best camera and select a high resolution (720p, 1080p, etc.) for crisp visuals.

Take advantage of built-in enhancements to make your video look great before hitting record. For example, you can apply virtual backgrounds or background blur if your setting is not ideal. OneStream Live also offers filters like color correction, low-light enhancement, and even beauty filters to polish your appearance. Adjust these settings to get a clean, professional look from the start.
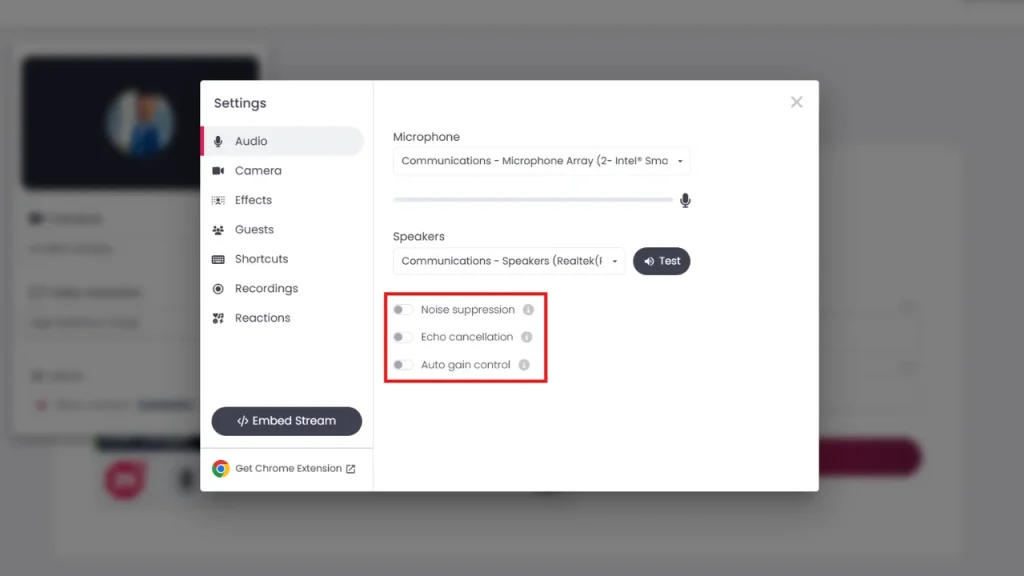
Don’t forget about audio quality as it is just as important as video. Select your preferred microphone in the studio and enable noise suppression to cut background hiss. You can also turn on echo cancellation and auto-gain control for balanced, clear sound.
If you plan to have co-hosts or guests, OneStream Live Studio makes it easy: send them a custom invite link so they can join your recording session.
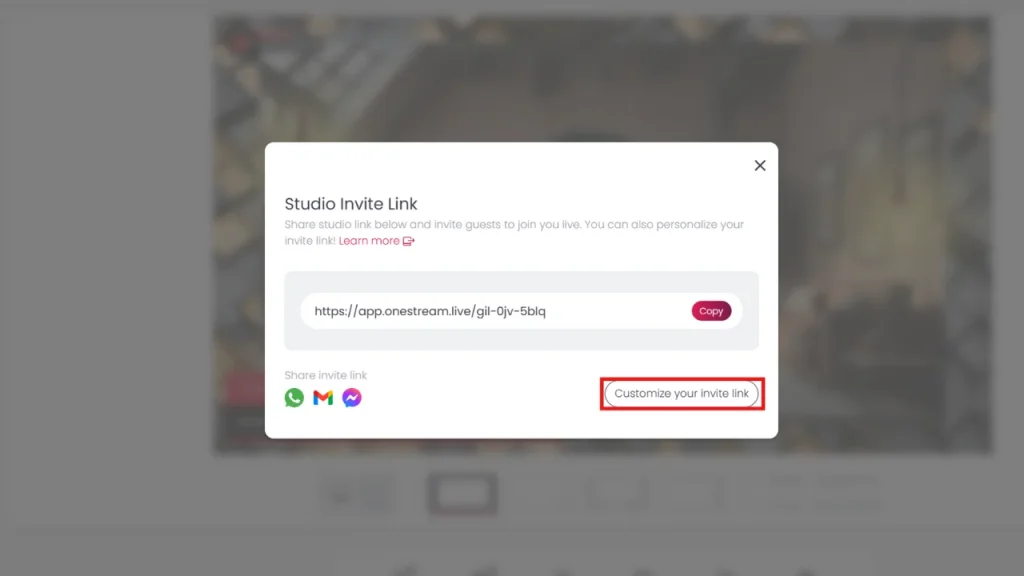
This way, you can record interviews or discussions with multiple people in high quality. Starting with great audio and video footage will make the rest of your editing process much smoother.
2. Add Branding to Your Videos
To look professional, your videos should reflect your brand style. Simple branding elements help a video look polished and professional. Add your logo, use on-brand colors, and include clean overlays or frames. These touches make your content instantly recognizable and more engaging.
For example, many vloggers include a small logo or a consistent banner on their videos. Such vlog editing techniques help create a personal brand. Good branding also gives viewers a more polished and credible impression of your video.
What to Do
OneStream Live Studio makes it easy to apply branding while recording video. In the studio’s design panel, you can add your logo to the top corner of the frame with a couple of clicks.
Upload your own logo image and position it as needed. Next, add backgrounds or overlays to enrich your scene. OneStream Live provides a library of templates for backgrounds, lower-thirds, and frames.
You can choose a professional background image or color, then layer your video over it for a picture-in-picture effect. You can also upload a custom overlay to sit on top of your footage.
These branding tools help your video look more professional and on-brand without needing complicated editing software.
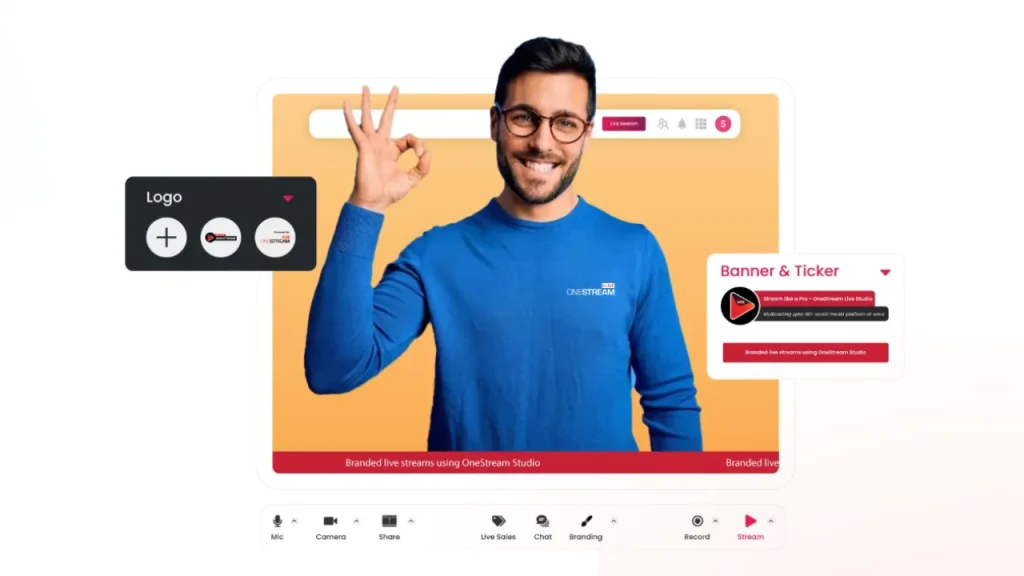
Take a moment to adjust the style to match your theme. Pick fonts and colors for any on-screen text that align with your brand. Consistent branding across all your videos will make them instantly identifiable. With OneStream Live, all these branding features are built-in and easy to toggle on or off, so you can experiment and get the perfect look before finalizing your video.
3. Diversify Your Shots and Angles
Watching a single static shot for an entire video can be boring. Professional videos switch up angles and visuals to keep things interesting.
As a beginner, you might only have one camera, but you can still mix it up. Try shooting from different positions or zoom levels and cut between them during editing. If you’re doing a talking-to-camera segment, consider inserting cutaways (B-roll), such as photos, slides, or screen recordings, to illustrate what you’re talking about.
These techniques make your video more dynamic. Even basic cinematic video editing tips emphasize variety: wide shots to establish context, close-ups for detail, etc. Mixing in a few angles or visual elements will greatly boost viewer engagement.
What to Do
OneStream Live Studio supports multicamera and media sharing, which helps you add variety to your video. You can connect up to four camera sources simultaneously.
For example, use your laptop webcam as one angle and your phone or another camera as a second angle. With two angles, you can switch views (wide shot vs. close-up) to make your video more lively. OneStream also lets you share external media during a recording.
Use the Share option to add images or video clips into your session which is perfect for inserting charts, photos, or any cutaway footage. You can even share your screen to walk viewers through a presentation or demo.
Additionally, you can upload background music or other audio to play underneath your narration. All of these media sources can be managed right in the studio.

OneStream Live Studio simplifies this by letting you switch cameras or media live while recording. By diversifying your shots and content, you’ll produce a more engaging video that holds your audience’s attention.
4. Use a Teleprompter or Script for Guidance
One big challenge in video editing for beginners is dealing with footage that drifts off-topic. It’s easy to hit record and then forget what to say next. Working from a script or outline can save you time and result in a tighter final video.
Before you start recording, outline the key points or write a full script, especially for your introduction and conclusion. A well-thought-out plan helps you stay on topic and avoid unnecessary tangents.
Remember, online viewers have short attention spans. If your video doesn’t get to the point quickly, they might leave. In fact, experts often cite that the first 15 seconds of a YouTube video can make or break its success. Planning your content make it sure you deliver a clear message from the start.
What to Do
Take advantage of OneStream Live Studio’s built-in teleprompter feature. This tool lets you have your script rolling on-screen as you record, so you never miss a beat. Prepare your script or bullet points beforehand.
When you enter OneStream Live Studio, click on the “Prompter” and paste in your script text. You can adjust the scrolling speed and font size to your comfort. Then hit “Play” on the teleprompter when you begin recording.
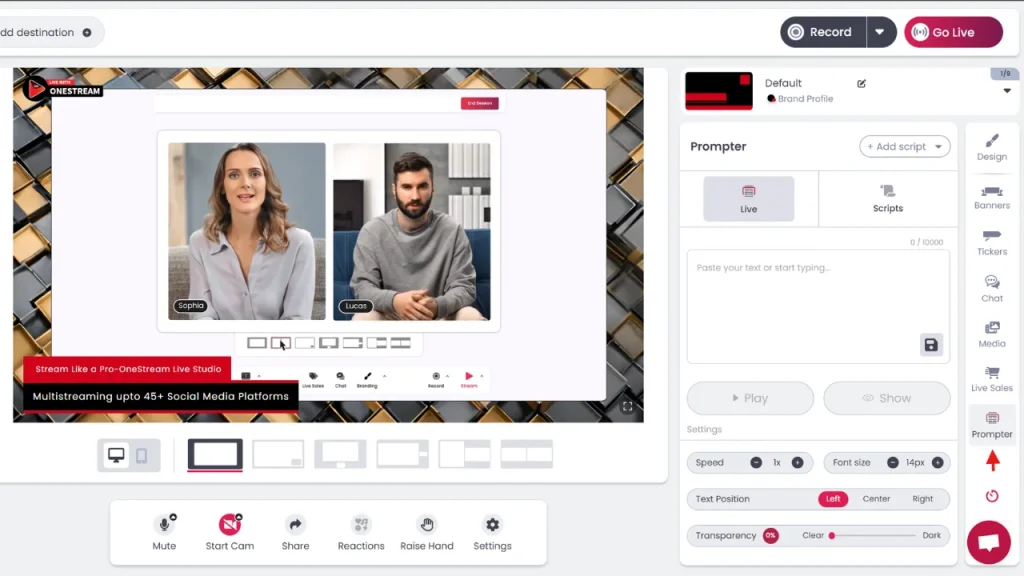
Now you can speak naturally while glancing at the script on your screen. This keeps you on track without obvious pauses or “ums.”
By using the teleprompter, you can confidently deliver a strong hook at the beginning and cover all your planned points. The result is a more coherent video that needs fewer edits later.
Good planning and using a teleprompter is arguably the best way to learn video editing fundamentals and as a result, you’ll have cleaner footage to work with, and “fixing it in post” becomes much easier.
5. Record and Save Your Video
After prepping everything (quality setup, branding, multiple angles, script ready), it’s time to hit record. Capturing your video properly is crucial so that you have footage to edit or share. As a beginner, it’s normal to redo a few takes but try to get a solid take you’re happy with from start to finish.
Once recorded, you should save or export the video in a high-quality format. This way you can either do additional edits in another software or proceed to publish it. The goal is to have a final cut of your video ready to go.
What to Do
In OneStream Live Studio, recording your session is very straightforward. When you’re ready, click the Record button. The platform will start capturing your live session including all cameras, media, and any on-screen elements you’ve set up. Perform your presentation or scene as practiced. If you make a small mistake, keep going (you can trim it out later), or stop and start again if needed.
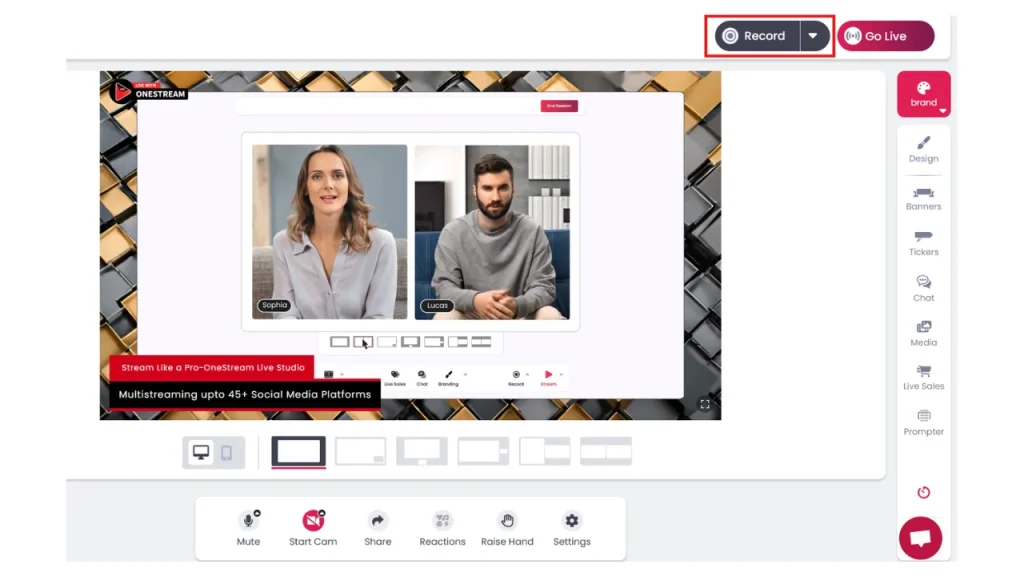
When you finish, click the record button again to stop. The recording is now saved to your OneStream Live account. You can find it in the My Recordings section of the dashboard. From there, you can download the video file to your computer. OneStream Live saves it at the quality you streamed/recorded.
Downloading the recording lets you perform any extra edits you might want in editing software, or you can directly use it for the next step (captions or streaming). By recording through OneStream, you make sure that all the elements (multiple angles, etc.) are already combined into one polished video file, which is a huge time-saver in the editing process.
6. Add Captions or Subtitles
Adding captions (subtitles) to your video is a smart finishing touch. Captions make your video accessible to a wider audience. Many people watch videos on mute, especially on social media, so having text on-screen is important today so they still get your message. Captions also help viewers who are not fluent in the video’s spoken language, and they help the hearing-impaired.
From an engagement perspective, captions can increase watch time. The viewers are more likely to continue watching if they can read along when audio isn’t available. Overall, subtitles give your content a professional feel and greater reach.
What to Do
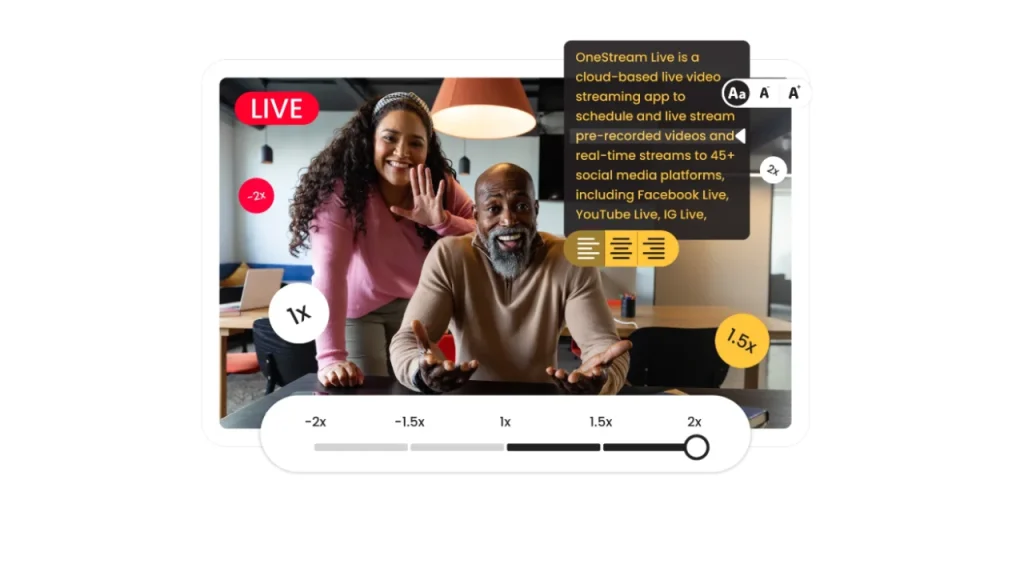
OneStream Live makes it easy to add captions to your videos. After recording, go to your OneStream dashboard and upload your video as a pre-recorded stream. Once the video is uploaded, click the options menu (the three dots ⋮ next to your video) and select “Captions & Subtitles.”
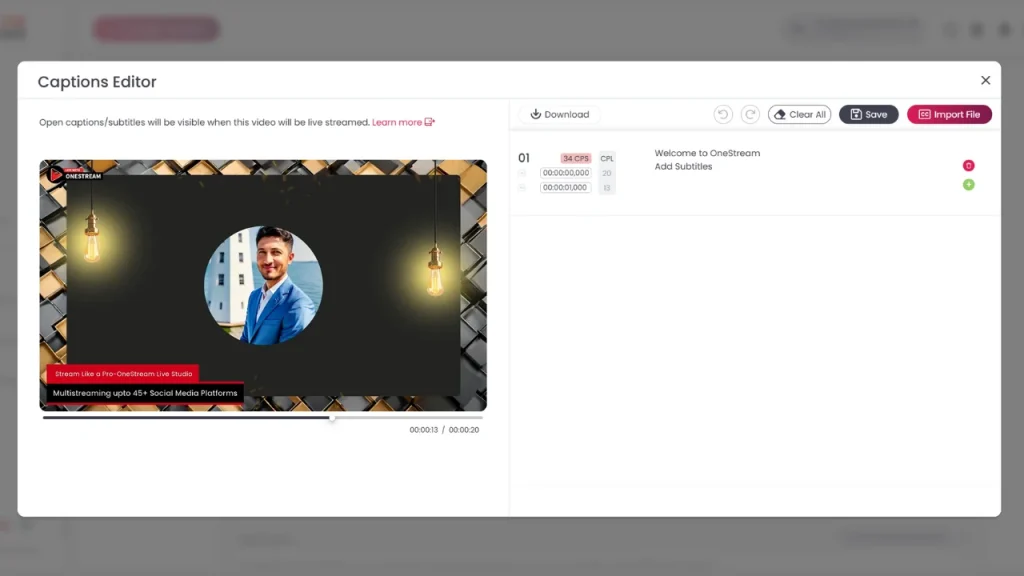
OneStream lets you either upload an existing subtitle file (in SRT format) or manually type captions for each segment of your video. If you have a script, you can create an SRT file using that text and import it; this will automatically sync captions with your video timing.
If not, you can use OneStream Live’s interface to play the video and type in captions at the right times. It’s a straightforward process guided by the tool. After you add captions, save them.
Now you can either download the video with captions burned-in or proceed to stream it. By completing this step, you make your video more viewer-friendly and professional.
7. Multistream to All Your Platforms at Once
Editing and producing a great video is only part of the journey – you also want people to see it! One of the pro video editing moves is to publish your content widely without extra effort.
The Majority of successful live streamers do multistreaming. Multistreaming means broadcasting your video live to multiple platforms simultaneously.
If you have followers on YouTube, Facebook, Twitch, etc., you can reach all of them at the same time with one stream. This maximizes your video’s exposure and saves you from uploading or going live separately on each platform.
Living in the age of social media makes this incredibly valuable. You’ll get more viewers and engagement by being everywhere your audience is. Multistreaming essentially turns one edited video into content for many channels at once.
Final Thoughts
Creating great videos is a learning process. As a beginner, start with these fundamental recording and video editing tips and use tools like OneStream Live Studio to simplify your workflow.
The platform’s features for recording, branding, multi-camera, teleprompter, captions, and multistreaming cover every step from production to publication. By practicing these skills, you will learn how to make an edit in the most effective way. In fact, the best way to learn video editing is to practice consistently with your own projects.
Remember, video editing for beginners might seem challenging, but each project you complete will build your confidence. Soon you’ll be ready to explore more advanced techniques.
As you gain experience, you can move on to creative effects and more pro video editing styles. For now, focus on telling a clear story and making your videos enjoyable to watch. With the tips and OneStream Live features outlined above, you have everything you need to polish your videos and share them with the world. Good luck, and happy editing!

FAQs - Recording and Video Editing Tips for Beginners
Pick software that records in HD, supports clear audio, easy setup, branding options, captions and offers editing tools. OneStream Live gives you all of these plus multistreaming in one platform.
The essentials are trimming clips, arranging them on a timeline, adding transitions, adjusting audio, and exporting in the right format.
Always start by organizing your files and footage before opening your editing software—it saves endless frustration later.
Practice by editing short clips regularly, experimenting with different tools, and recreating simple projects you admire.
Most people can grasp the basics within a few weeks of consistent practice, though mastery takes much longer.
OneStream Live is a cloud-based live streaming solution to create, schedule, and multistream professional-looking live streams across 45+ social media platforms and the web simultaneously. For content-related queries and feedback, write to us at [email protected]. You’re also welcome to Write for Us!