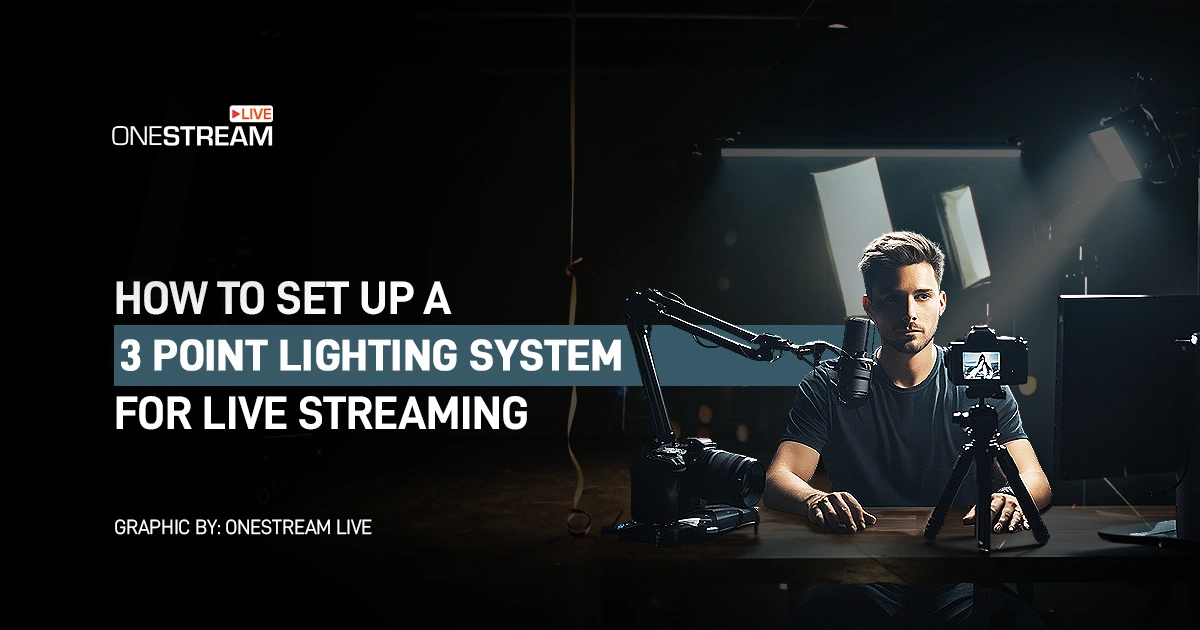
You’ve likely seen a YouTube video or a Twitch stream with perfect lighting in the background where subtle lights add depth, and the host still remains highlighted. Every content creator knows the importance of lighting in content creation. It instantly adds a good cinematic feel to your videos and turns your gaming setup or bedroom into a professional studio. This often brings the question to content creators’ minds: how to achieve this visually appealing look? This setup is called 3 point lighting system.
No matter the type of content you stream, be it video games, podcasts, or educational content, mastering this lighting technique can dramatically improve how you look on camera.
- 3-point lighting improves live stream quality by creating balanced, professional-looking visuals.
- Each light serves a purpose: key light for exposure, fill light for shadows, and backlight for depth.
- Modern streaming uses RGB and mood lighting to enhance backgrounds and add personality.
- Proper placement matters more than expensive gear.
- Small adjustments make a big difference in your final on-camera look.
What is a 3 Point Lighting Setup?
It’s basically the strategic placement of three light sources in your room or studio. Each light serves a purpose, and their positions control how the subject/host is highlighted. Learning how to position these three lights is essential because they cover all the necessary elements in content creation. This setup in place lets you achieve a vibrant, diverse and sharp look for a film, video or photography.
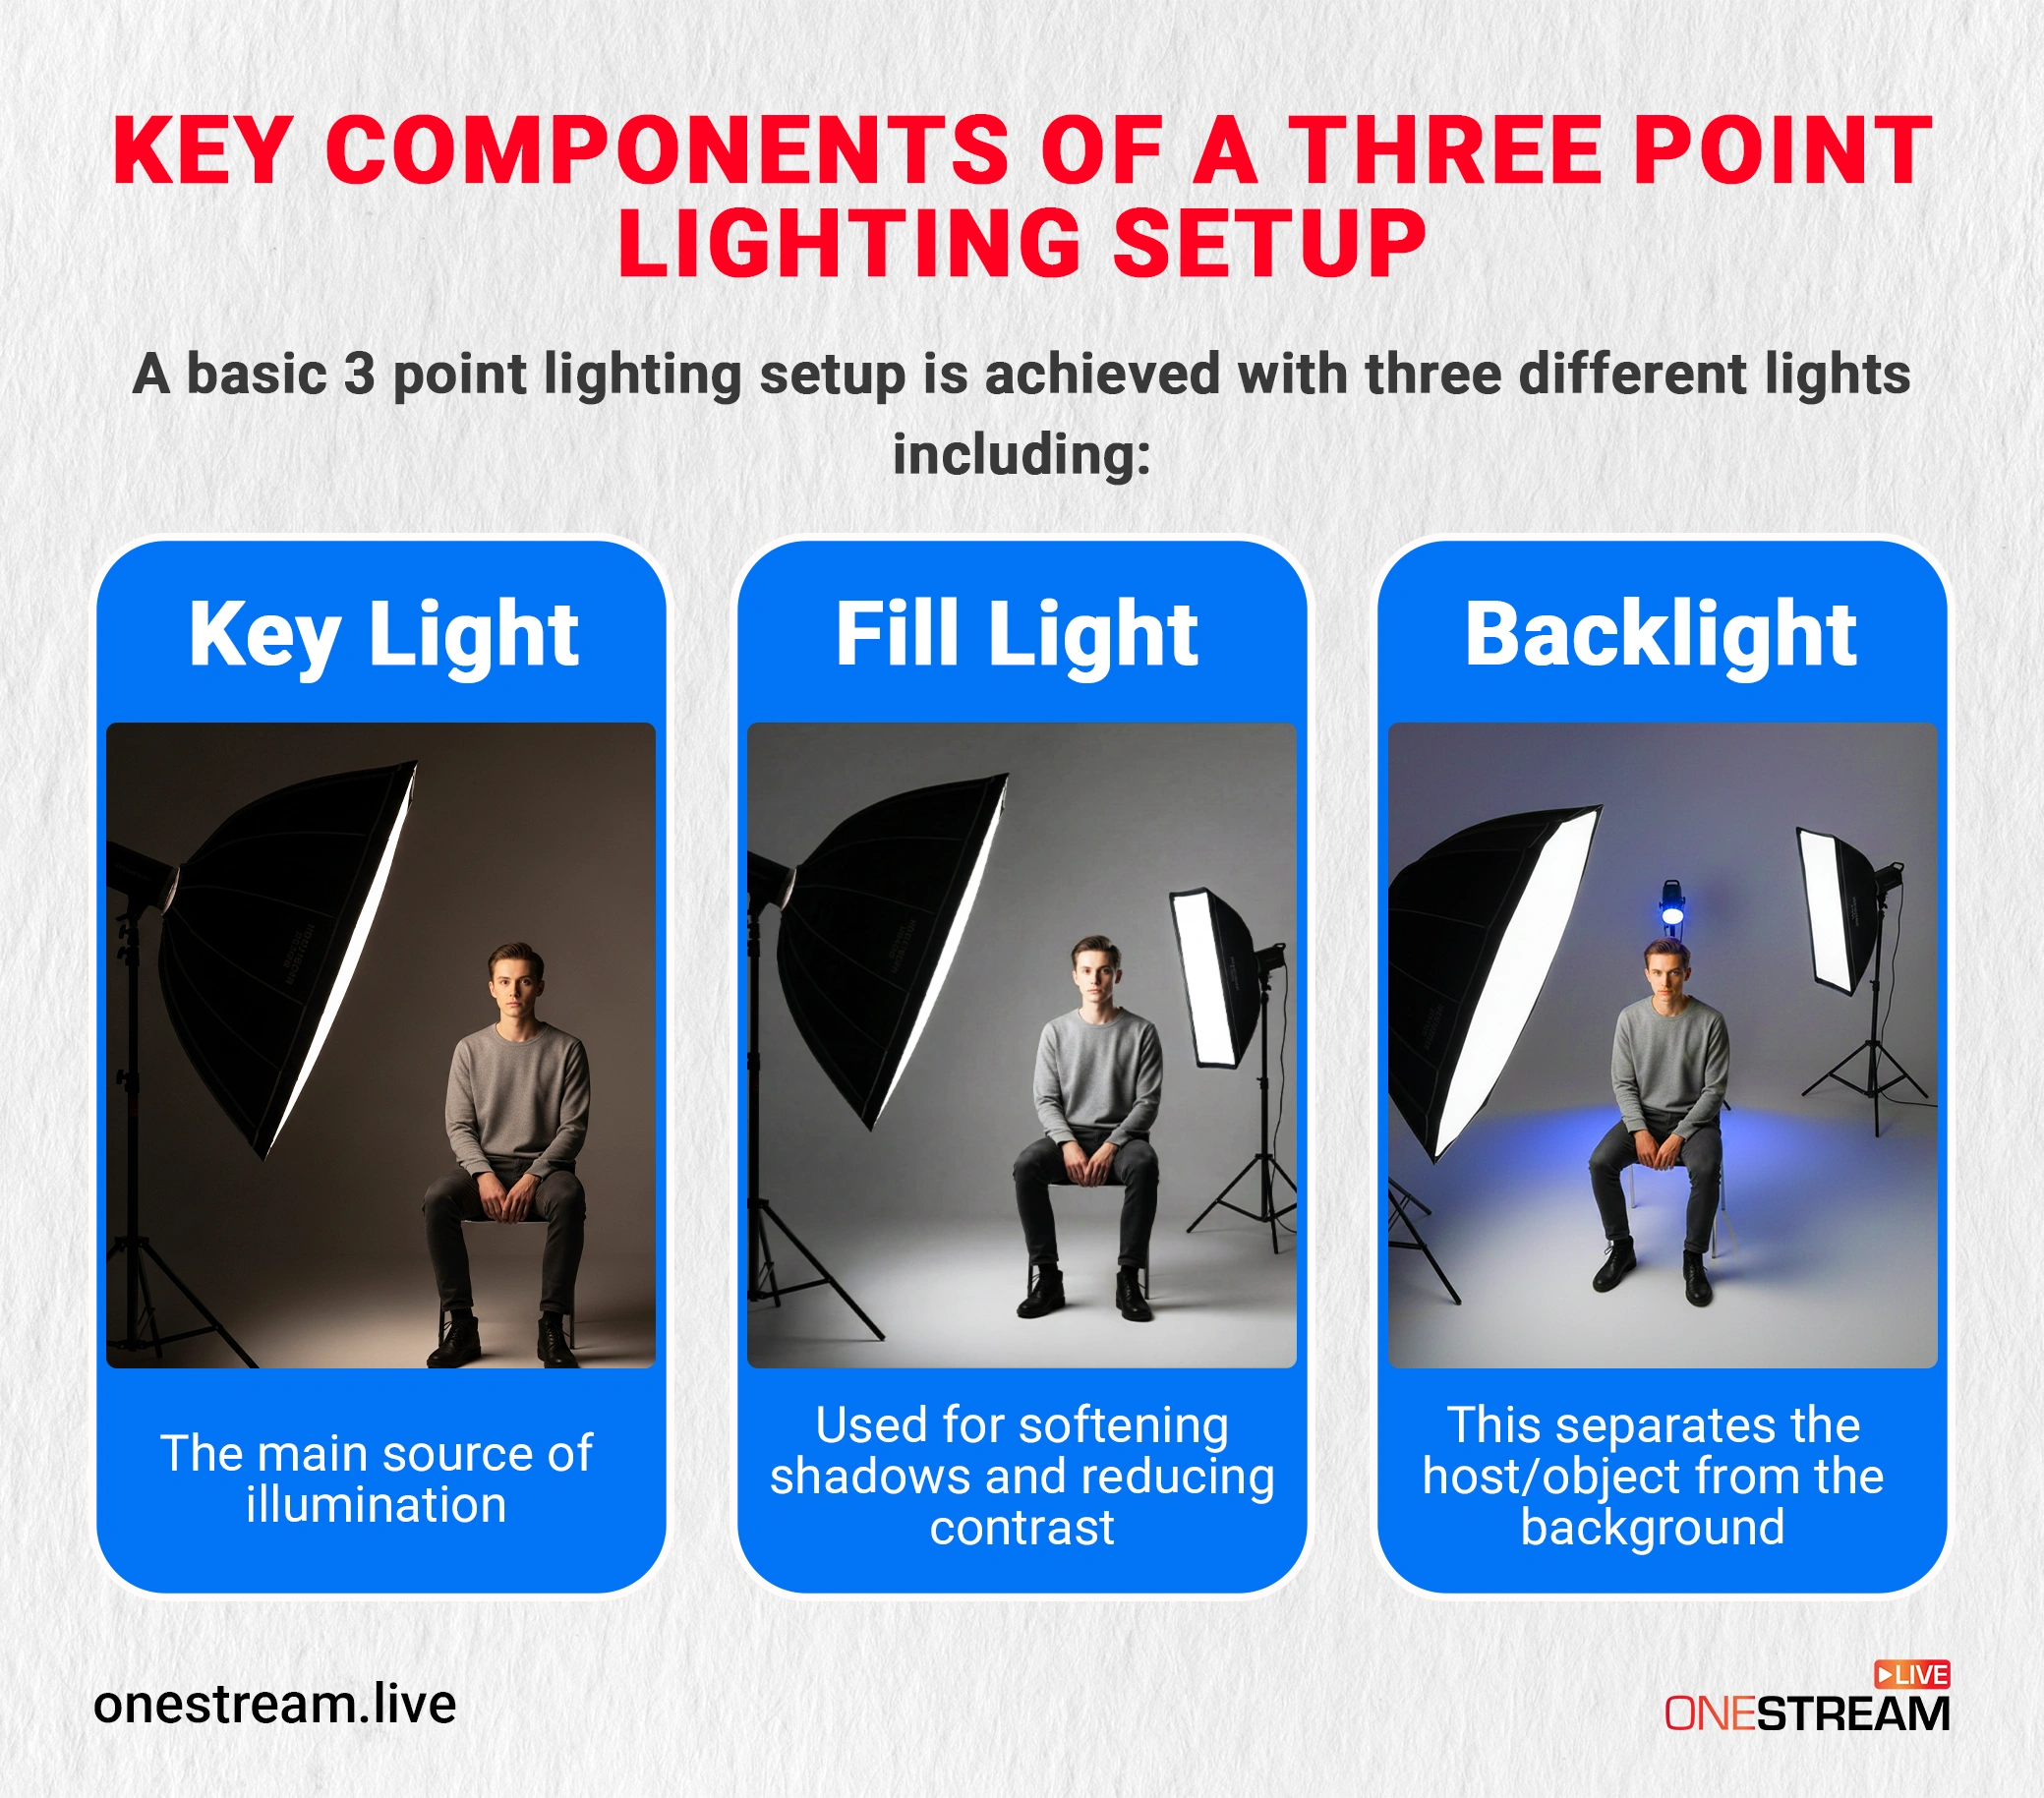
Key Components of a Three Point Lighting Setup
A basic 3 point lighting setup is achieved with three different lights, including:
- Key Light: The main source of illumination, it’s the brightest light in the setup.
- Fill Light: Used for softening shadows and reducing contrast.
- Backlight: This separates the streamers from the background.
1. Key Light: The Main Light
This is the light that sets the tone for the scene, it adjusts your exposure and helps you highlight the subject’s features, defines the mood and focus of your scene. Specifically for live videos, this light is important for creating depth and clarity.
2. Fill Light: Softening Shadows
The fill light complements the key light by reducing the shadows and softening the contrasts. With this light, you get a three-dimensional appearance without flattening the subject. In live sessions and photography, this light ensures that details aren’t lost in shadow while keeping the scene balanced.
3. Backlight (Hair Light):
The backlight, also known as hair light, is the one that separates the subject from the background. This also adds depth and highlights the outline of the subject while preventing a flat or two-dimensional look. It’s important for studios or rooms where you want the subject to stand out from the background.
How to Set up 3 Point Lighting: Step-by-Step Guide
Now that you are familiar with each light, let’s learn how to adjust them for your streaming setup. Before we move to actual steps, here are some expert suggestions to keep in mind:
- A recommended location for a 3-point lighting system is a dark room with dark walls or controlled backgrounds.
- Make sure you’ve got enough space available because keeping the lights too close together will lead to harsh shadows.
- Your key light should be in front of the subject with at least a 3 feet distance. Make sure the key light is pointed towards the subject’s face. Ideally, keep 3 feet of distance. If you are at a desk against a wall, use a rim light or LED strip instead.
- Keep playing with the adjustments until you get them perfect.
Here’s a detailed breakdown to get every light adjusted for the best visuals.
Key Light Adjustment
The other two lights would be less effective without the presence of a key light; placing the key light properly is crucial.
Placement
Put the light in front of the subject, slightly off to the right or left. Directly in front can look flat. If using a Ring Light, ensure it is diffused; otherwise, place your panel light at a 45-degree angle. You don’t want that. On the flip side, if it’s placed too far to either side, it may cast half of the subject’s face in shadow.
The correct placement of this light is subjective; in some settings, extreme looks are appropriate, too. However, what has proven to be effective for a general lighting setup is a slightly angled placement.
What Do You Need
- Softbox lights are ideal for key light because they diffuse light evenly and create soft shadows.
- LED panels are also perfect, they come with adjustable brightness, color temperature and with a minimal heat output.
Fill Light Adjustment
With the key light in place, the subject’s one side will be well-lit, but the other will remain in shadow. That’s exactly why we use fill light, it addresses the harsh shadows. So, key light and fill light both go hand-in-hand.
Placement
The position for this is simple: your focus while adjusting should reflect the placement of the key light. It should be on the opposite side of the subject’s face. For example, if your key light is in front and to the right, the fill light should be positioned in front and to the left.
What Do You Need
- Ring lights are commonly used in streaming setups as they provide an even and soft illumination.
- If you’re looking for a cost-effective option, go for reflectors. Reflectors bounce light from the key light back onto the shadowed side of the face.
Backlight Adjustment
This one is the final piece to complete your lighting setup in the studio. It holds a lot of potential in making your content and live videos far more appealing.
Placement
The backlight goes behind and slightly above or to the side of the subject.” (If it is directly behind, your body blocks it.) It’s placed to provide brightness and form a halo of light around the subject. People often question the use of this light. This light is important because it separates the subject from the background and brings the spotlight on the subject to grab the viewers’ attention.
What Do You Need
- Go for LED strips behind the desk or along the wall to get a subtle background separation.
- RGB tubes are also used as background lights in streaming setups to add color and mood in the stream.
RGB & Mood Lighting (Going Beyond 3 Lights)
3-point lighting is the foundation of your lighting setup. Modern streamers further enhance the visual appeal of their setup by utilizing the RGB and mood lights. You can add LED strips, light panels, and RGB tubes from Nanoleaf or Govee and start playing with them. Here’s why you shouldn’t skip RGB and mood lights:
- Adds depth and separation beyond standard backlighting.
- Creates a visually engaging and modern look.
- Helps reinforce personal branding or stream themes.
- Prevents the background from looking flat or dull.
Unlike key and fill lights, RGB lights are not meant to illuminate the face. Instead, they work best when used subtly in the background to complement the main lighting setup.
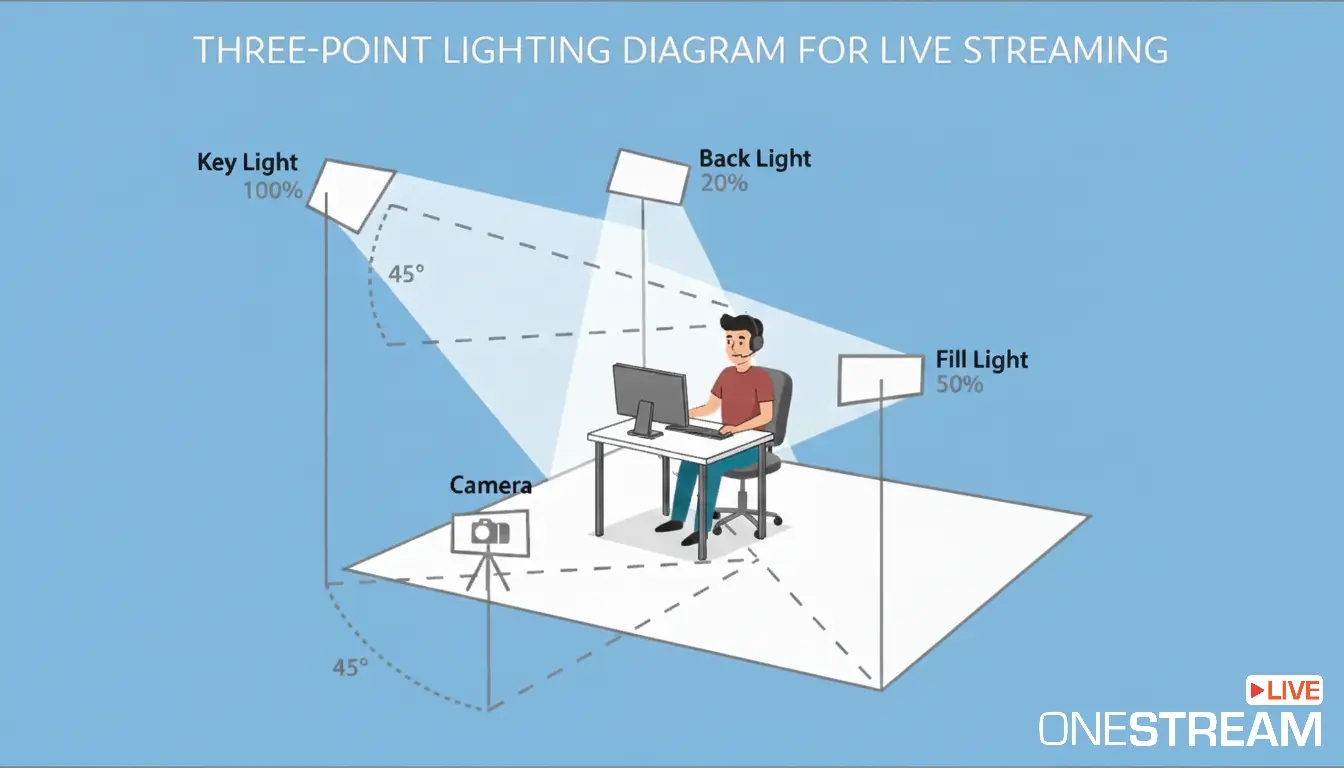
Three Point Lighting Diagram
We discussed the placement of each light, but you might still wonder how they look in place. Here is our studio lighting setup diagram for you to better understand.
3 Tips for 3-Point Lighting Setup
With care, you still may not be satisfied with the final result. If that feeling of “imperfection” gets stuck in your chest, then use these three tips to achieve the best.
Tip 1: Don’t Forget Your Creativity
This 3-point lighting setup serves as the foundation of your lighting. Adjust key light, fill light, and backlight however you want, and after that, experiment with:
- Different angles
- Adjust distances
- Varying light intensity
- Brightness levels
Tip 2: The 3 Ds
There are three methods of decreasing the brightness of a level: dimming, distance and diffusion.
- Dimming means reducing the light’s brightness.
- Distance means trying different light positions; the longer the distance from the subject, the lower the brightness.
- Diffusion is reducing the light’s intensity by bouncing or passing it through an object.
Tip 3: Focus on Consistency
Most people focus on natural light, but streamers who are live for hours may not find this suitable because they don’t have control over it. Yes, natural light is great, but inconsistent. For live streaming, controlled artificial light is safer.
Conclusion: Light Up Your Future Streams
Making the right use of every light can set you apart from casual streamers and turn your content comparatively more engaging. Understand each light by its role, and with this, you’ll be able to quickly get it right without any hassle. Once you look professional with your 3-point lighting, use OneStream Live to broadcast that high-quality video to 45+ platforms simultaneously. Through this, your appealing visuals can reach multiple platforms and engage more people.

FAQs
A basic 3-point lighting setup is arranged as follows:
- Key Light: The main light is placed at a 45° angle to illuminate the subject.
- Fill Light: A softer light placed opposite the key light to reduce shadows.
- Back Light: A light placed behind the subject to separate them from the background and add depth.
Position one strong light in front at eye level, eliminate harsh shadows, and make sure your background isn’t brighter than your face.
Use one soft front light, bounce natural daylight when possible, and avoid overhead room lights that create deep shadows.
It’s a simple balance of key light for shape, fill light for control, and back light for depth.
Color, contrast, consistency, and control are the four elements that determine how professional your lighting looks.
Light the face first and then adjust the background lighting (RGBs/Practicals) to create depth.
OneStream Live is a cloud-based live streaming solution to create, schedule, and multistream professional-looking live streams across 45+ social media platforms and the web simultaneously. For content-related queries and feedback, write to us at [email protected]. You’re also welcome to Write for Us!