
Editing a long live stream recording can mean hours of editing pain. As a senior content strategist and video producer, I’ve spent way too many late nights trimming down marathon live sessions. This practice has led me to master how to edit live video fast and extract a week’s worth of content from a single stream.
The secret is a focused, 60-minute workflow that turns your Video On Demand (VOD) into bite-sized, engaging assets. We’ll walk through this process step by step. You’ll learn how to repurpose live stream content like a pro, starting with the initial “sniper cut” of your VOD’s best moments, then resizing videos for vertical platforms, and finally adding captions that stop the scroll.
Not only will this save you time (and sanity), but it amplifies your reach. Short-form videos on platforms like TikTok and Instagram drive 70% higher engagement with short clips than plain long-form posts. Let’s dive into the 60-minute workflow that will take your content from VOD to viral.
The 60-Minute Workflow to Edit Live Video
So, how can one hour of editing churn out seven days of content? The key is planning and efficiency. The 60-minute workflow breaks down into four focused steps: clip, merge, resize, and caption.
Here’s a quick overview:
- Clip (15 min): Scrub through your recorded live video and sniper-cut the standout moments. You’re identifying the 2-3 nuggets that encapsulate the best of your stream. E.g., the biggest laughs, the aha insights, and the dramatic reactions. Precision is everything here; you only want the gold.
- Merge (10 min): Take those highlights and see if any combine to tell a new mini-story. Maybe clip A and clip C actually flow nicely together. In a few quick edits, you can merge clips to create a narrative that didn’t exist in the live format. This might become a 3-minute YouTube highlight reel or an IGTV video, for example.
- Resize (15 min): Now, repurpose those clips for vertical formats. The same highlight that killed on Facebook Live might also be a hit on TikTok after a vertical chop. You’ll reframe or crop your 16:9 horizontal video into 9:16 vertical, adjusting the composition so nothing important gets cut off. This step ensures your content looks native on Instagram Reels and TikTok (where 1080×1920 px, 9:16 ratio is ideal.
- Caption & Polish (20 min): Finally, add text overlays and subtitles to make your video thumb-stopping. Captions are a must because a huge chunk of people watch on mute, and up to 80% of viewers are more likely to watch an entire video when captions are available. You’ll burn in subtitles for spoken words and sprinkle some bold headlines or animated text to emphasize key points. A little background music or a sound effect cut can also be added if it suits the clip, but keep it platform-appropriate and copyright-safe.
Read More About Open Captions & Closed Captions
By the end of these steps, you’ll have multiple variants of content: perhaps a longer “highlight reel” video, a couple of snackable vertical clips, and maybe a graphic or quote card pulled from the video’s best quote (easy to create as a bonus).
Now, let’s break down each step in detail.
Step 1: How to Cut Video Clips from Your VOD (The "Sniper" Cut)
The first order of business is hunting down the hero moments in your live stream recording. You want to pick off the best clips with precision, not spray-and-pray. Start by watching your VOD (Video On Demand) at 1.5× or 2× speed if you’re short on time, and flag the timestamps of any segment that makes you react: laugh, gasp, learn something, etc.
Those are your likely highlights. As a seasoned producer, I keep a notebook (or a timestamp note in my editing software) of “good bits” while I’m live. But if you didn’t do that during the stream, no worries, you can spot them now in playback.
Aim to extract 2–5 strong clips depending on your stream’s length. For a one-hour stream, for example, you might grab three highlights that are 30 seconds to 2 minutes each. Keep each clip as tight as possible. Trim dead air, filler words, and tangents.
The goal is to edit segments so they get straight to the point or punchline, as online audiences have micro-attention spans. If a clip needs a bit of context, you can include a one-sentence setup from the host or a quick question slide before the answer, but be ruthless about length.
How to cut quickly?
Use an online video editor for fast trimming right in your browser. An online video editor lets you upload your large VOD file and slice out sections without having to re-render the whole thing, which is a huge time saver.
Drag the handles to your start and end points, and boom, clip exported. If you prefer desktop software (Adobe Premiere, Final Cut, etc.), set in/out points and export selection for each highlight. The key is to export each clip individually in this step. Name them clearly (e.g., StreamXYZ_highlight1.mp4) so you don’t mix them up later.
By the end of Step 1, you should have a folder of your “sniper-cut” clips, which are basically short, standalone videos each focusing on one highlight. Take a moment to verify each starts and ends cleanly (no awkward cut-offs or trailing silence). These will serve as the building blocks for the next steps.
In my experience, nailing the right clips is half the battle. A great clip can practically go viral on its own if it’s timely and resonates. You’ve now got your ammo so let’s assemble some bigger stories out of it.
Also Read Helpful Recording and Video Editing Tips for Beginners
Step 2: Merging Clips to Create New Narratives
Sometimes the sum is greater than the parts. Step 2 is about merging clips to craft a new narrative or a more impactful story than any single clip provides.
Look at the highlights you cut in Step 1, do any of them complement each other? For instance, perhaps Clip A is a setup (you posed a question or problem) and Clip B is the payoff (later in the stream, you delivered the answer or solution). On their own, they’re fine; stitched together, they become a powerful mini-episode.
To do this, start your video editor and drop two or more clips on the timeline in sequence. Trim transitions so the flow is natural, and for this, you might need a quick crossfade or a graphical transition if the scene changes abruptly.
Often, I’ll add a simple title card or text in between merged clips to orient the viewer (e.g., a slide that says “3 Tips from the Live Stream, Coming Up Next!” when transitioning). Merging clips is also where you can add a little intro or outro if needed: maybe your brand logo animation for a few seconds at the start, or a call-to-action at the end (“Follow for more!” or “Watch the full webinar replay on my site”).
The result might be a 2-3 minute highlight reel suitable for Facebook or YouTube. It could even become an intro trailer for your content: some creators merge the best moments into a teaser montage to promote the full replay.
Also Read How to Use Facebook Reels for Your Business
Get creative with it! The idea is to create a new narrative arc: maybe all your funniest moments spliced back-to-back for a comedy supercut, or all the Q&A answers on a specific topic merged into one value-packed clip.
Keep an eye on pacing. When merging, watch the whole sequence and ensure it holds attention. Cut out any redundant bits that feel slow. If two merged clips still feel disjointed, don’t force it, as they may be stronger as separate pieces.
Also, be mindful of tone and context: merging a very serious clip with a very goofy one might confuse viewers unless you add context or a segue. Group clips that match in vibe or theme for best results.
After Step 2, you’ll have one or two polished multi-clip videos in addition to your single clips. Now you’ve got both individual nuggets and a compilation option. Time check: maybe ~25 minutes into our workflow. Up next, we’ll prep these for the land of vertical video, where much of the viral magic happens these days.
Step 3: Resizing for TikTok, Reels & Shorts
In 2025, if you want your content to go viral on TikTok, Instagram Reels, or YouTube Shorts, you need to convert horizontal video to vertical. This step is all about reformatting your clips (or merged videos) into a 9:16 portrait frame.
Vertical video takes up maximum screen real estate on mobile devices, which is why it’s king on those platforms. In fact, TikTok requires vertical for full-screen, and the video aspect ratio for Instagram Reels follows the same 1080×1920 pixel recommendation (a 9:16 aspect ratio). So let’s get chopping.
Read the Ultimate Guide to Instagram Reel Size
Choose the clips that you think will perform best on short-form platforms. Usually, the snappiest, most visually engaging ones work best. Open each in your editor and switch the project resolution to 1080 x 1920 (or simply an aspect ratio of 9:16).
If your editing tool has a one-click aspect ratio switch (many modern tools do) to reframe a video, use it. As an example, TikTok’s recommended video size is indeed 1080×1920px, so you’ll be aligning with best practices by doing this.
Now, check the framing. Your original stream was probably 16:9, meaning in vertical you might be cropping out some parts. Reframe the shot so the subject is centered and important visuals or text are not cut off. This might involve zooming in a bit on the subject or using a technique like “pan and scan” for wider shots.
If two people were side by side in the original, you may have to choose to focus on one person at a time or use creative splits. Some editors allow you to move the video within the vertical frame, so do that to make sure heads aren’t chopped off (the only thing we want chopped here is the aspect ratio!).
Don’t be afraid to add padding or background if needed. A common trick: if your horizontal video doesn’t nicely crop to vertical, you can blur the original video and use it as a background behind the narrower, centered frame of the main action. This gives a full-screen feel without black bars. Or use a colored background or graphic that matches your branding. The key is to make it look intentional and native to vertical viewing.
OneStream Live actually anticipated this trend. It even offers a Portrait Mode streaming option in its Studio, letting creators go live in vertical format. But assuming your source was horizontal, these editing tweaks will do the job.
Also, keep vertical platform specifics in mind: for example, Instagram Reel size will show the center 4:5 portion in the feed thumbnail before someone taps, so avoid putting critical text at the very top or bottom of your 9:16 frame (it could get cut off or covered by UI). Safe zones are key in vertical video.
Finally, if you’re on the move or prefer mobile editing, good news: there are apps for that. Clideo, for instance, has a handy mobile video editor app on iOS that can resize and crop videos to vertical in a jiffy.
Step 4: Adding Text and Captions to Stop the Scroll
In the noisy social media feed, text overlays and captions are your best friends for grabbing attention. We have two main objectives here: make the content understandable without sound (hence, captions), and add visual flair or context with titles or graphics.
First, add subtitles to a video for any speakers in the clip. The fastest path is using an auto caption tool to generate and sync subtitles for you. As mentioned earlier, a large portion of viewers watch videos on mute. One survey found 80% of consumers are more likely to watch the whole video when captions are available.
Subtitles ensure your message isn’t lost on the silent scroller. Many editing tools now have auto-transcription features; if not, you can use services to generate an SRT file, then burn it into the video. Aim for readable formatting: white or yellow text with a subtle shadow or background for contrast. And size the font so it’s easily read on a phone screen (typically 24–30px for 1080p video works well).
OneStream Live users: if you plan to schedule these edited videos as “live” broadcasts later, note that OneStream Live lets you attach SRT caption files to your pre-recorded streams. That can cover live closed-captioning. But for social uploads, you’ll likely want open captions burned in, since not all platforms auto-show captions by default.
Read How to Make an SRT File for Pre-Recorded Live Streaming
Next, consider adding headline text or stickers to emphasize key points. Think of the style popularized by viral Facebook videos: a big bold title at the top (“You Won’t Believe What He Says Here 👉”) or an animated caption for a shocking moment (“Ouch! That had to hurt.”).
While you don’t need to be that clickbait-y, a tasteful bit of text can provide context. For example, if your clip is tip #3 from your livestream, you might add a heading that says “Tip 3: Use an online video editor for quick clips”. Or if it’s a funny reaction, maybe a caption like “When the Wi-Fi drops mid-stream…”. This gives viewers immediate understanding of what they’re watching, even before the actual video hooks them.
Keep text concise and on-screen just long enough to be read. Use brand fonts/colors if you have them, to stay consistent. Emojis can be useful 👍 to convey tone in a playful way, especially on TikTok or Reels. Also, if vertical, remember important text should stay within the safe zone (not too high/low or it might be obscured by app UI).
After adding all the text and captions, do a final review with sound off. Does it still make sense? Does the visual text guide the viewer through the story? If yes, congrats, as you’ve made a scroll-stopper. Also, review with sound on, of course, to ensure your audio is clear and synced with captions, and that any background music or effects aren’t too loud.
By the end of Step 4, your clips are fully polished for publishing. You should have a set of videos that are engaging, accessible, and platform-tailored. Now it’s time to distribute them smartly over the week.
Edit Live Video for a Week of Content
You’ve got the content, so now let’s talk game plan for releasing it. A consistent publishing cadence will keep your audience engaged all week without overwhelming them on any single day.
Here’s a simple schedule using our freshly edited assets:
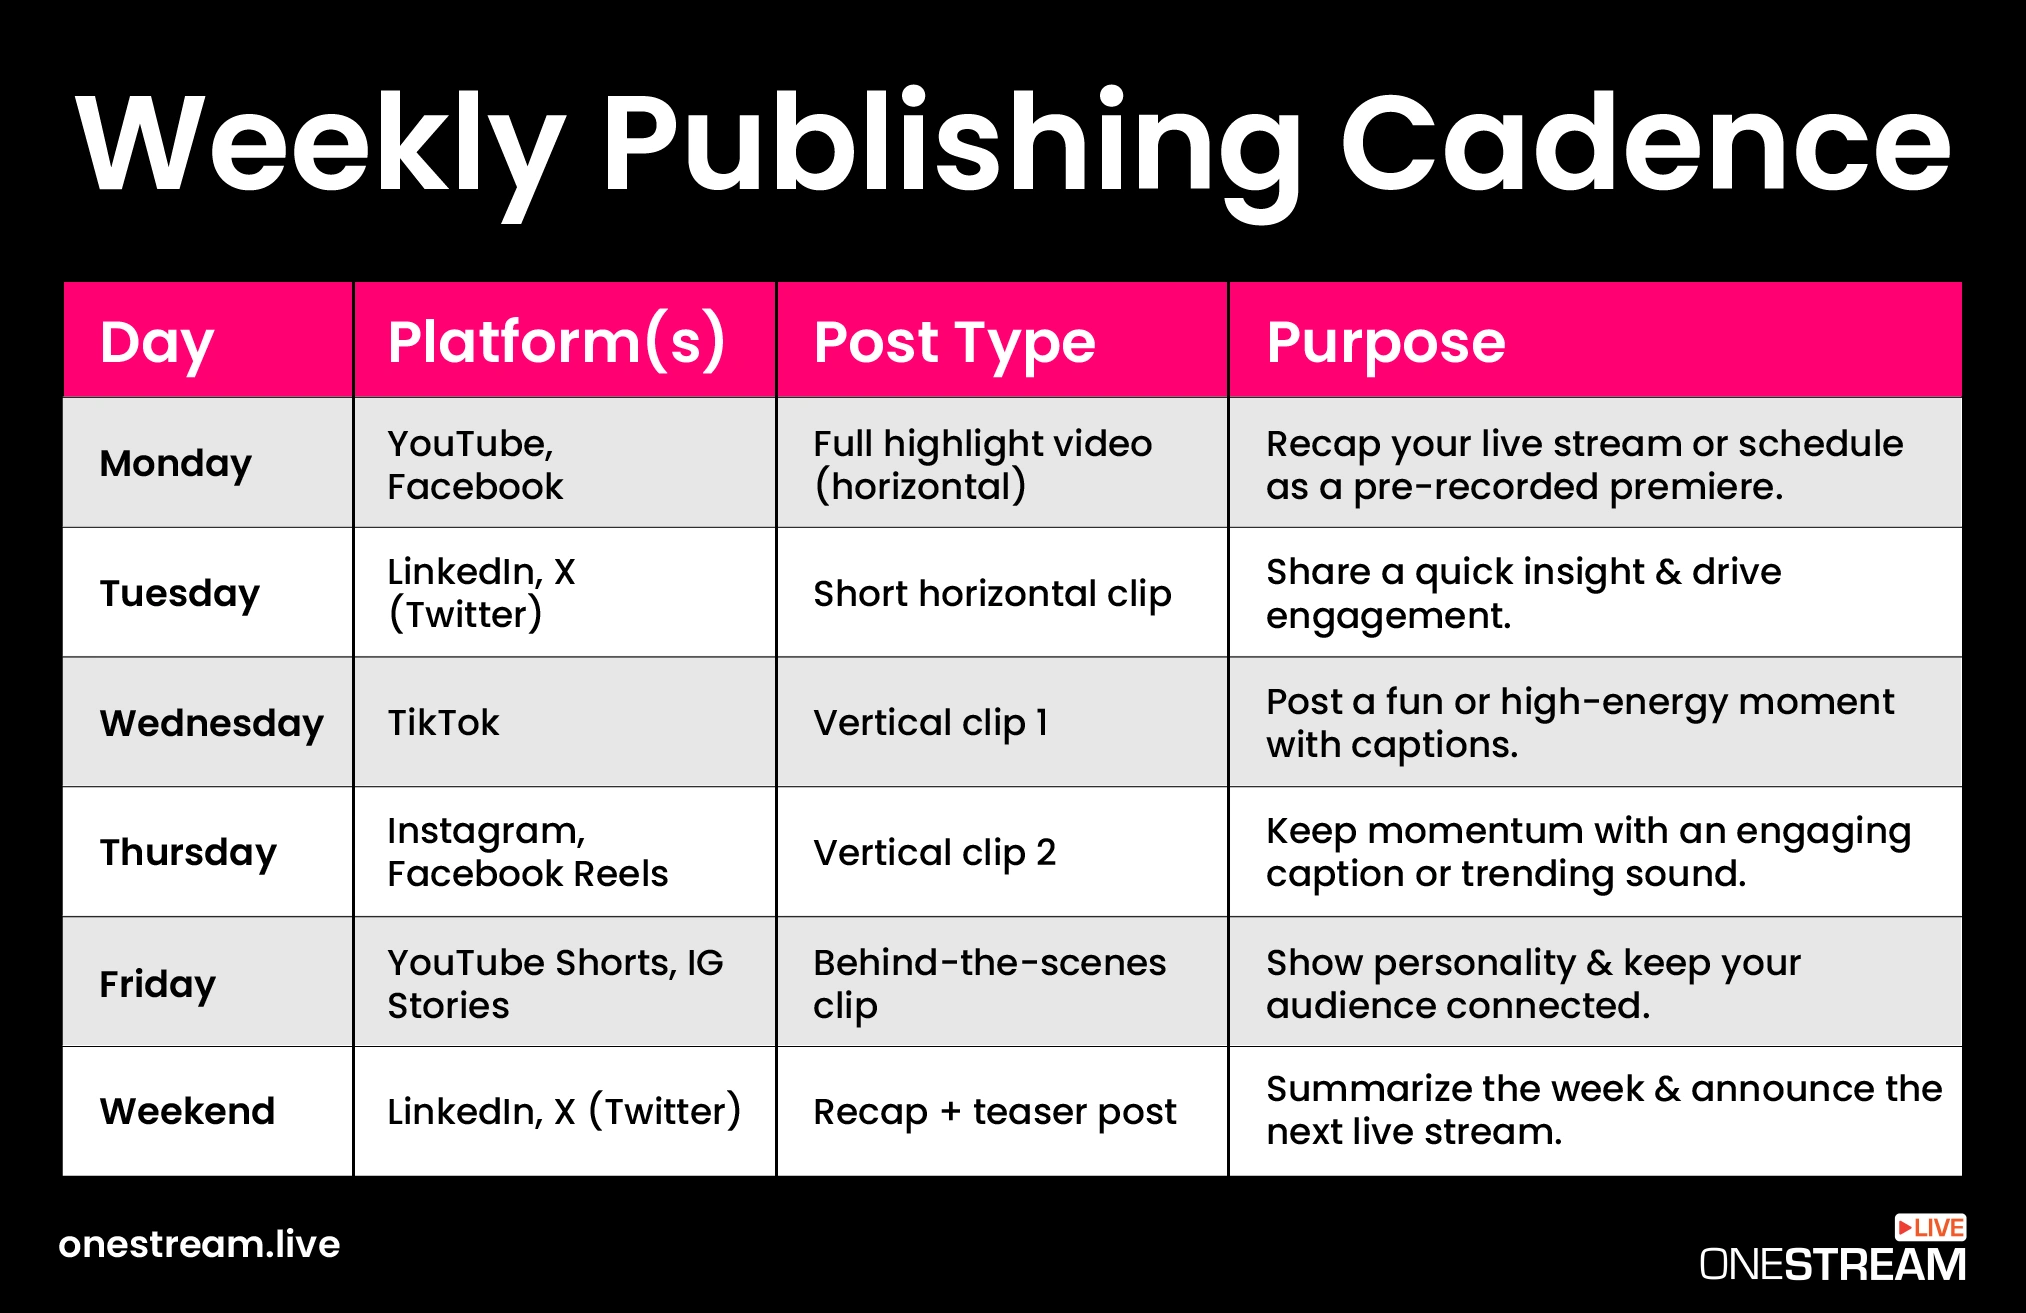
1. Monday – Full Highlight Video (Horizontal)
Kick off the week by posting the longer highlight compilation (the one you merged in Step 2) on platforms like YouTube or Facebook. This caters to your core audience who might have missed the live stream or want a polished recap. Include a friendly note like “In case you missed our live session, here are the best bits!” and a link to the full VOD on your website or OneStream Live if applicable.
Pro Tip: If you want to create an event feel, you could even re-stream this highlight video as a “premiere” or scheduled live broadcast using OneStream Live’s pre-recorded streaming feature.
2. Tuesday – Native LinkedIn or Twitter Clip
Take one of the short horizontal clips (maybe a 60-second insightful answer from the stream) and post it to LinkedIn, Twitter (X), or your blog. Write a brief text post around it, e.g., “We discussed X in our live stream, so here’s a quick tip on Y from that session.” This hits the weekday professional crowd. It also drives traffic back to your main content hub if you include a call-to-action.
3. Wednesday – Vertical Video on TikTok
Midweek is perfect for a fun or dramatic clip on TikTok. Use one of your vertical chops and post it with a snappy caption and relevant hashtags. TikTok’s algorithm loves frequent posting, so if you have two great vertical clips, you could even do one on Wednesday and one on Thursday.
Since you added captions and trendy text, you’re set to grab attention. Watch how the clip performs as the beauty of short-form platforms is you get quick feedback on what hits!
4. Thursday – Instagram Reel
Publish another vertical video, this time on Instagram Reels (and/or Facebook Reels, since you can cross-post). Perhaps this is a different highlight than the TikTok one, or the same clip if it’s universally good as repurposing across platforms is fair game. Write an engaging caption for the Reel, maybe pose a question to encourage comments.
Pro Tip: Use relevant sound or music from Instagram’s library if it fits your clip, to get an algorithm boost. You already have on-screen text and captions, which is great because many IG users scroll with sound off, too.
5. Friday – Behind-the-Scenes Story or Short
To wrap the week, consider sharing a more casual snippet. This could be an Instagram Story or YouTube Short using one of your clips that maybe didn’t make the main cut but is still fun.
Or film a quick selfie video reflecting on the live stream (“I can’t believe what happened at the 30 min mark… if you missed it, check out the clip I posted!”). The idea is to keep the conversation going into the weekend in a light way.
6. Weekend – Recap and Teaser
On Saturday or Sunday, you might do a quick recap post (“This week we pulled 5 videos out of one live stream. Have you repurposed your content like this yet?”) on Twitter or LinkedIn, possibly linking to the full replay or your blog discussing the topic.
Additionally, tease the next live event if you have one: e.g., “The next live stream is Monday, so get ready!” This ensures your weekly edited content also funnels interest back to your live streams, creating a virtuous cycle.
This cadence is just a blueprint, so adjust it based on your audience and platforms. The core idea is spreading out the content to maximize reach. You’re essentially multi-streaming your content across platforms throughout the week, much like how OneStream Live allows you to multistream live video to 45+ platforms simultaneously, except here we’re doing it sequentially with edited content.
With this week of content workflow, you’ve essentially upcycled one piece of content into many. You saved time (only 60 minutes of editing!) and maintained a consistent presence online without scrambling for new ideas every day. This is content strategy gold, and your future self (and teammates) will thank you.
Final Word
By following this 60-minute editing workflow, you’ve gone from staring at a daunting long VOD to confidently rolling out quality content all week long. It’s efficient, it’s practical, and yes, it’s actually kind of fun once you get the hang of it!
So next time you edit live video, you won’t dread the edit; you’ll know you’ve got a system to make that footage work overtime for you. Happy editing, and even happier repurposing!
FAQs About How to Edit Live Video
The single best piece of advice: don’t try to edit the entire long-form video. The fastest and most effective method is to adopt a content repurposing strategy. This means you scan your VOD (Video on Demand) to find highlights, cut video clips of the best 3-5 moments, and treat those clips as your new raw material.
This is the biggest time-sink for most creators. Here are two pro-level tricks:
- Use Markers During the Stream: While you are live, hit a “marker” button or type a command (like
/markerin Twitch) whenever a great moment happens. This creates a log you can reference later, turning a two-hour search into a five-minute job. - Scan for Engagement: If you forgot to use markers, don’t watch the VOD. Scan it. Look for the moments where your chat activity spiked or where you had a lot of donations or reactions. This is almost always where your golden-nugget stream highglights are hiding.
That’s a huge part of it, but the ultimate goal is to maximize your return on effort. The benefits of repurposing video are massive:
- Reach New Audiences: The person scrolling TikTok is not the same person watching your two-hour stream.
- Reinforce Your Message: Repetition makes you memorable. Serving your best tips in different formats builds your authority.
- Create a “Week of Content”: Instead of one content “event,” your stream becomes the engine for a full week of posts, including a YouTube highlight reel, several TikToks, and even quote-graphics for Instagram.
It’s daunting, but it’s simple with the right tools. The main job is to convert horizontal video to vertical. The most important number to know is the video aspect ratio for Instagram Reels and TikTok, which is 9:16. A good online video editor will have presets for this.
Because a massive percentage of social video is watched with the sound OFF. If you don’t add text to video, your brilliant point is just… silent. These are called burn-in captions for social media because they are permanently “burned” into the video file. They are non-negotiable for accessibility, but more importantly, they are what stop the user from scrolling past your video.
This is a very common question. The short answer is no, not in the way you’re thinking. You can’t “edit out” a mistake on a live feed.
What you can do is live-switch. Using a tool like OneStream Live Studio, you can cut between different cameras, share your screen, or show a graphic, which feels like live editing. But the actual, surgical editing—like using an online video editor to cut out bad parts of a stream or remove silence from video—happens after the broadcast on your VOD.
OneStream Live is a cloud-based live streaming solution to create, schedule, and multistream professional-looking live streams across 45+ social media platforms and the web simultaneously. For content-related queries and feedback, write to us at [email protected]. You’re also welcome to Write for Us!