After years of watching my favorite streamer, I finally decided to do the same: stream what I play. But with this thought, my head filled with so many questions. What if my stream isn’t as good as others? What if the quality is so bad that no one watches it? To be confident, I decided to do a Twitch test stream before actually going live in front of the public.
It turned out to be the best decision I made. As shown in Twitch Inspector diagnostics, it helped me identify weak points and fix them before they could push my viewers away. This is something that has become non-negotiable in 2026; you have Twitch streamers with perfect visuals and optimized streams that retain viewers for hours. So if you just hit the live button without caring, you’re definitely having a hard time growing on the platform.
So let me walk you through how I did my Twitch live test to improve my stream quality and how you can too.
A Twitch Test Stream helps you identify technical issues before going live to a real audience.
Twitch Inspector allows you to measure bitrate stability and test your connection safely.
Always calculate a safe streaming bitrate (around 70% of your stable upload speed).
Proper encoder, resolution, and FPS settings prevent dropped frames and CPU overload.
Testing your stream regularly ensures consistent quality and better viewer retention.
What You Need for Twitch Test Stream Setup
Your computer and upload speed are the two most important things that decide the stream quality. A good GPU will help you stream higher quality, and a good upload speed will support a high bitrate to support those changing frames. Here’s what I had while testing:
Computer:
Processor: At least an Intel i7 or AMD Ryzen 5 (I used Ryzen 5 7500F)
RAM: Minimum 8GB, but 16GB is recommended
Graphics: A dedicated GPU, RTX 3080 or AMD 9070 XT, can support 1440p gaming (Reliable legacy hardware). For (modern standards), you can go with RTX 50-series/RX 9000-series, which are best for 4k gaming in 2026.
Internet:Looking at Twitch’s recommended internet speed for different bitrates, here is what you need:
How to Do a Test Stream Using Twitch Inspector and OBS
Step 1: Setting Up Your Twitch Account
If you’ve been watching other streamers on Twitch, you probably have an account already. Create one. Once you’re done with the sign-up, you should check the Twitch server status to see if there are any outages. You might be troubleshooting your setup for hours while the real problem was the temporary server outage. Check these resources for server status:
Step – 2 Connecting OBS for Test Stream with Twitch Inspector
In this test, I went with OBS because it’s free and a reliable streaming software. Once you’re done installing OBS, it’s time to connect it with Twitch.
Before we dive, you may be wondering what Twitch Inspector is. Twitch Inspector is a free web-based diagnostic tool launched by the platform to help streamers check the health, stability, and quality of their live streams.
Steps to connect Twitch Inspector with OBS:
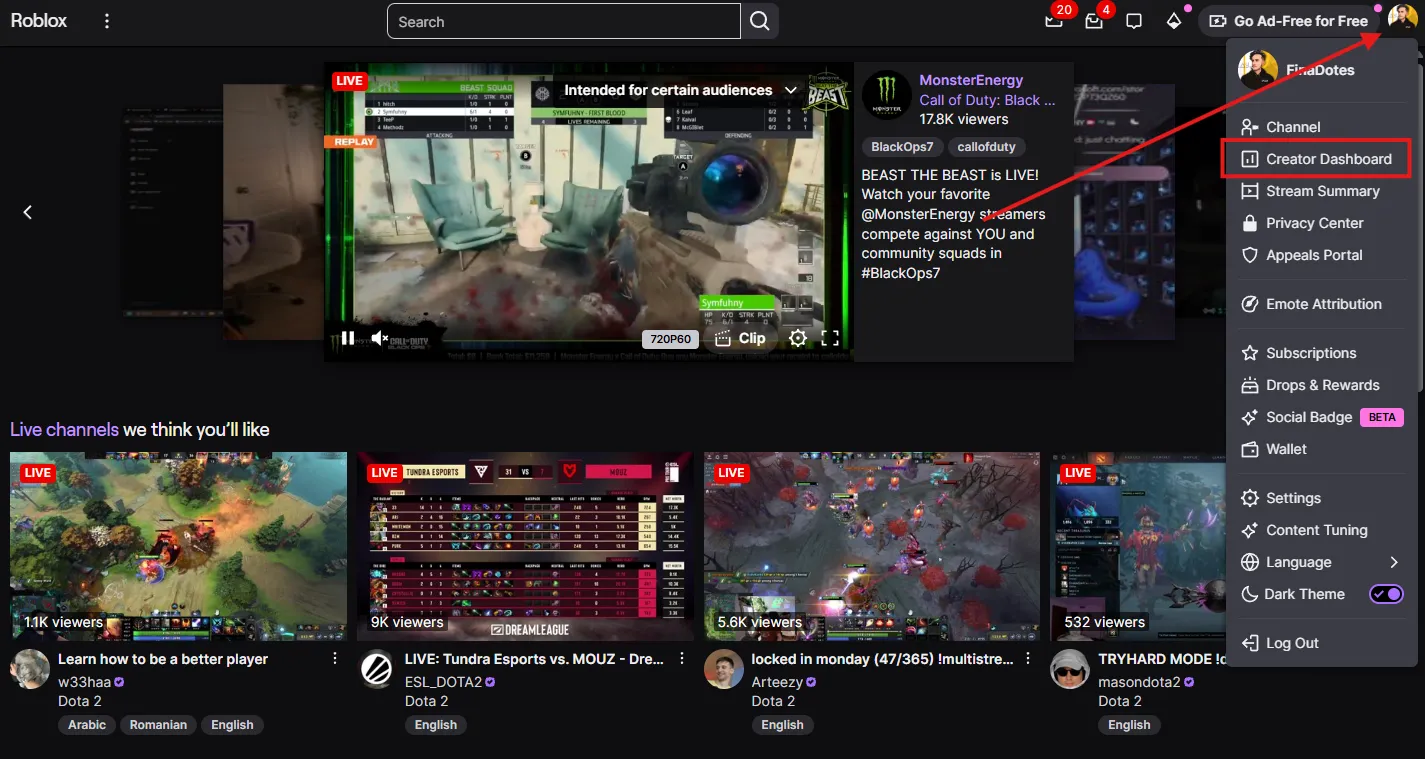
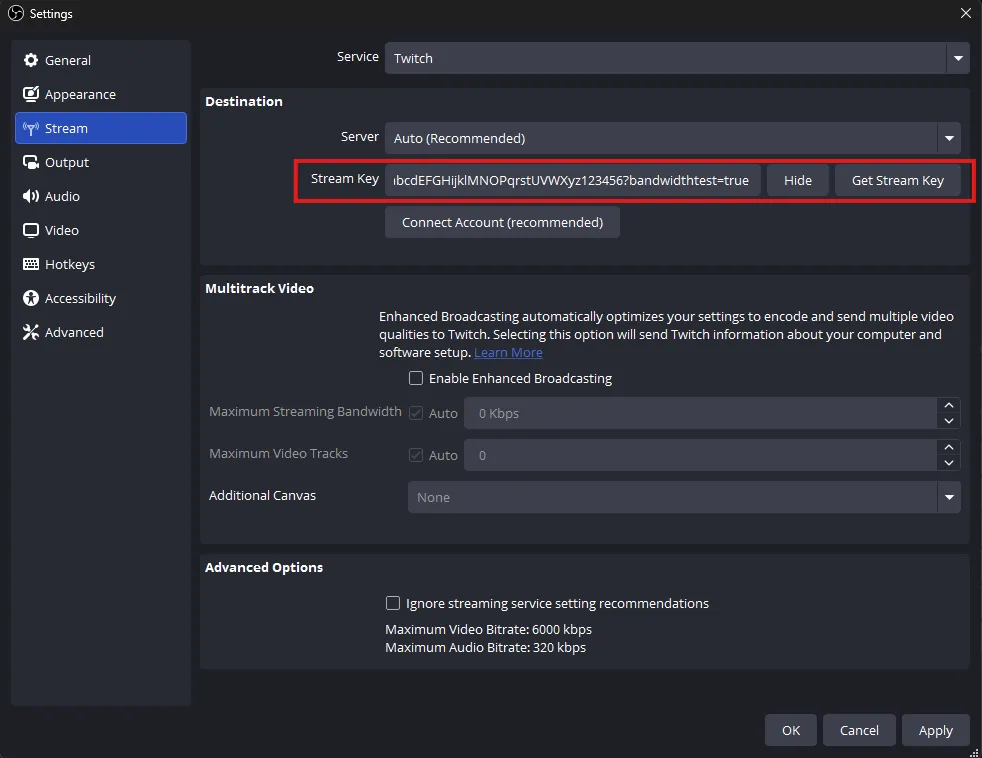
You need to get your stream key from Twitch by clicking your “profile” icon on the top right and going into “creator dashboard” like this:
2. Then, from the left menu bar, click on “settings” and then “stream” like this:
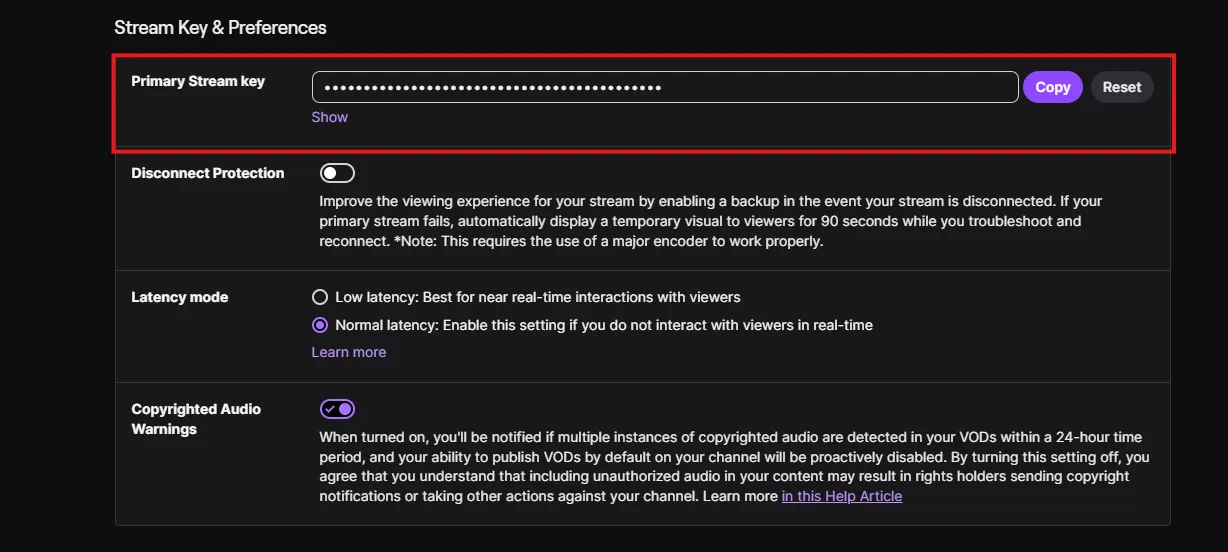
3. Then grab the stream key from here:
4. Once you have the stream key, we need to combine the stream key with the Twitch Inspector URL parameter so it sends the stream to the test server, not the Twitch public server. Visit Twitch Inspector and sign in with your Twitch account.
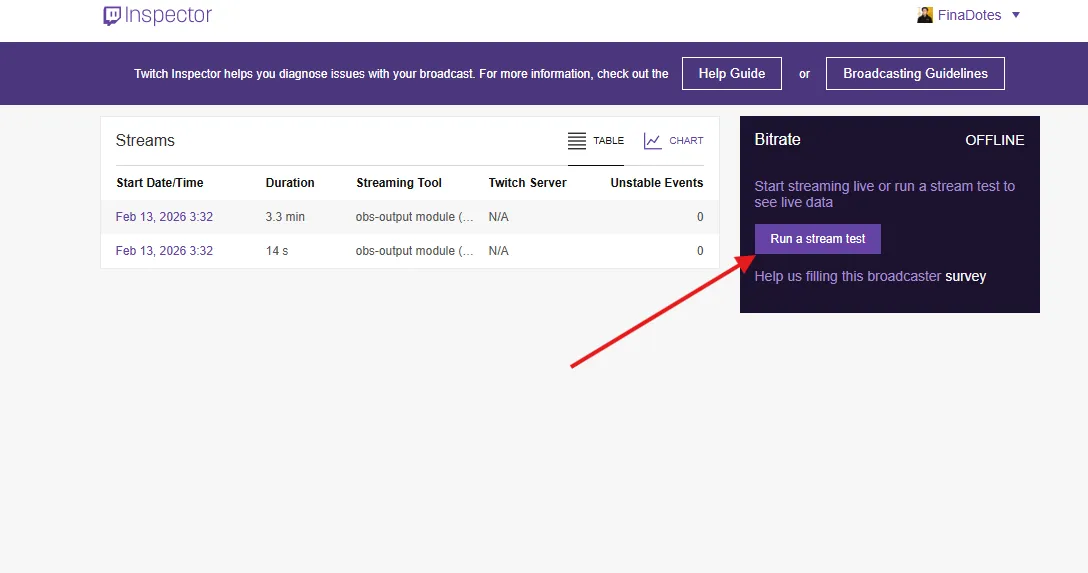
5. Once you’re on the page, click “run a stream test” to get the URL parameter like this:
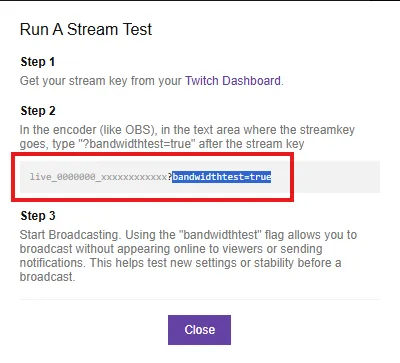
6. Copy the URL parameter from here:
7. Now you need to paste this URL parameter right next to your stream key, for example:
8. Copy this test stream key and paste it into OBS by going into Settings > Stream, like this:
9. Click “Apply,” and you’ve successfully connected OBS with Twitch Analyzer/Inspector.
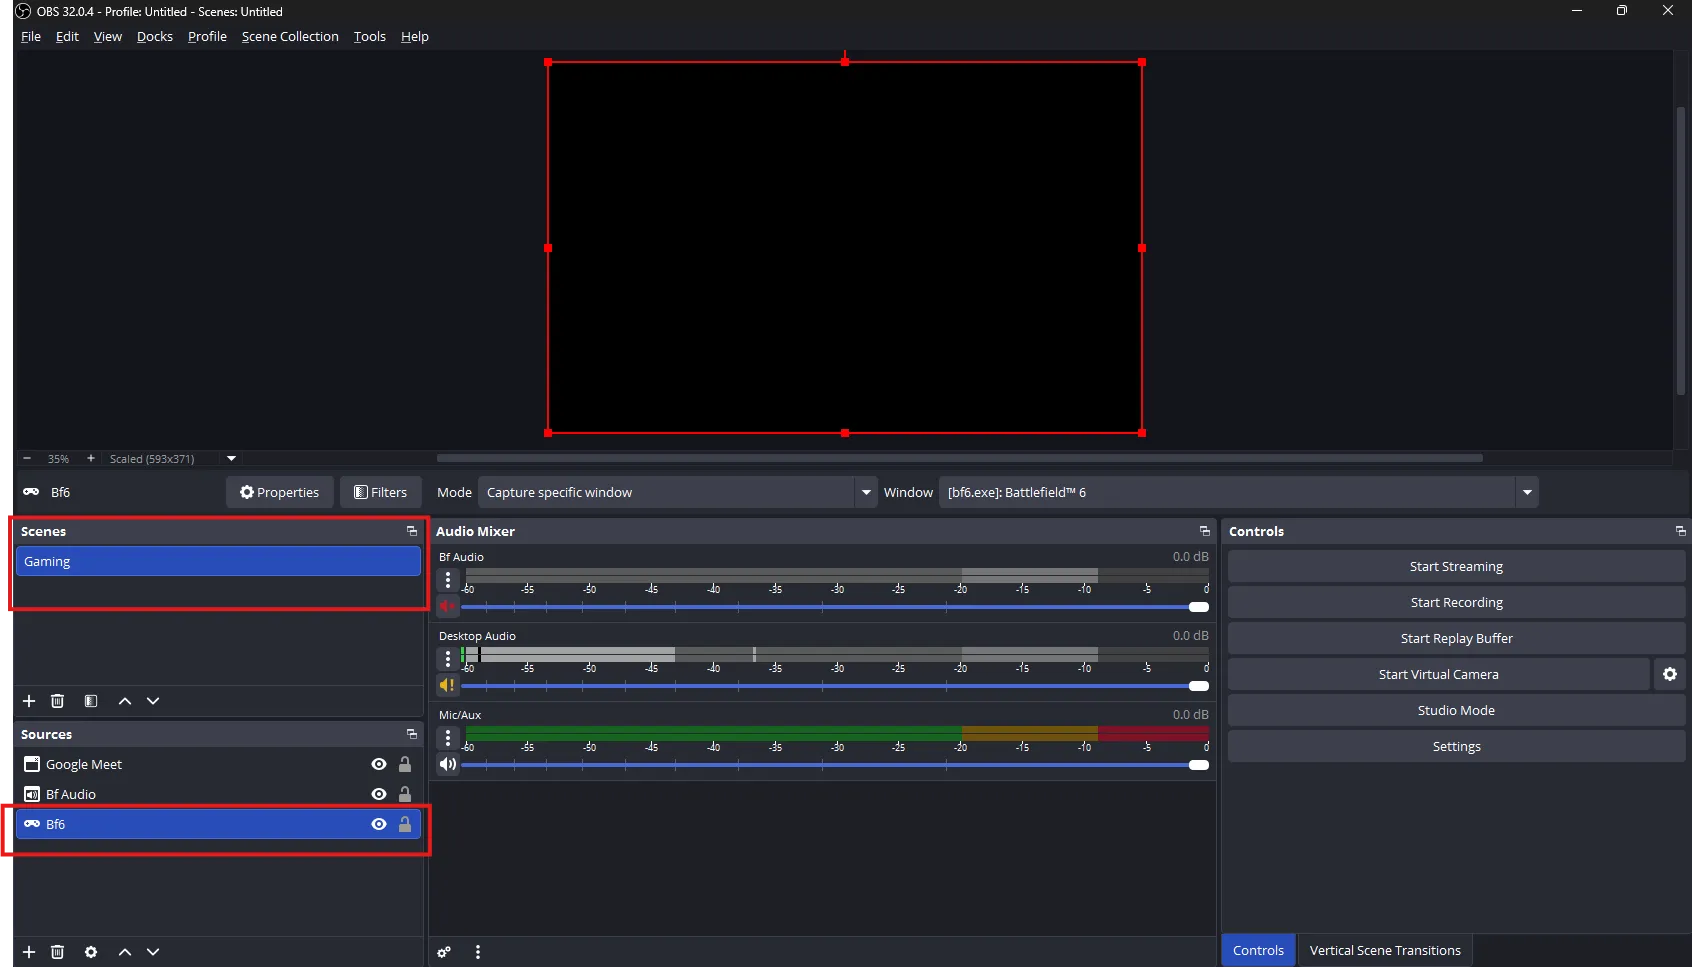
Step – 3: Creating Your First Scene
Now, let’s add the game or application in OBS that you want to test on Twitch. In my case, I tested the game “Battlefield 6,” so I created a scene “Gaming” and added the game in the “Sources” like this:
Step – 4: The Test Stream
Once you have OBS ready, click start streaming, and it should send the stream to Twitch Inspector.
Running Twitch Bandwidth Test
On Twitch Inspector, you’ll see bitrate, so let’s understand what it is before diving further.
What is the bitrate on Twitch Inspector?
Bitrate is the amount of data transmitted every second in a video, audio, or live stream.
It is usually measured in:
kbps (kilobits per second)
Mbps (megabits per second)
In streaming, bitrate determines video quality and smoothness; a higher bitrate means clearer video but requires faster internet.
Now let’s calculate your bitrate for streaming:
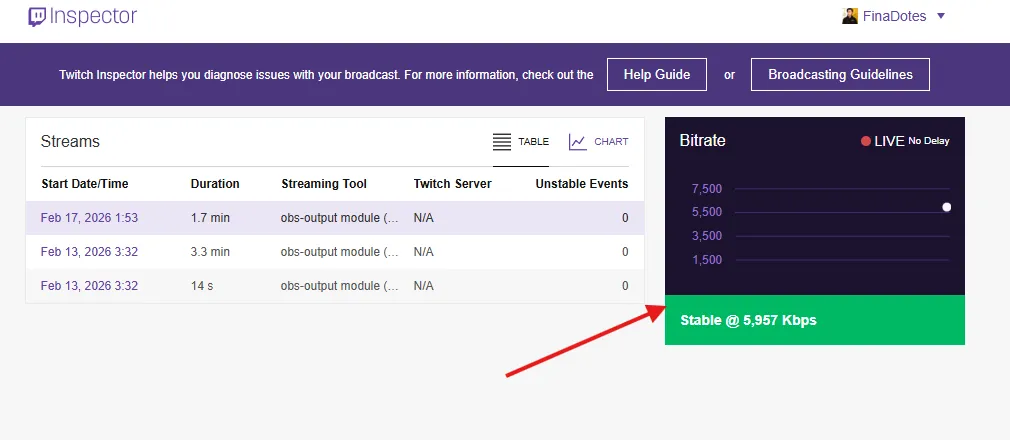
Open Twitch Inspector, and you should see it connected like this:
This is basically a bitrate tester, which will help you adjust overall quality.
2. Click the “stable,” and you should see an advanced Twitch bitrate test like this:
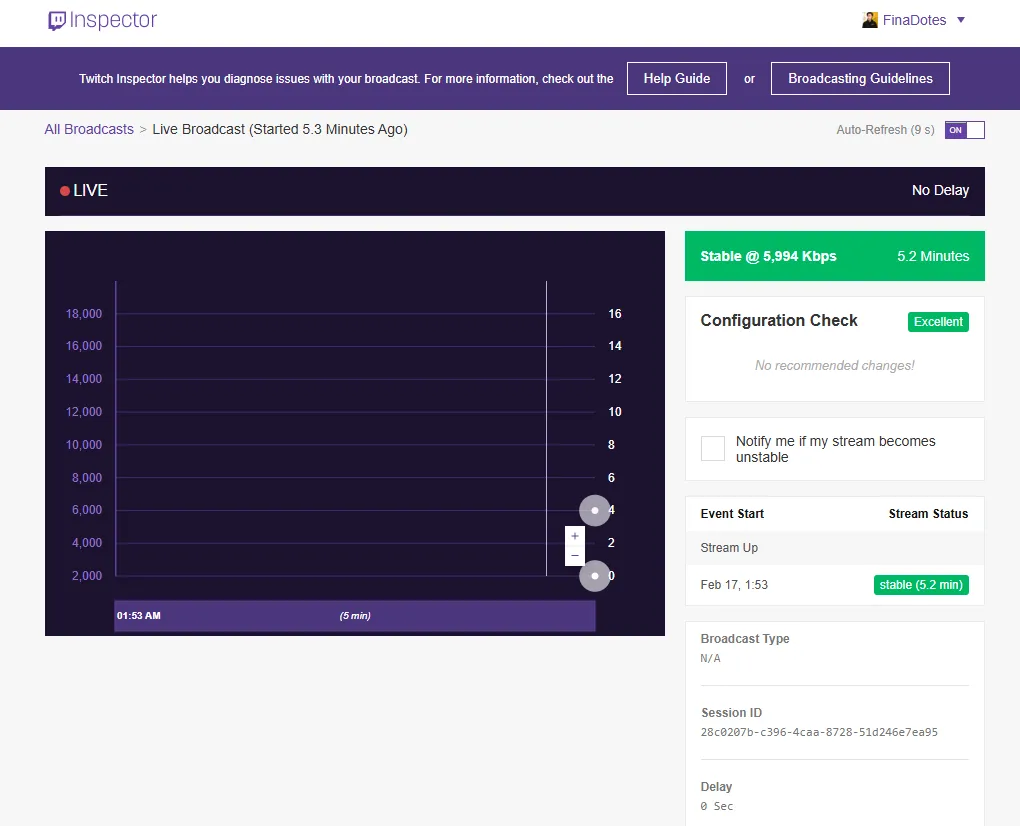
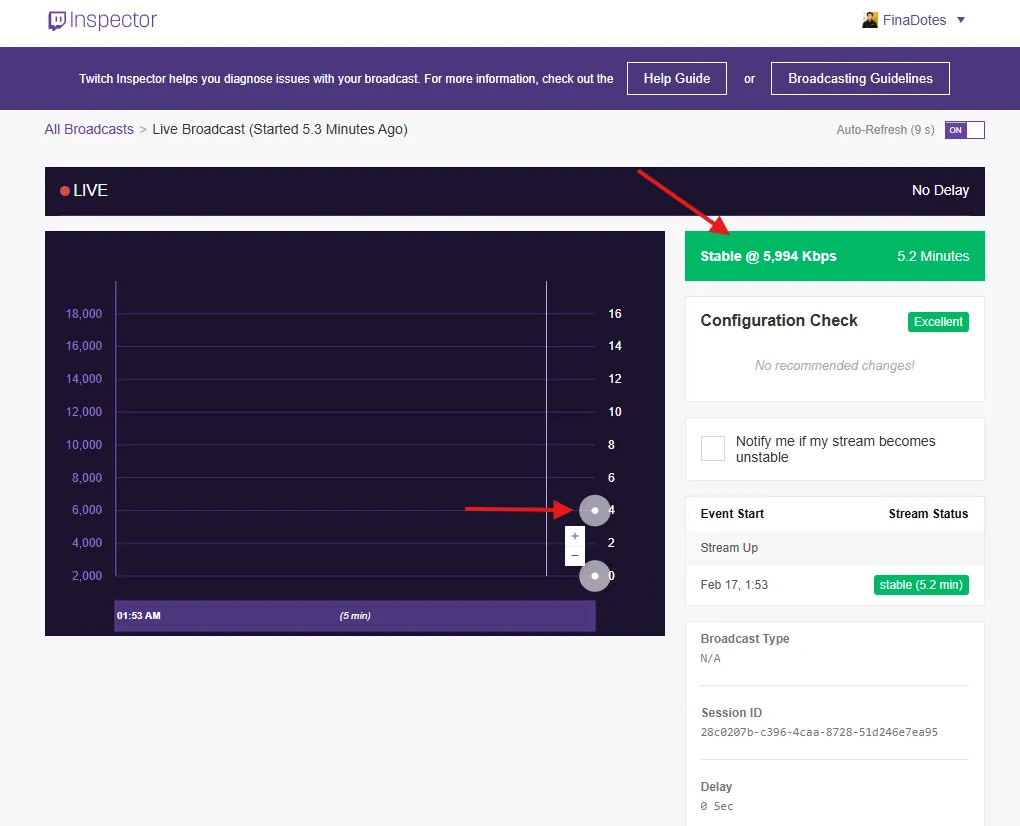
3. Let it run for at least 10 – 15 minutes and pay attention to the Twitch speed graph and notice stable points:
4. In my bitrate test for streaming, I noticed my speed staying between “5,000 kbps to 6,000 kbps”.
5. Once you get the stable numbers, you can then match the numbers with Twitch Recommended speed guidelines here.
6. As mine wasn’t stable at 6,000 bitrate, I knew I couldn’t stream at 1080p 60fps. This means my internet supports a 1080p 30fps stream, considering my max bitrate was 5,000 kbps.
Pro Tip: Always take the 70% of the speed as your actual speed and assume the 30% for other internet usage, specifically if you have family members using the same internet.
Twitch Optimization: How I Improved My Streams After Twitch Internet Speed Test
I noted the values I got from the Twitch upload speed test, and you should too. That’s because we’re going to adjust the settings in OBS according to the test we just ran.
Step 1: Setting the Right Bitrate in OBS
Considering that I was getting a stable 5,500 kbps, I went with the 70% rule I mentioned earlier. This means my safe streaming bitrate should be around 3,500 kbps.
Here’s how I adjusted it:
In OBS, go to Settings > Output
Make sure Output Mode is set to “Advanced.”
Under the Streaming tab, find Video Bitrate and set it to 3,500 kbps
Set Audio Bitrate to 160 kbps (standard for Twitch)
Step 2: Configuring Video Settings for 1080p 30fps
Since my bandwidth test confirmed I couldn’t reliably stream at 1080p 60fps, I optimized for 1080p 30fps instead:
Go to Settings > Video in OBS
Set Base (Canvas) Resolution to 1920×1080
Set Output (Scaled) Resolution to 1920×1080
Set Common FPS Values to 30
Step 3: Choosing the Right Encoder
The encoder is crucial for maintaining stream quality while managing CPU/GPU usage. Here’s what I did:
In Settings > Output > Streaming
For Encoder, I selected NVIDIA NVENC H.264 (since I had an RTX 3080)
Set Rate Control to CBR (Constant Bitrate) for consistent quality
Set Keyframe Interval to 2 seconds (Twitch’s recommendation)
Set Preset to “Quality” for better visual output
Set Profile to “high.”
Note: If you have an AMD GPU, use AMD VCE/VCN. If you don’t have a dedicated GPU, use the x264 encoder. Also, if you are using a Ryzen 5, do NOT use x264 encoding. You must use hardware encoding (NVENC/AV1).
While all this took me more than an hour, it did save me from going live with a subpar setup that would have driven viewers away. I wanted to stream to Twitch and YouTube simultaneously. Doing this directly from OBS would require double the upload speed (which I don’t have). OneStream Live takes my single OBS stream and multiplies it in the cloud. I send one stream and OneStream Live sends it everywhere. You adjust settings once in OBS, and then you stream with the same settings to 45+ platforms, stable streams everywhere.
Twitch houses millions of streamers, and everyone is trying to deliver the best quality. Ignoring the quality of your stream simply means letting your competitors take away your audience. The Twitch test ingest is there specifically for this purpose: to help you improve your stream quality. Run the test, note down your max limits, adjust your settings in your broadcast software, and now you’re getting smooth visuals just like everyone else.
OneStream Live further simplifies your streaming. Once your configurations in the broadcasting software are done, you can connect to OneStream Live via the RTMP method. That’s it, now you’re pushing the same high-quality optimized stream to various platforms.
Yes, because internet stability, platform behavior, and software updates can change even when your setup looks the same.
OneStream Live is a cloud-based live streaming solution to create, schedule, and multistream professional-looking live streams across 45+ social media platforms and the web simultaneously. For content-related queries and feedback, write to us at [email protected]. You’re also welcome to Write for Us!
Meer is a tech enthusiast and writer who’s been exploring the digital world for over four years. He loves diving into how technology shapes our online presence. He’s worked with a range of clients and platforms around the globe, helping brands communicate complex ideas in a clear, relatable way. Outside of writing, you'll find him hiking or streaming his favorite video games.